It sounds all too familiar—a client schedules an appointment only to later cancel on you—leaving you potentially out of pocket and annoyed because you've had 3 clients cancel in 2 days. Whatever the case may be, charging your clients a deposit can drastically reduce the likelihood of cancellations.
It's also less likely a client will forget their appointment if a deposit has already been paid!
This article specifically covers deposits taken in your Simple Salon account (i.e. via the Appointments page & POS). You can also require deposits for appointments booked via Online Bookings, simply click here to find out how!
We'll be covering the following (you can use the following links to jump ahead):
- How to enable deposits for POS
- Force deposits for appointment bookings
- How to take a deposit while creating an appointment
- How to use a clients deposit in POS
- Where to view a clients deposit balance
- Canceling an open appointment with a deposit paid
- Refunding deposits
- Reporting
How to enable deposits for POS
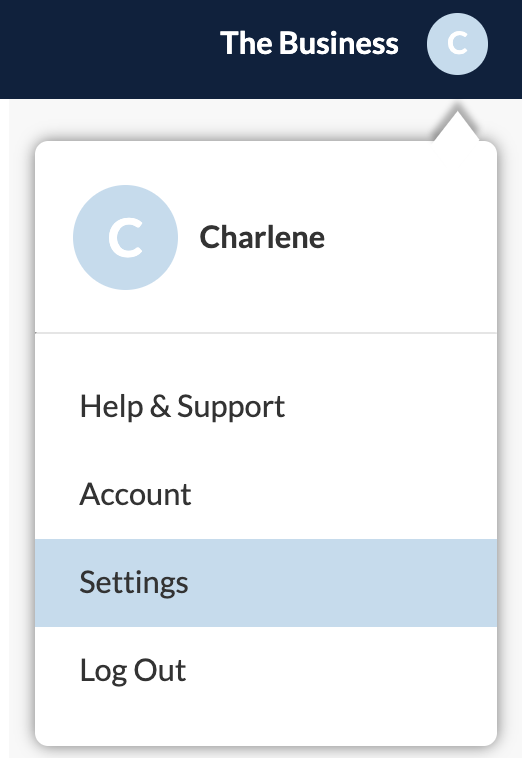
Go to Settings by clicking the blue circle icon on the top right corner:
Then into Cash Register (POS) settings:
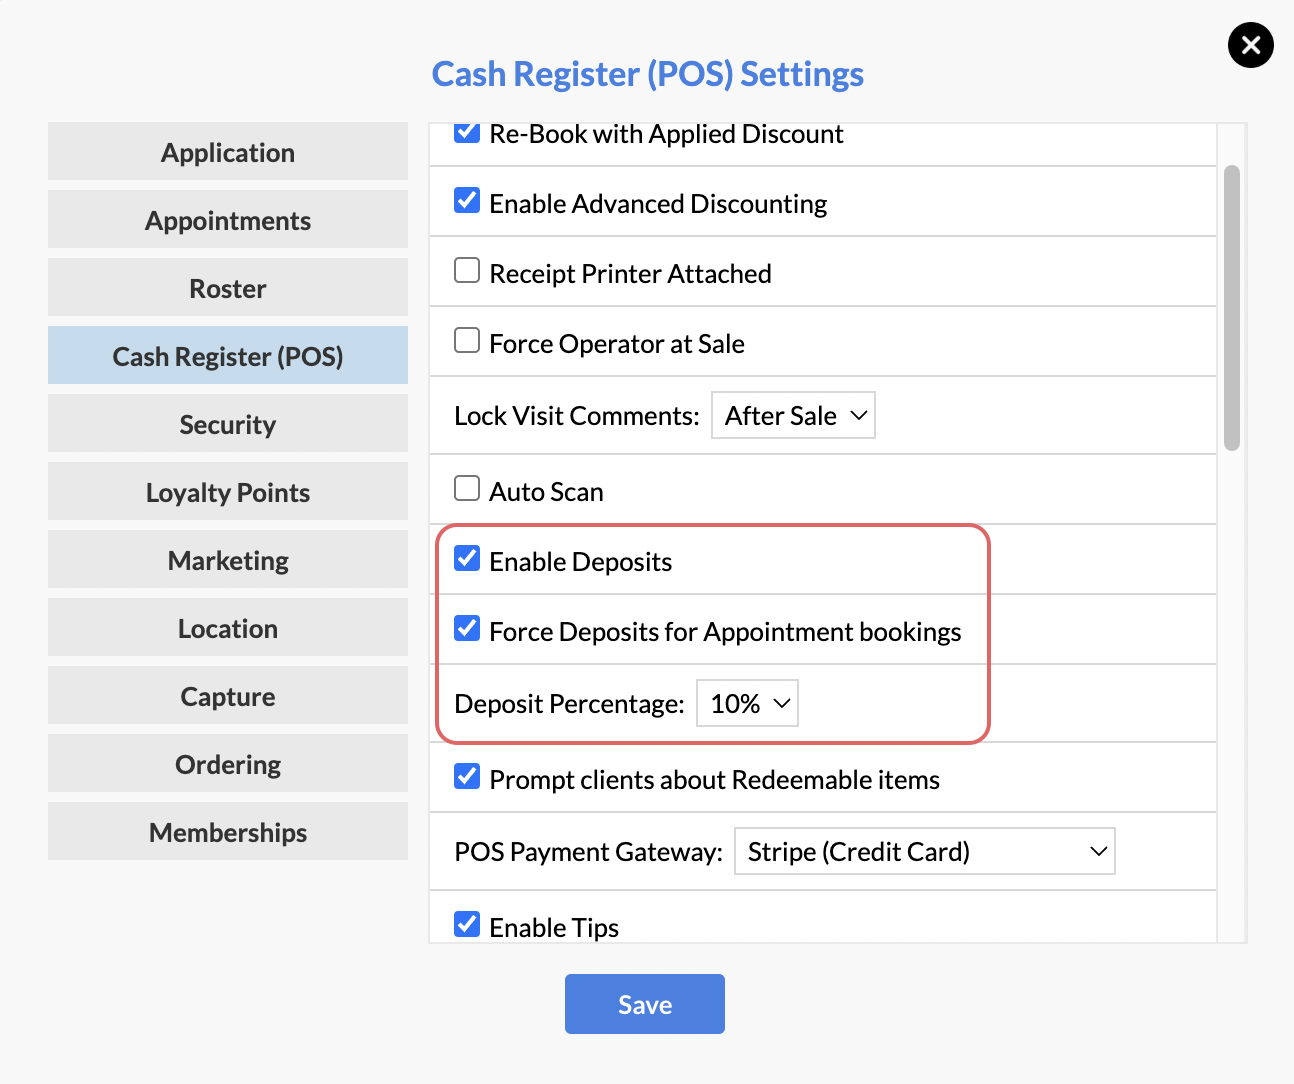
1. Select Enable Deposits
2. Choose your Deposit Percentage amount (this amount can be adjusted on the fly in POS as well if needed)
3. Decide if you want to Force Deposits for Appointment bookings and then Save.
How does the "Force Deposits for Appointment Bookings" setting work?
When this setting is enabled and you create an appointment on the Appointments page—you will always be required to take payment for the client's deposit.
Here's what it will look like when creating an appointment with Force Deposits for Appointment Bookings enabled:
As you can see, deposits will be required for all bookings when this setting is enabled, and you will be taken over to POS to complete the booking (we'll show you how to do this in the next section).
If you use the Stripe Invoice feature to take deposit payment using a link, OR you leave POS without successfully making payment for the deposit—the appointment will start a 30 minute "expiry timer", like so:
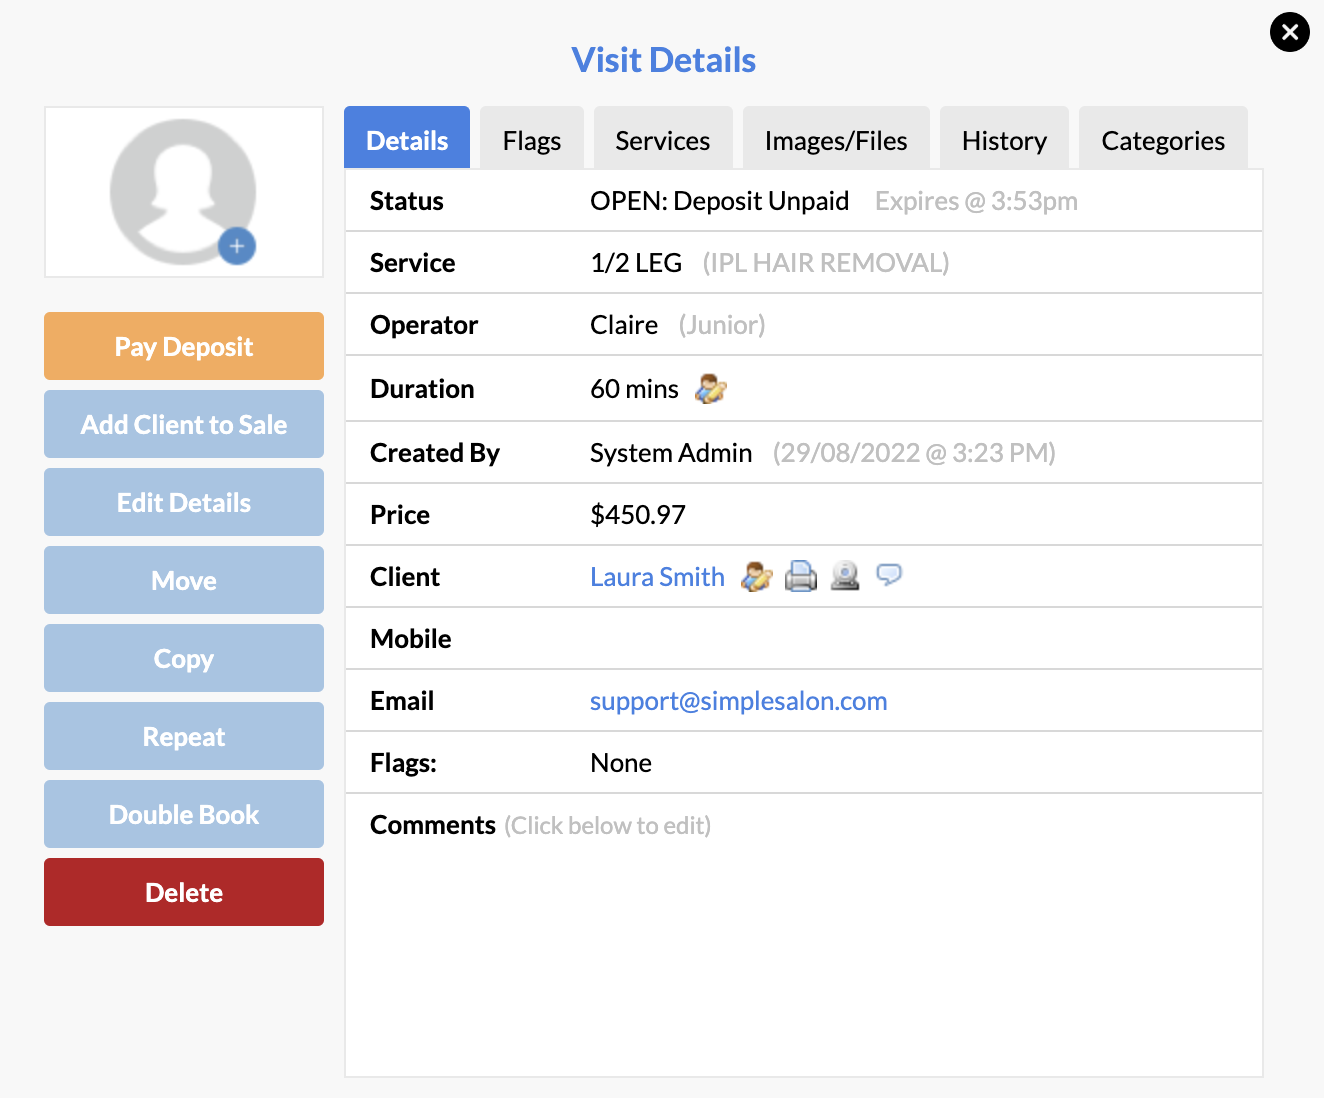
If the appointment remains unpaid for 30 minutes, it will be automatically deleted to make space for a new appointment.
When this setting is not enabled, you can instead select the Take Deposit button while creating the appointment.
If a Stripe Invoice is unpaid when not forcing bookings—the Status of the appointment will simply remain as OPEN: Deposit Unpaid until payment is made (there is no expiry timer).
How to take a deposit while creating an appointment
To take a client's deposit, you will first create a new appointment as normal on the Appointments page (if you haven't created an appointment before, please click here).
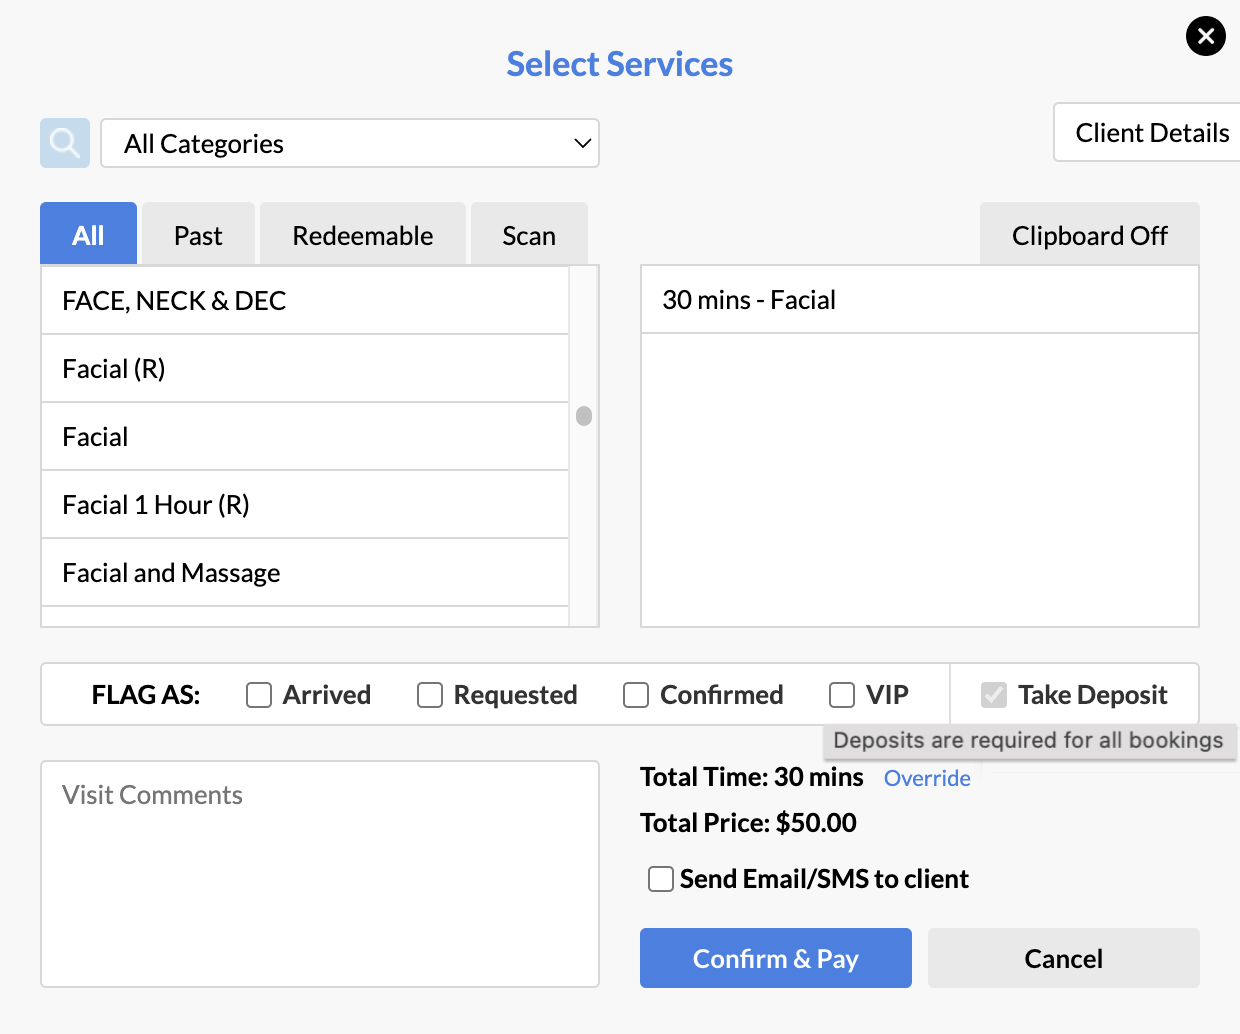
In the Select Services window, you'll notice a Take Deposit button, like so:
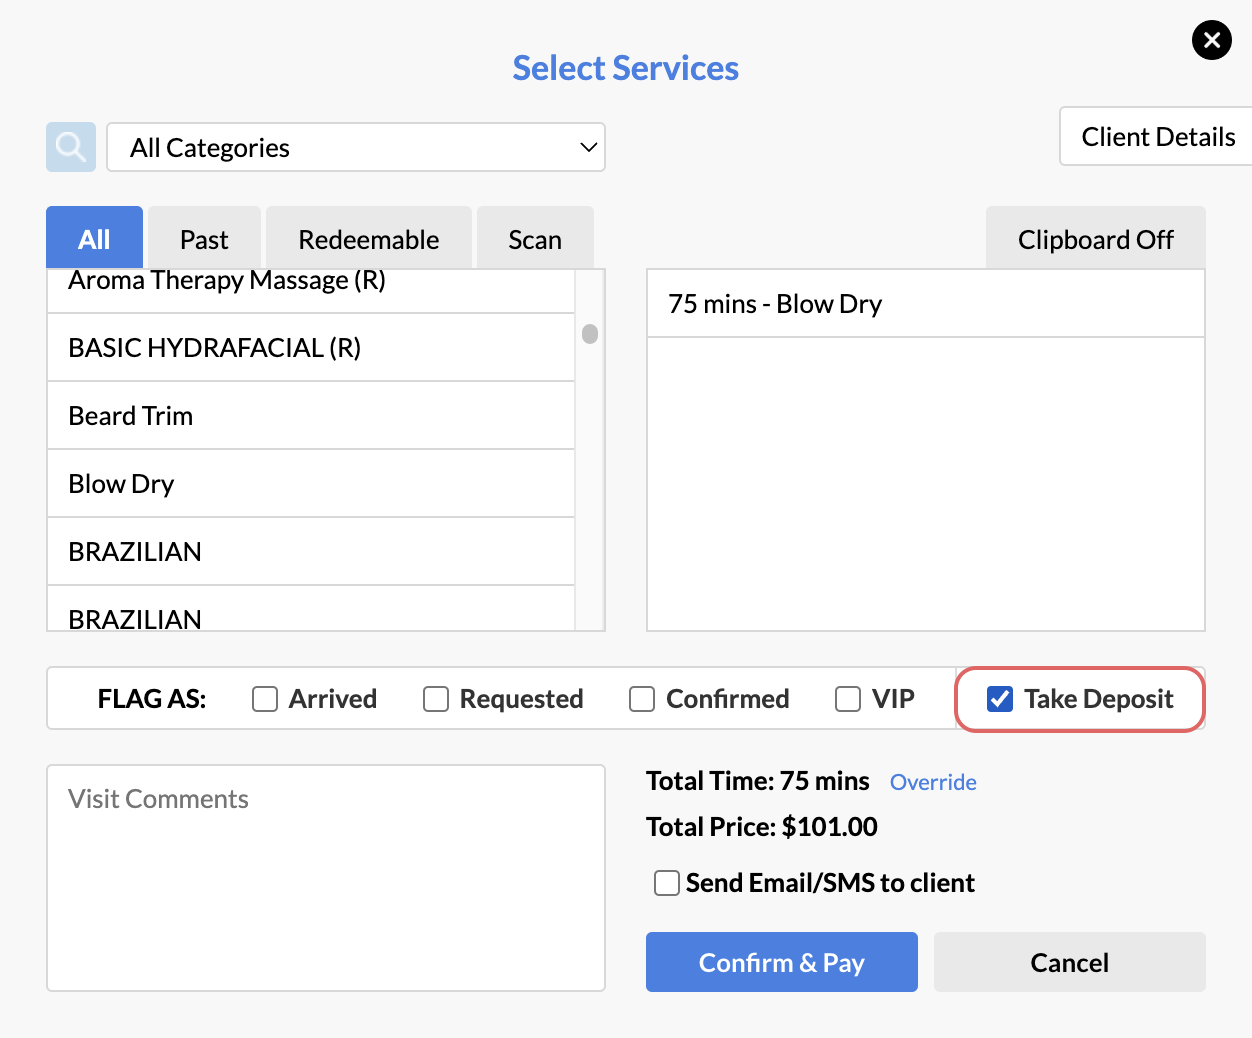
- If you are not forcing deposits, then you will need to click the Take Deposit button on the appointment whenever you want to take a deposit
- If you are forcing deposits, the Take Deposit button will always be automatically selected, and cannot be unselected, like so:
Once you click Confirm & Pay, you will be taken over to POS to finalise payment:

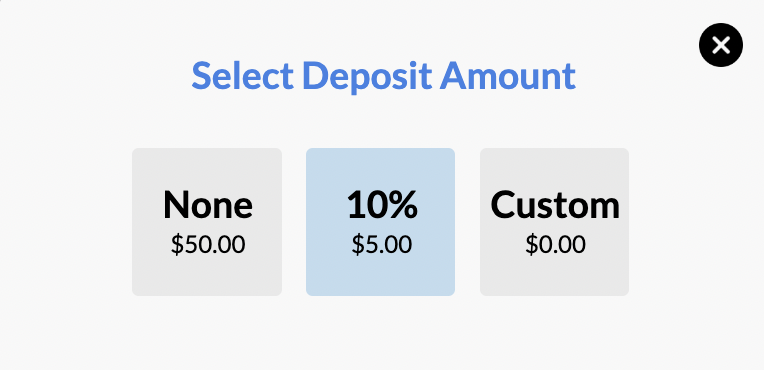
The services added to this appointment will be listed, and the Deposit Percentage you setup earlier will automatically be applied.
If you want to change the deposit amount, simply click the Take Deposit button. Clicking Custom will allow you to set a different amount:
At this point, you can click Receive Payment:
- Choose a normal payment method such as Cash, EFTPOS etc and then Finish Sale
- OR you can use the Stripe Invoice option. The Stripe Invoicing option allows you to send a unique link to your client via email, in which they will be sent an invoice to pay for their deposit:
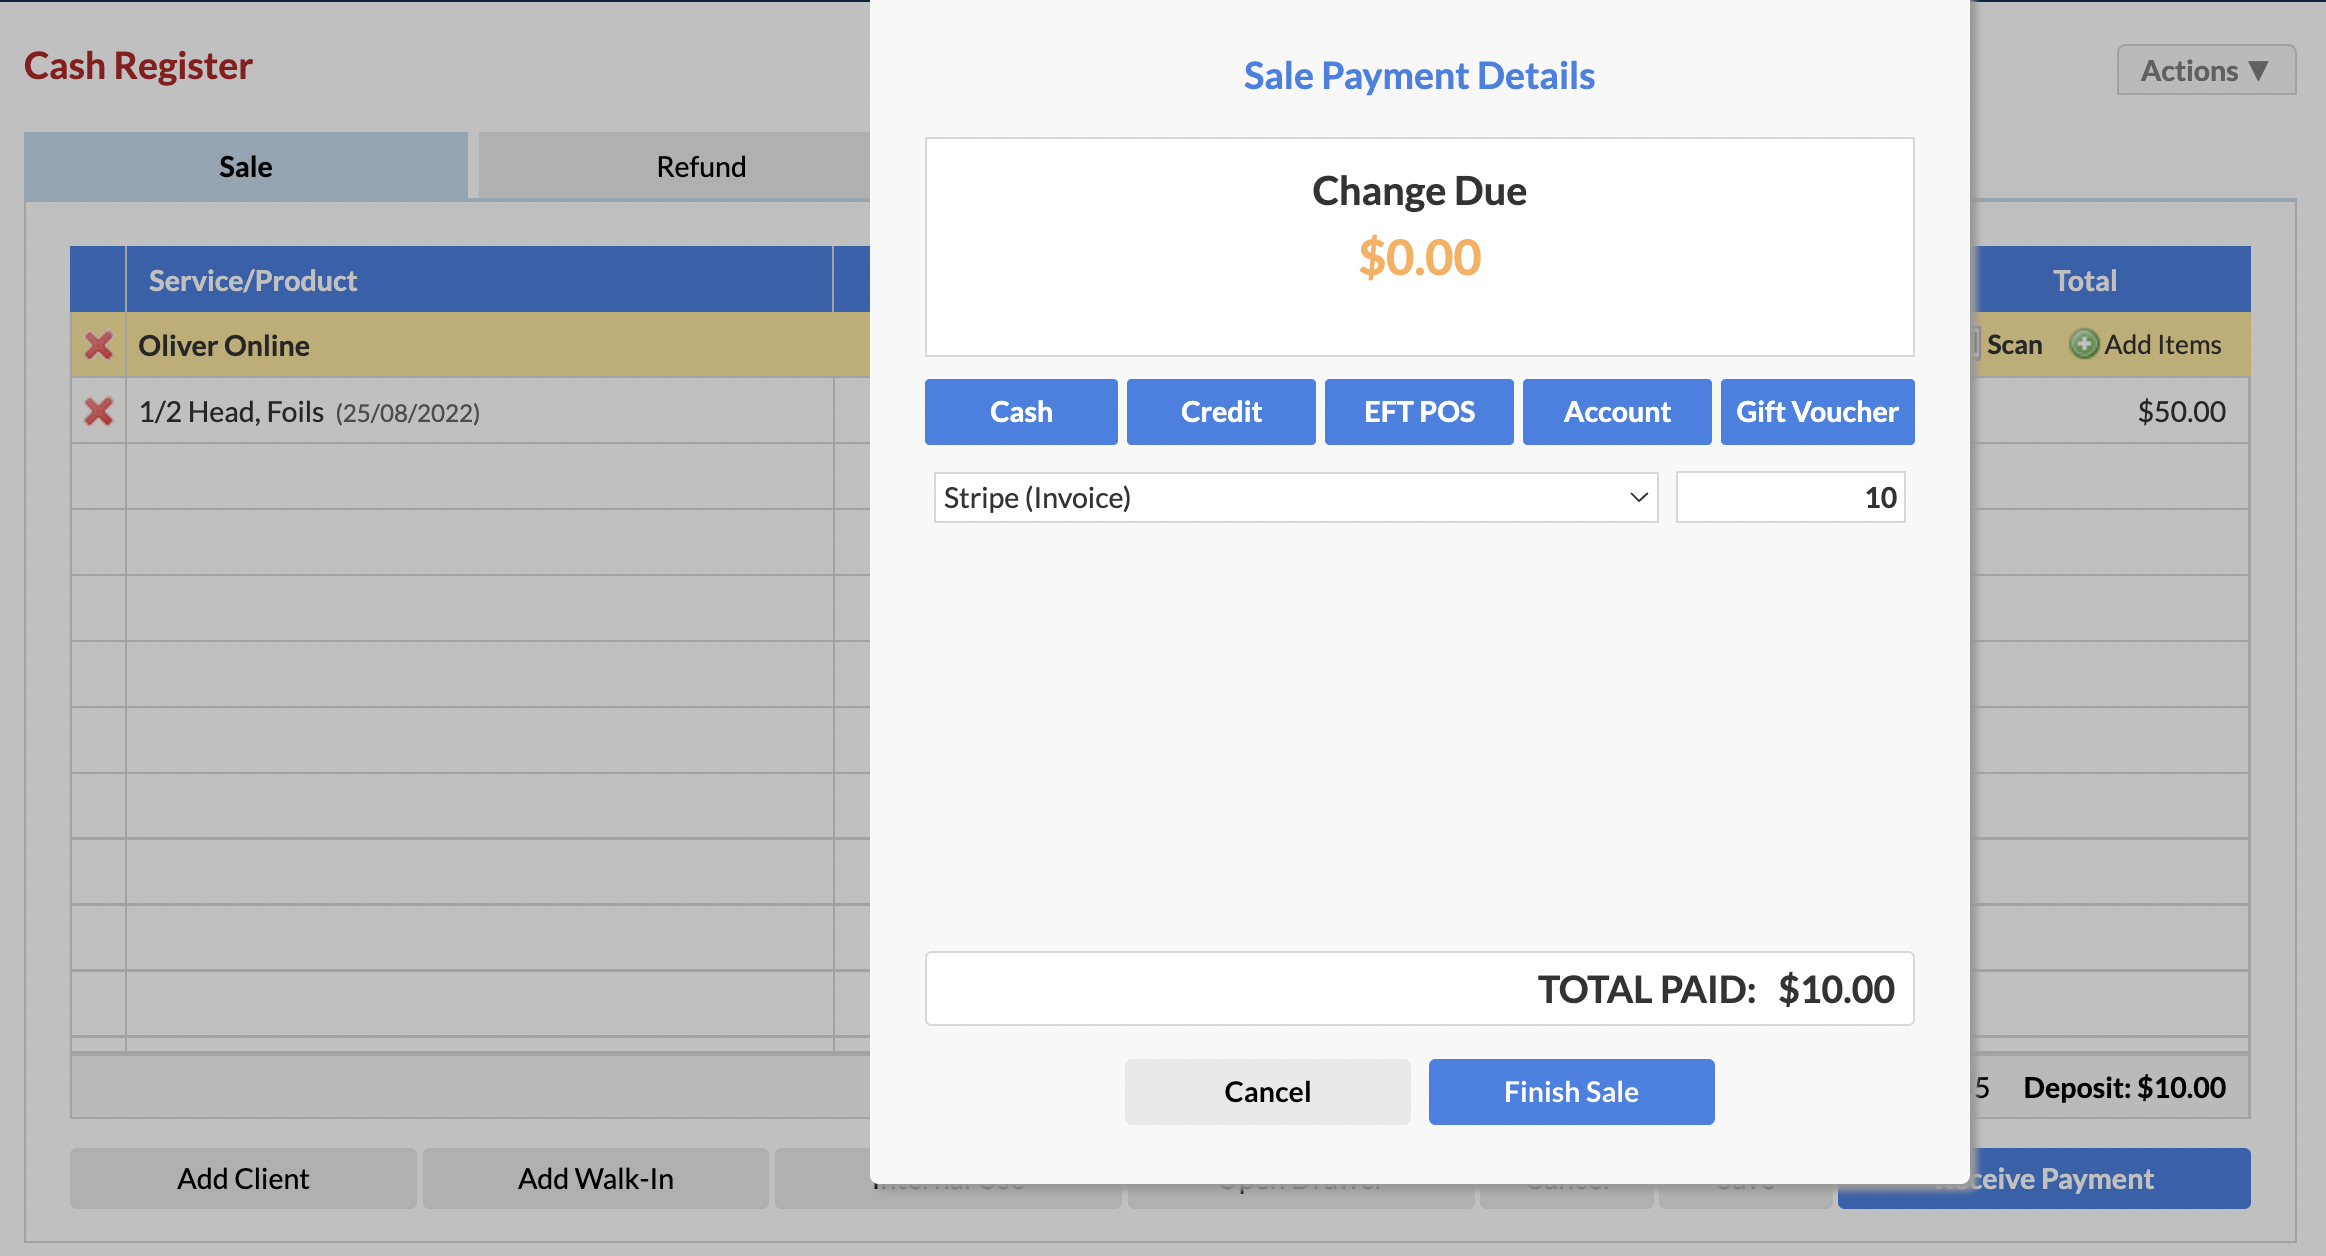
The Stripe Invoice option needs to be enabled in your Account section before it will appear as an option in POS.
To learn how to setup Stripe Invoicing, and learn how Stripe Invoicing works specifically when taking a clients deposit, please check out the following resource:
How to use the Stripe Invoice feature with POS Deposits
How to use a clients deposit
When a client has finished their appointment and is ready to pay:
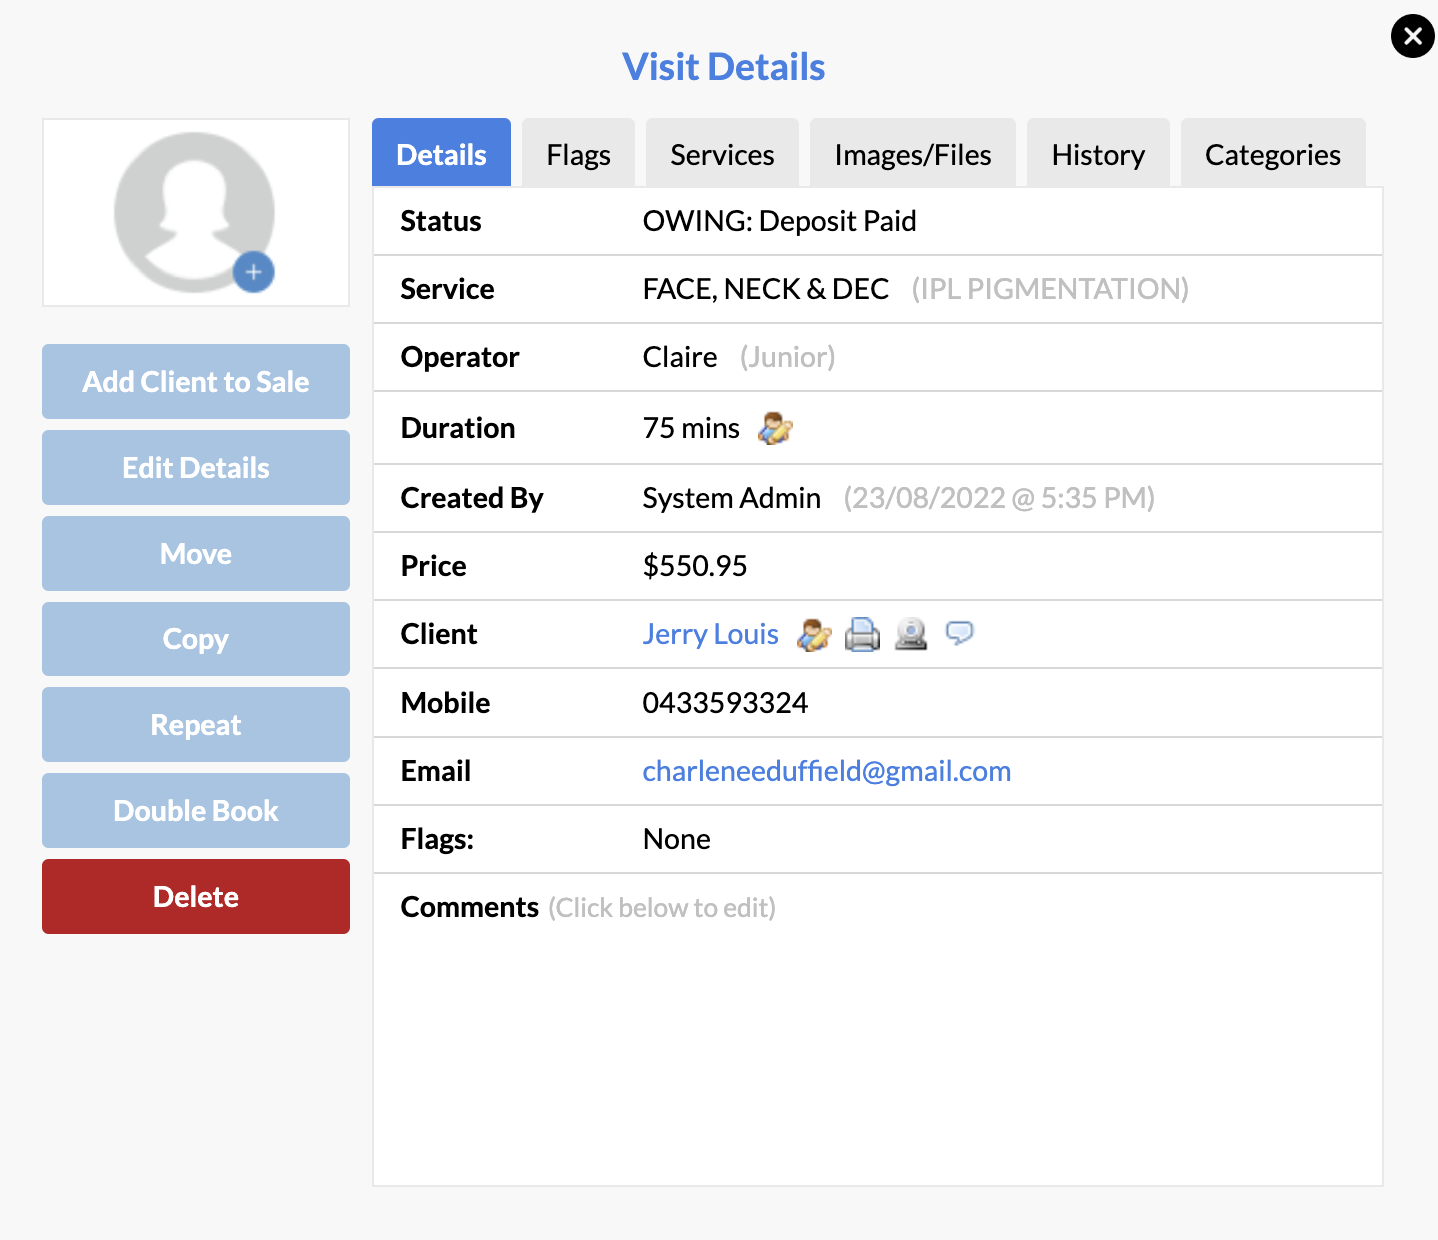
1. Click on the client's name on their appointment (on the Appointments Page), to open up the Visit Details window:

2. Click Add Client to Sale:
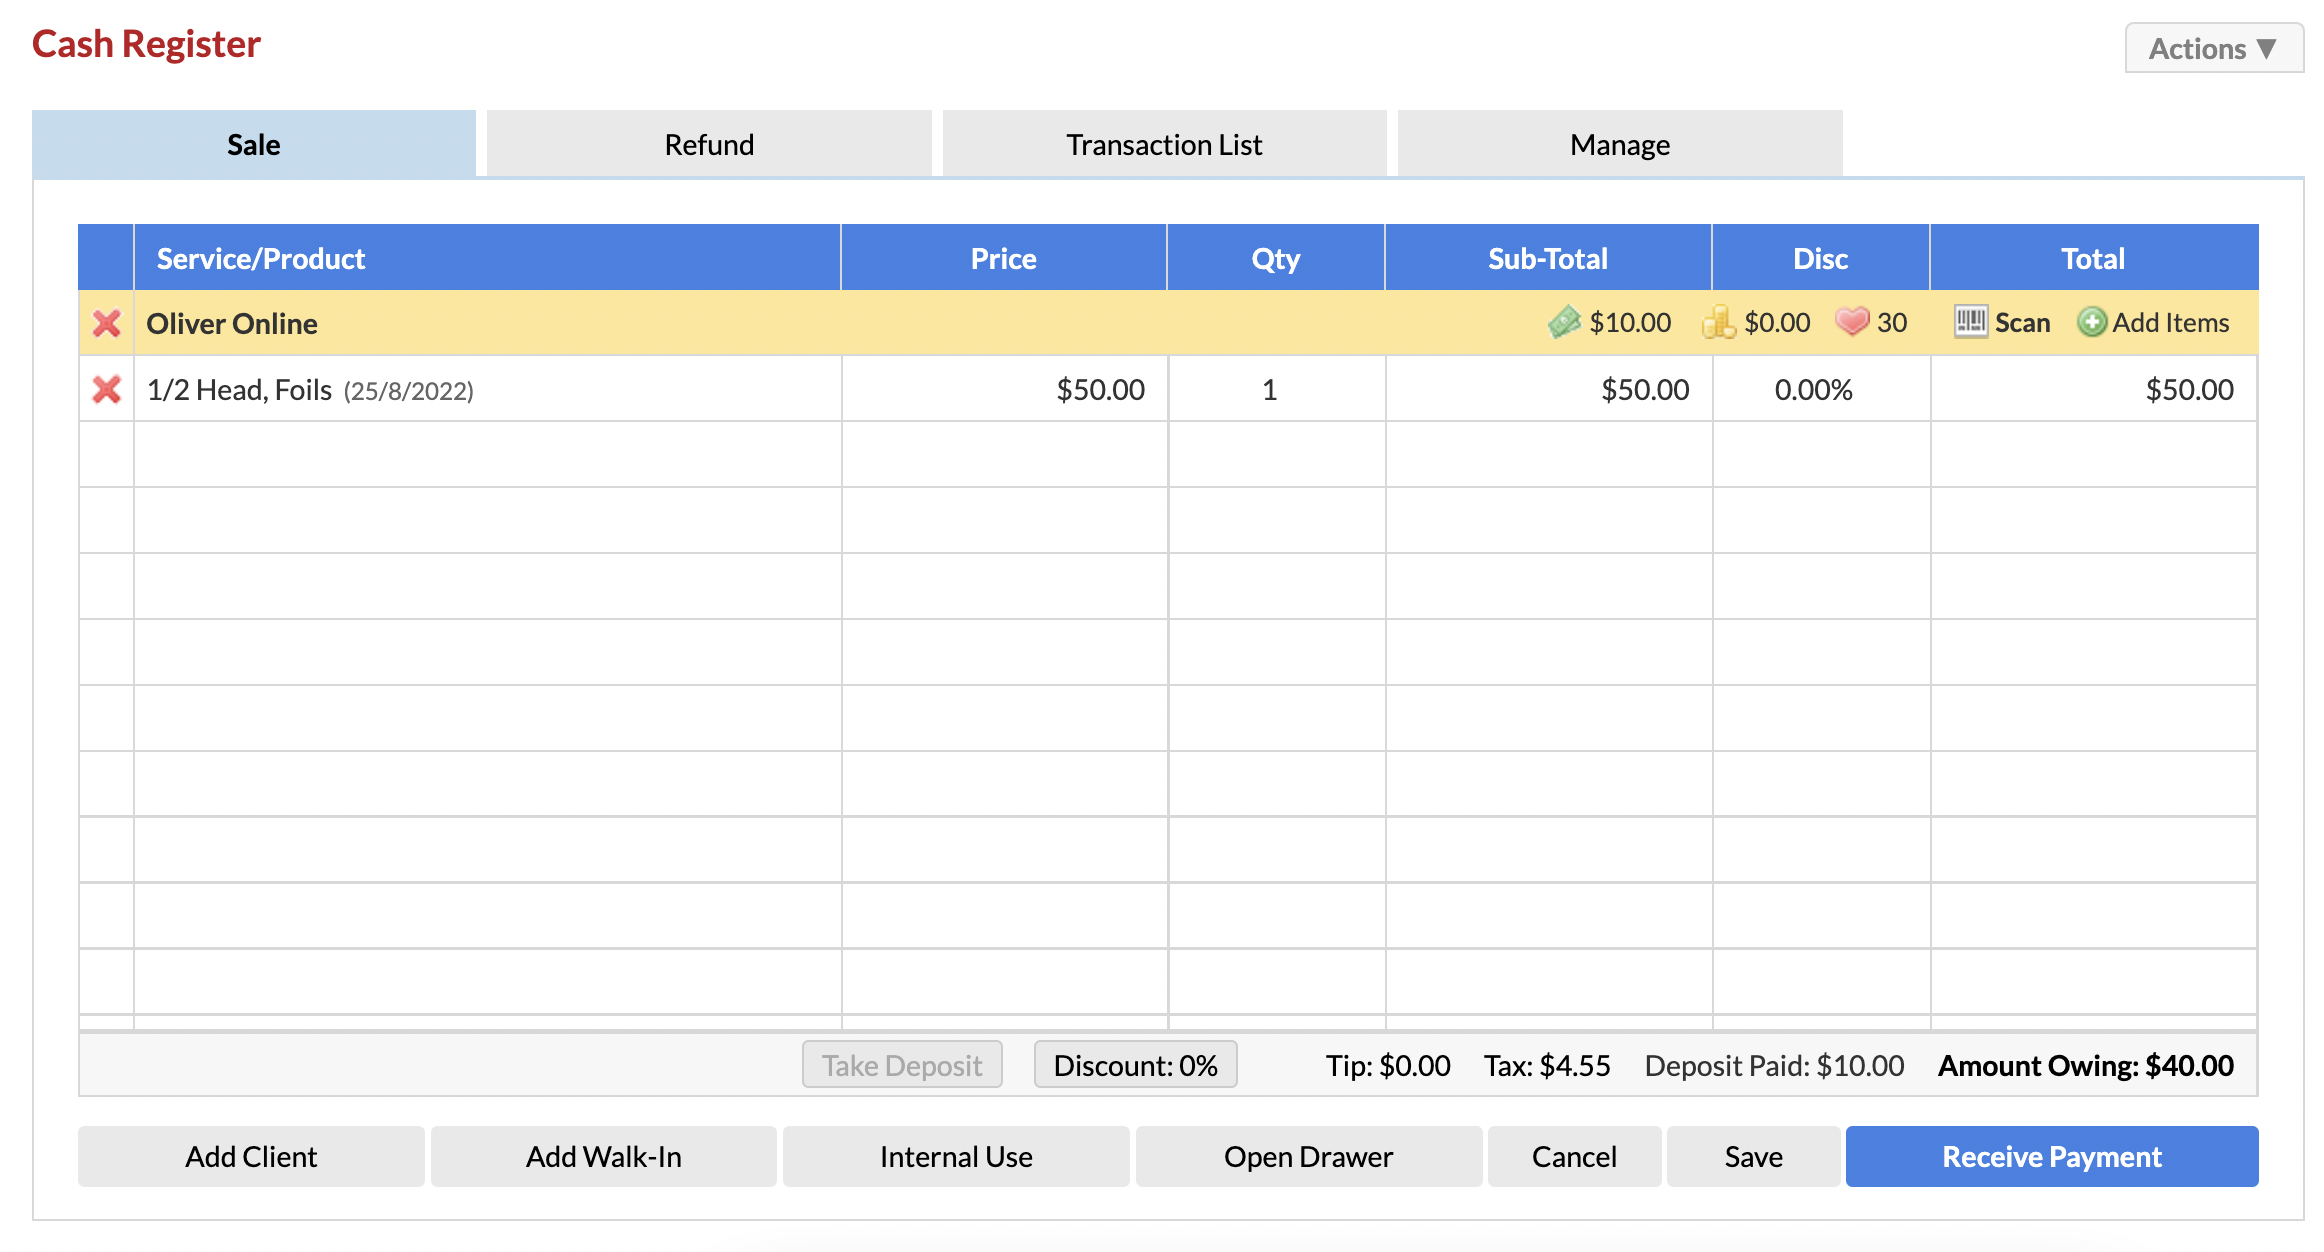
You'll be taken over to POS as normal, except you'll notice on the POS screen the Deposit Paid amount:
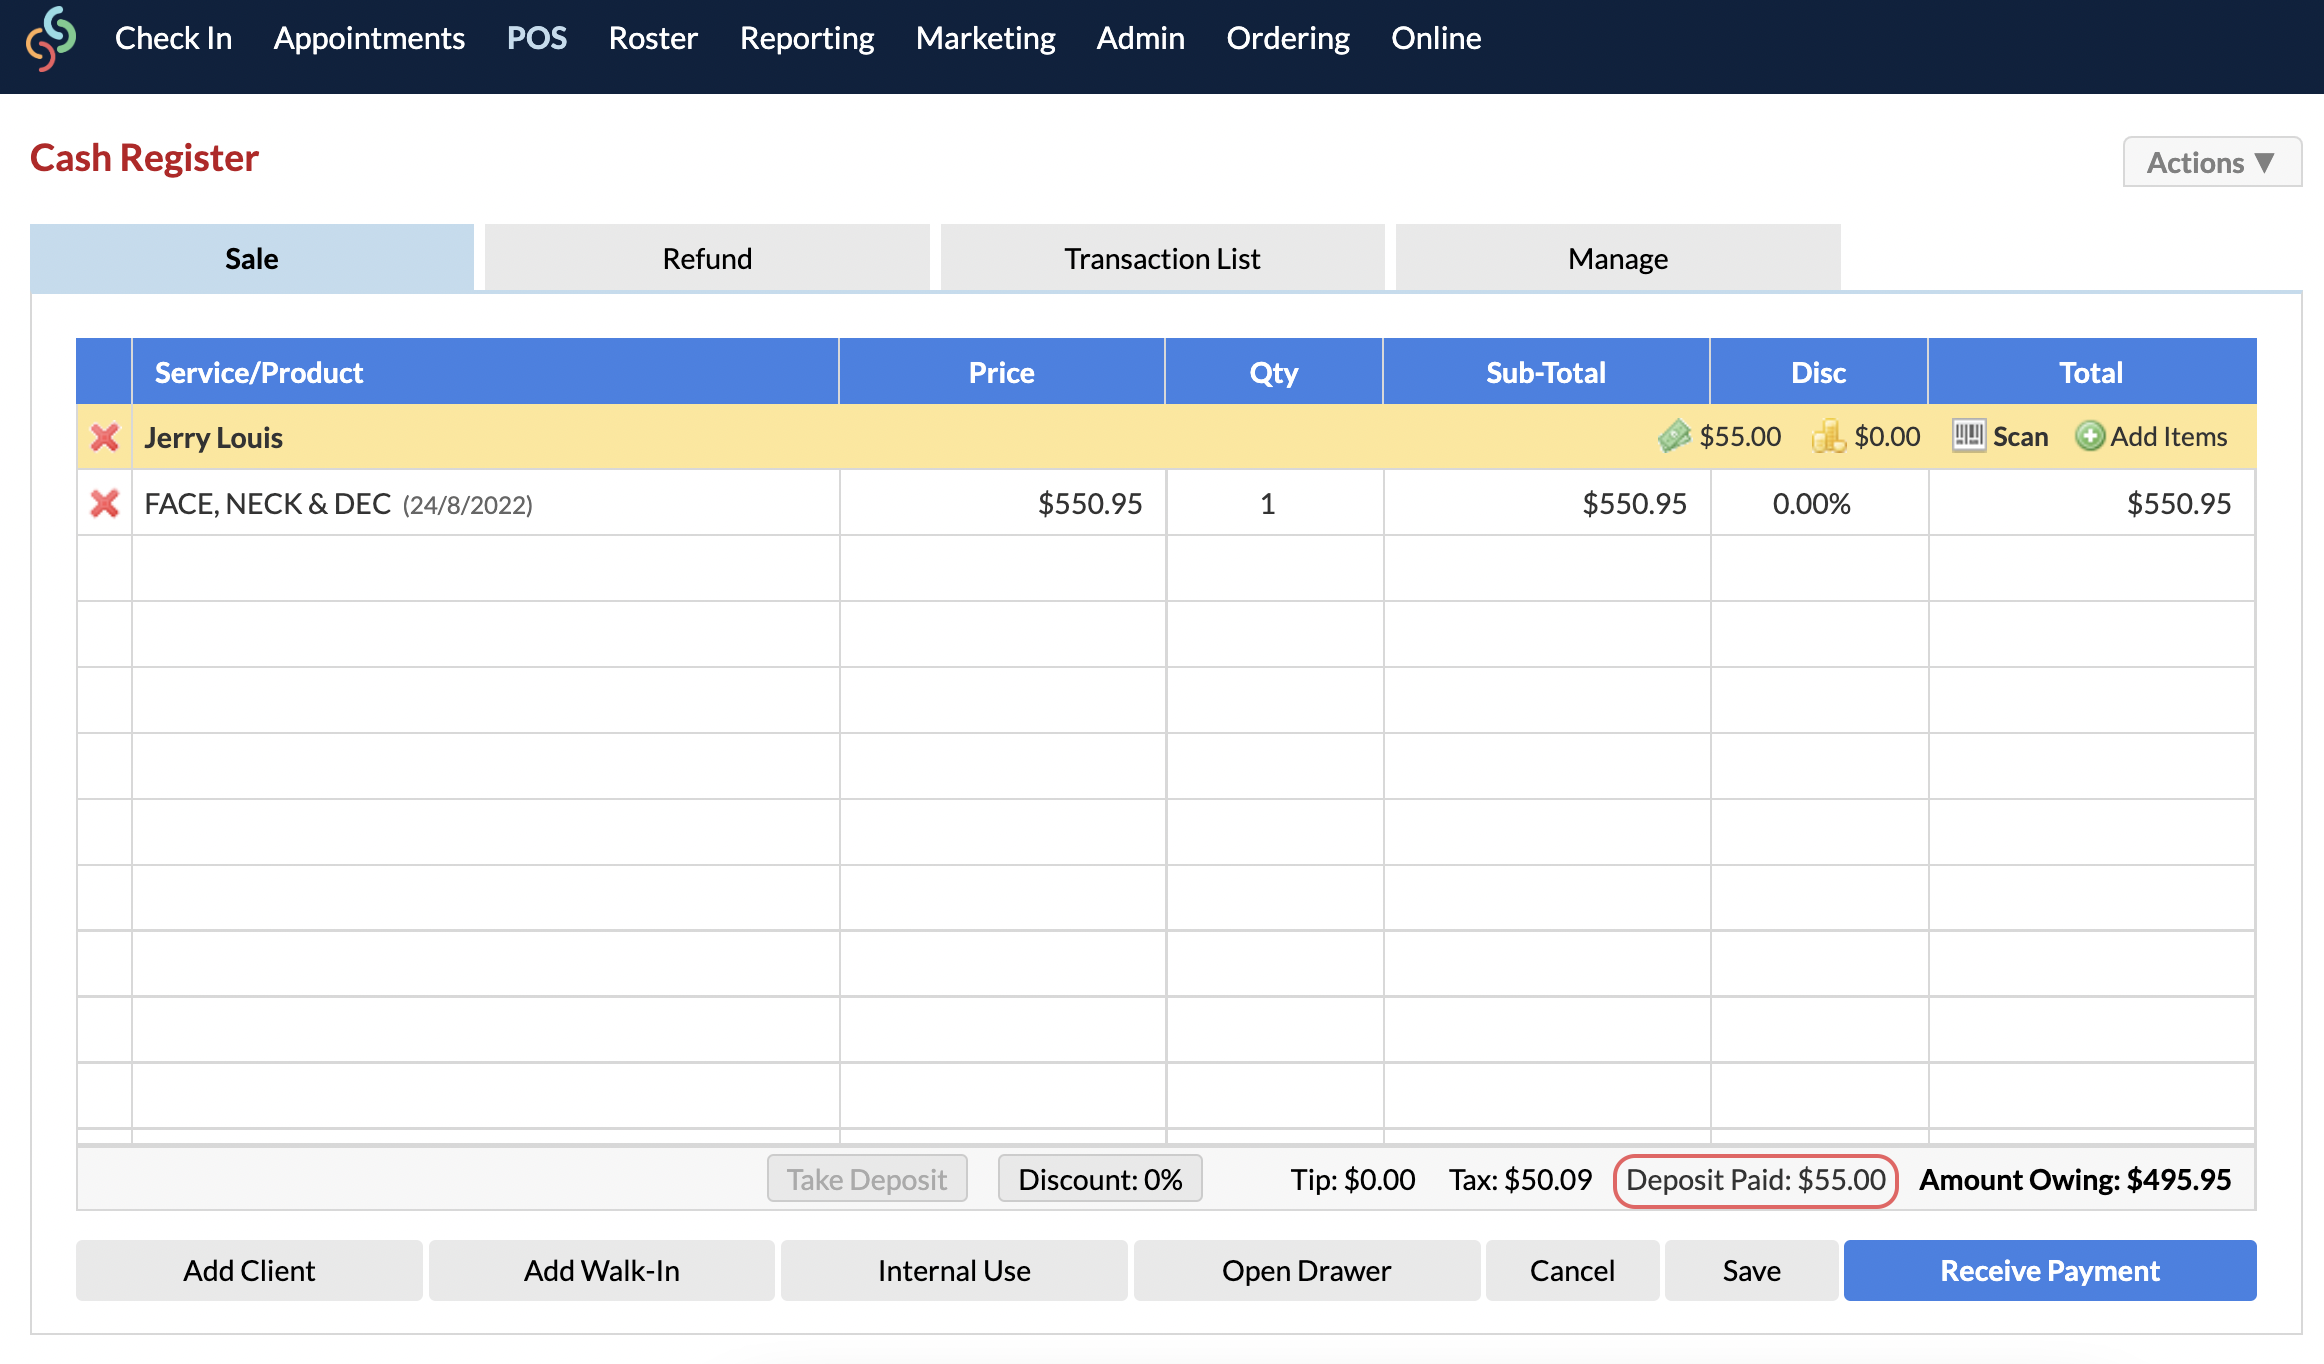
If you need to add further services or products to the sale, simply click + Add Items.
3. Otherwise, you can click Receive Payment. The Sale Payment Details window will pop up, and the deposit transaction linked to their appointment will be listed.
4. Choose their payment method for the remaining amount, and you can proceed to Finish Sale as usual:

The appointment has now been paid for, and the deposit will be taken away from their deposit balance!
Where to view a clients deposit balance:
POS
When you add a client to POS that has a deposit ![]() paid, their deposit balance will be listed in the yellow bar, like so:
paid, their deposit balance will be listed in the yellow bar, like so:

Clicking on this deposit ![]() icon will allow you to view the client's Outstanding Deposit Transactions:
icon will allow you to view the client's Outstanding Deposit Transactions:
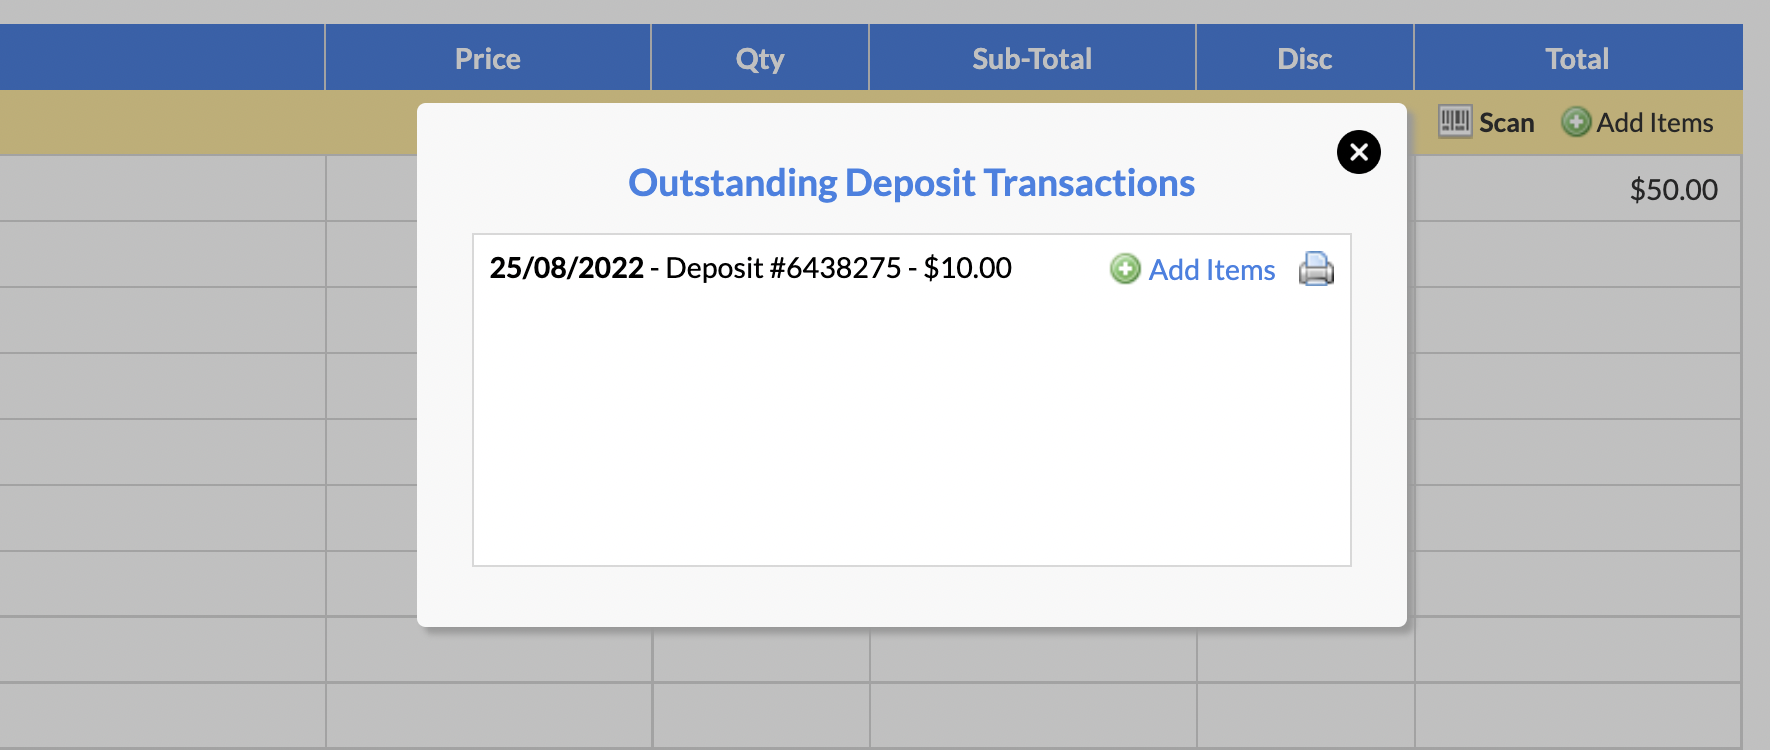
Clicking + Add Items in the Outstanding Deposit Transaction window will add any services to POS that are linked to that particular deposit:
Client Card
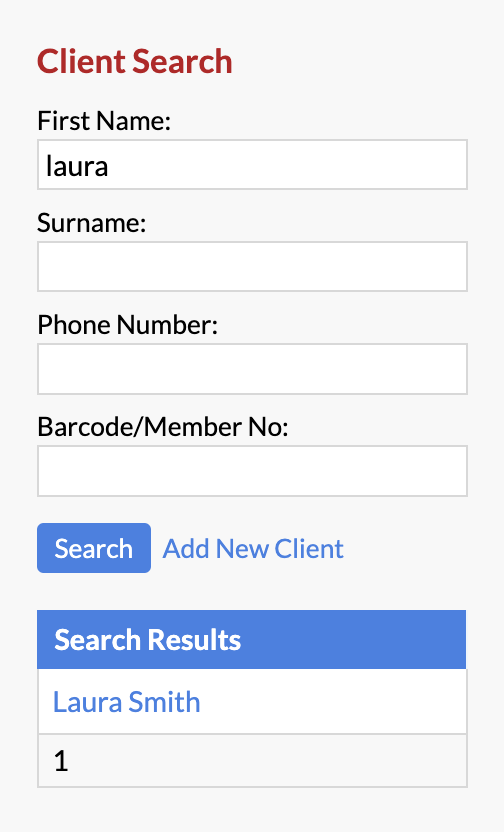
You can also view a client's current deposit balance from their Client Card.
To get there, search for the client in the Client Search, then click on their name:
Once in their Client Card, click on the Actions menu and select the Deposits ![]() icon:
icon:
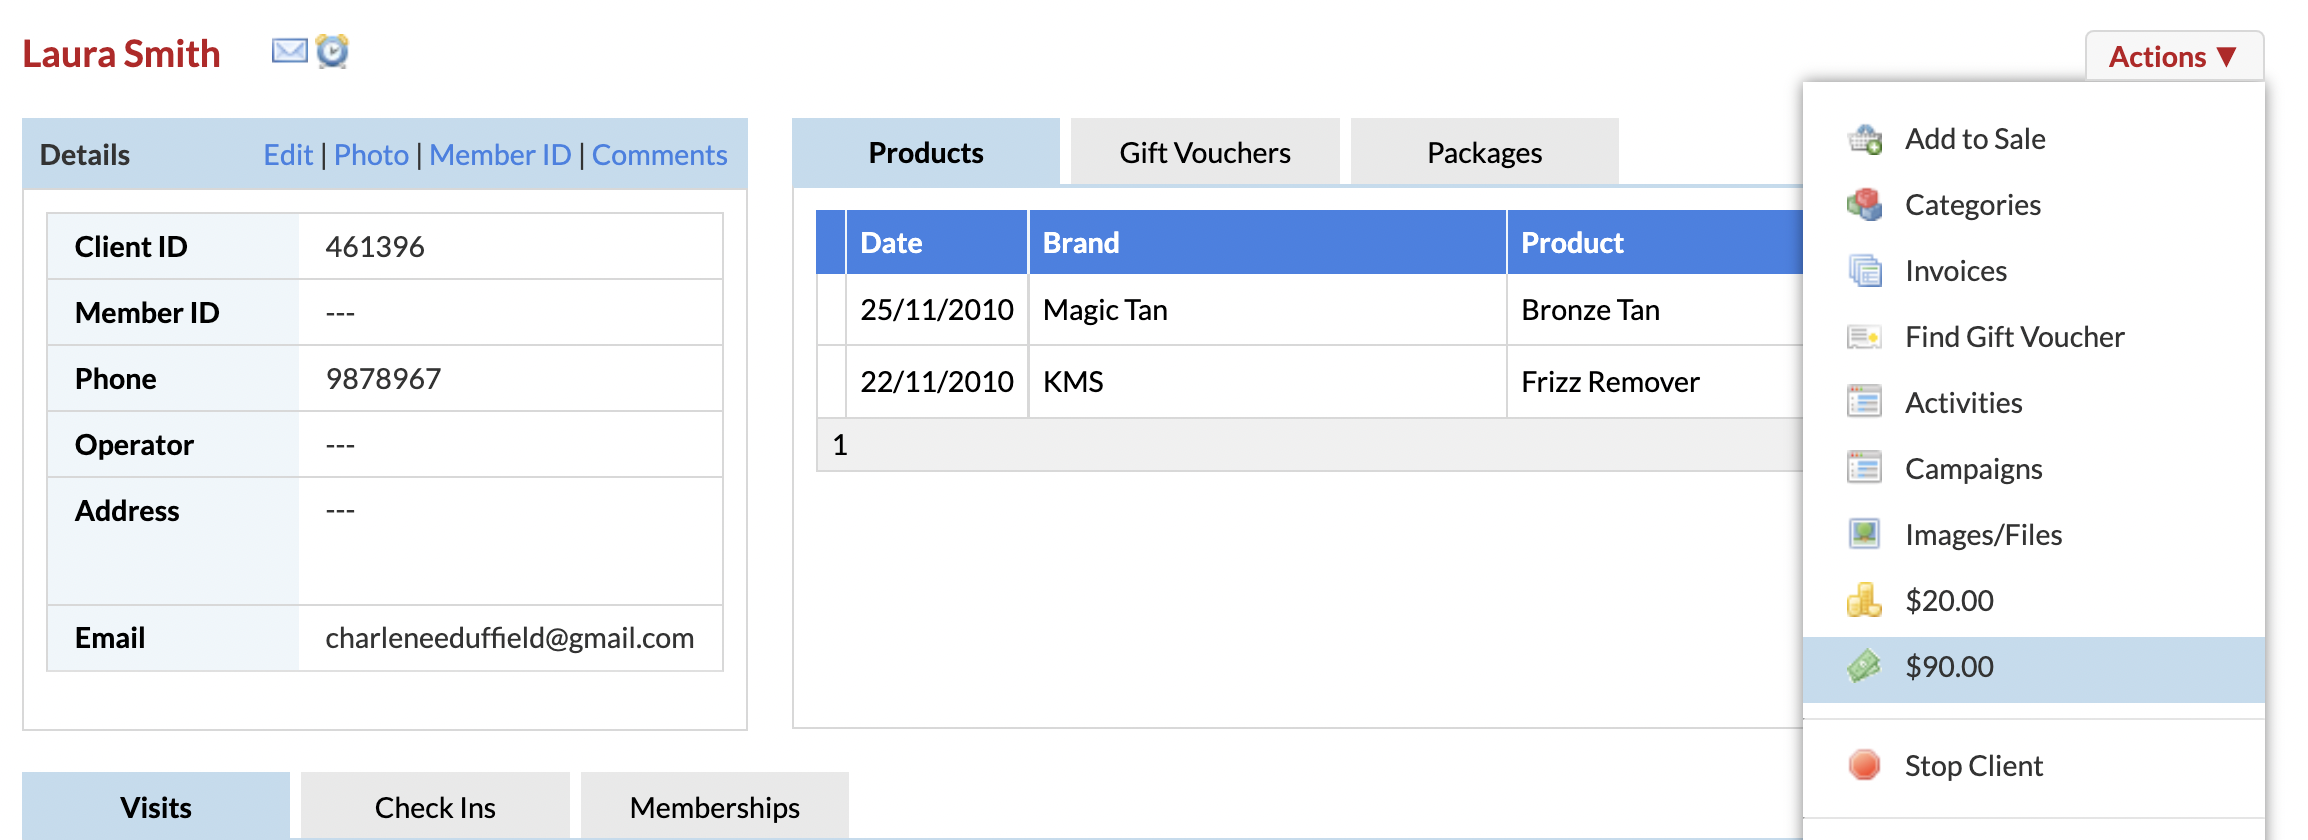
All of their Outstanding Deposit Transactions and Deposit Transaction history can be viewed from here:
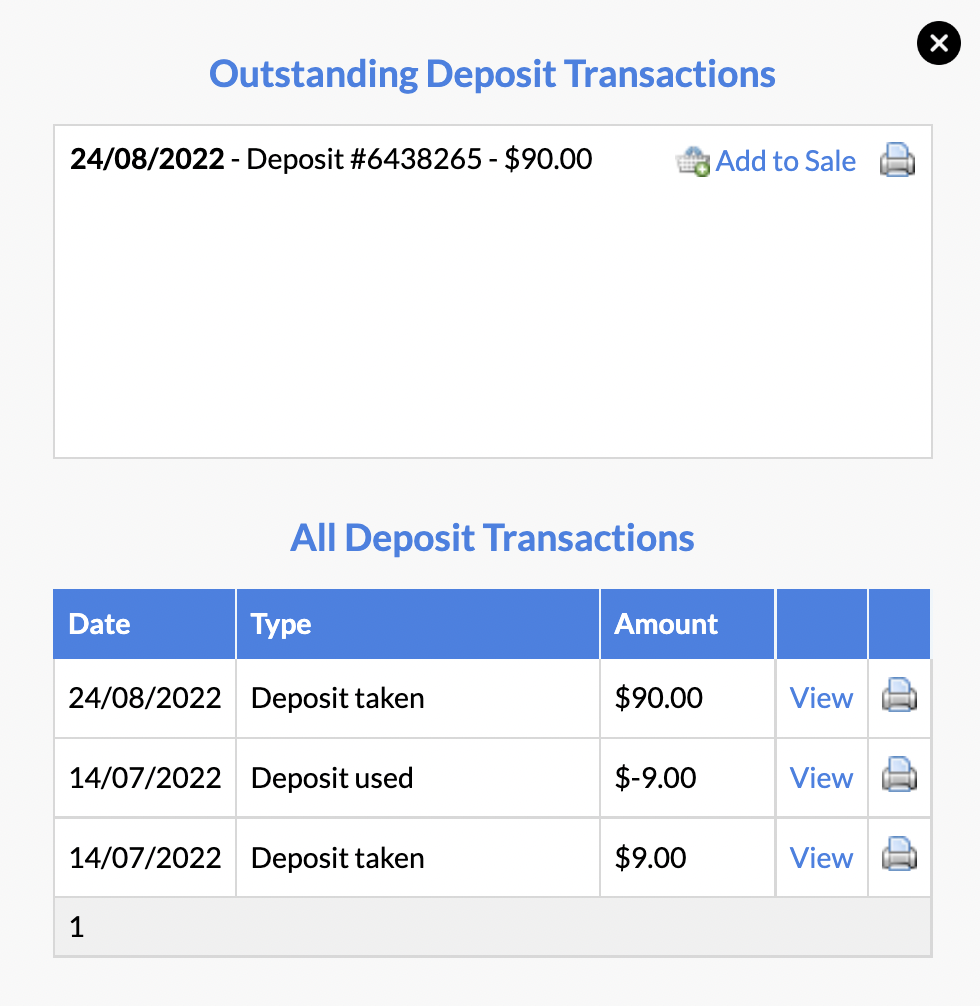
You can click + Add to Sale from here, which will add any services to POS that are linked to that particular deposit.
Selecting View next to any Transaction Type will take you over to the Transaction/Invoice Details in your Transaction List.
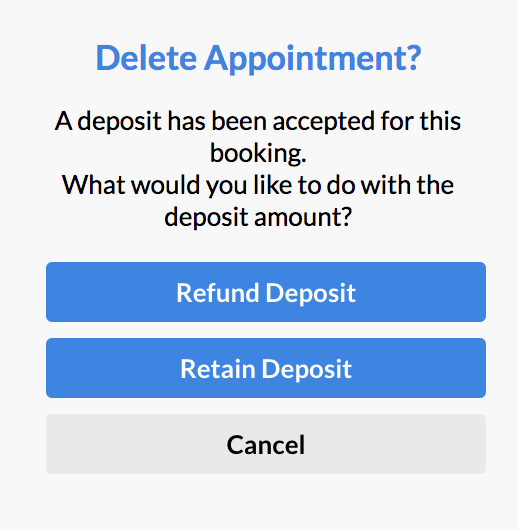
Canceling an Open Appointment with Deposit from the Appointments Page
If you try to delete an appointment from the Appointments page that has had a Deposit paid with it, you'll receive a pop-up that will ask if you would like to either Retain the deposit (which means your business keeps the client's deposit)—or Refund the deposit (deposit goes back to client's original payment method):
Refund Deposit
If you select Refund Deposit, you'll receive a pop-up asking if you're sure you would like to delete the appointment and refund the deposit:
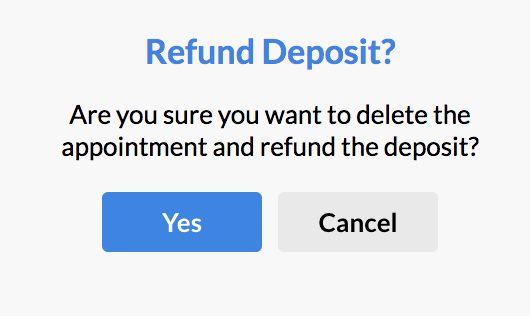
Select Yes if you would like to proceed.
Click Refund at POS in the "Automatic Refund" pop-up:
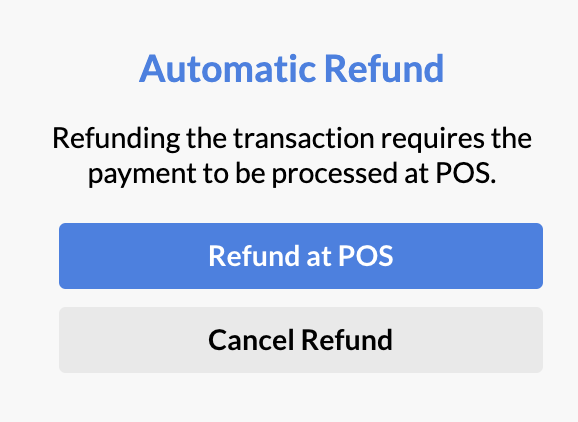
You will be taken over to POS, where you can complete the deposit refund by clicking Refund Payment.
Their original payment method will already be selected, and you can click Finish Refund.
If the client paid via Stripe Invoice, the deposit will be refunded back to the client's original deposit payment method.
Retain Deposit
If you select Retain Deposit, you'll receive a pop-up asking if you're sure you would like to delete the appointment and retain the deposit:
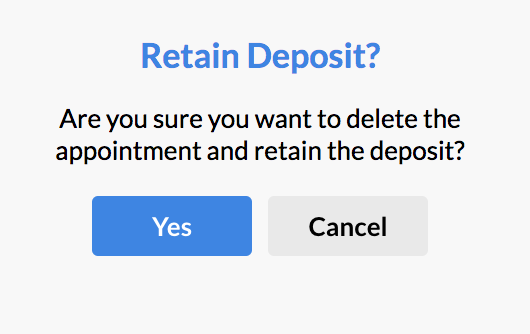
NOTE: Selecting Yes will FORFEIT the client's deposit. Your salon will be retaining/keeping the payment.
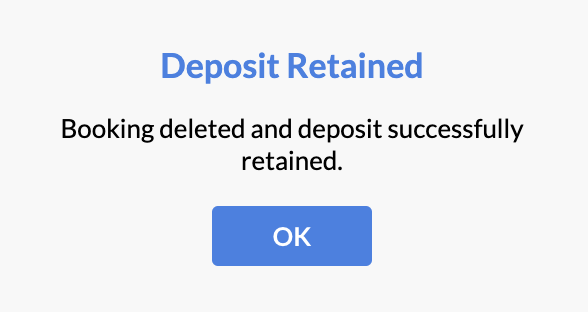
Select Yes if you would like to proceed. Once it has processed, the appointment will be deleted, and your business will retain the deposit amount:
Refunding deposits
Refunding a sale with a deposit:
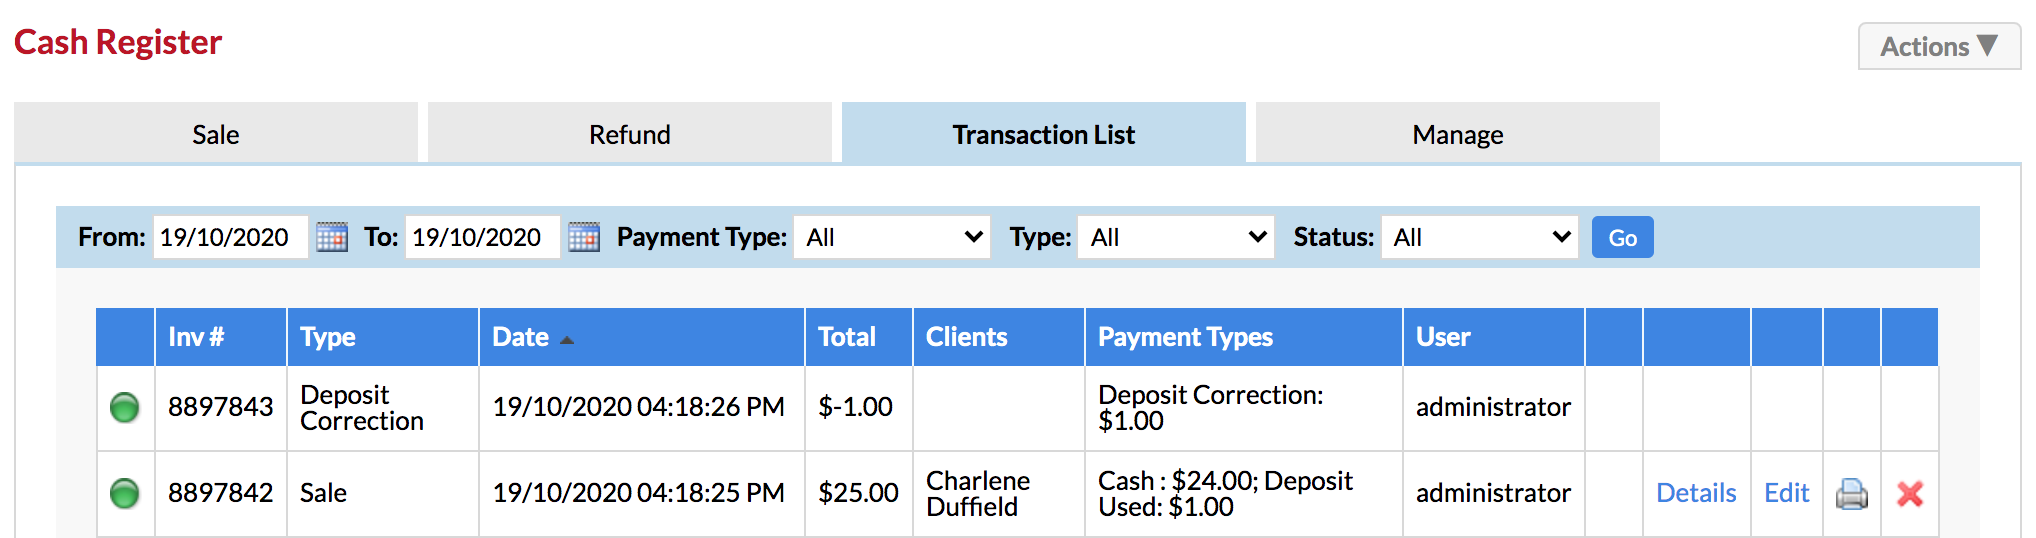
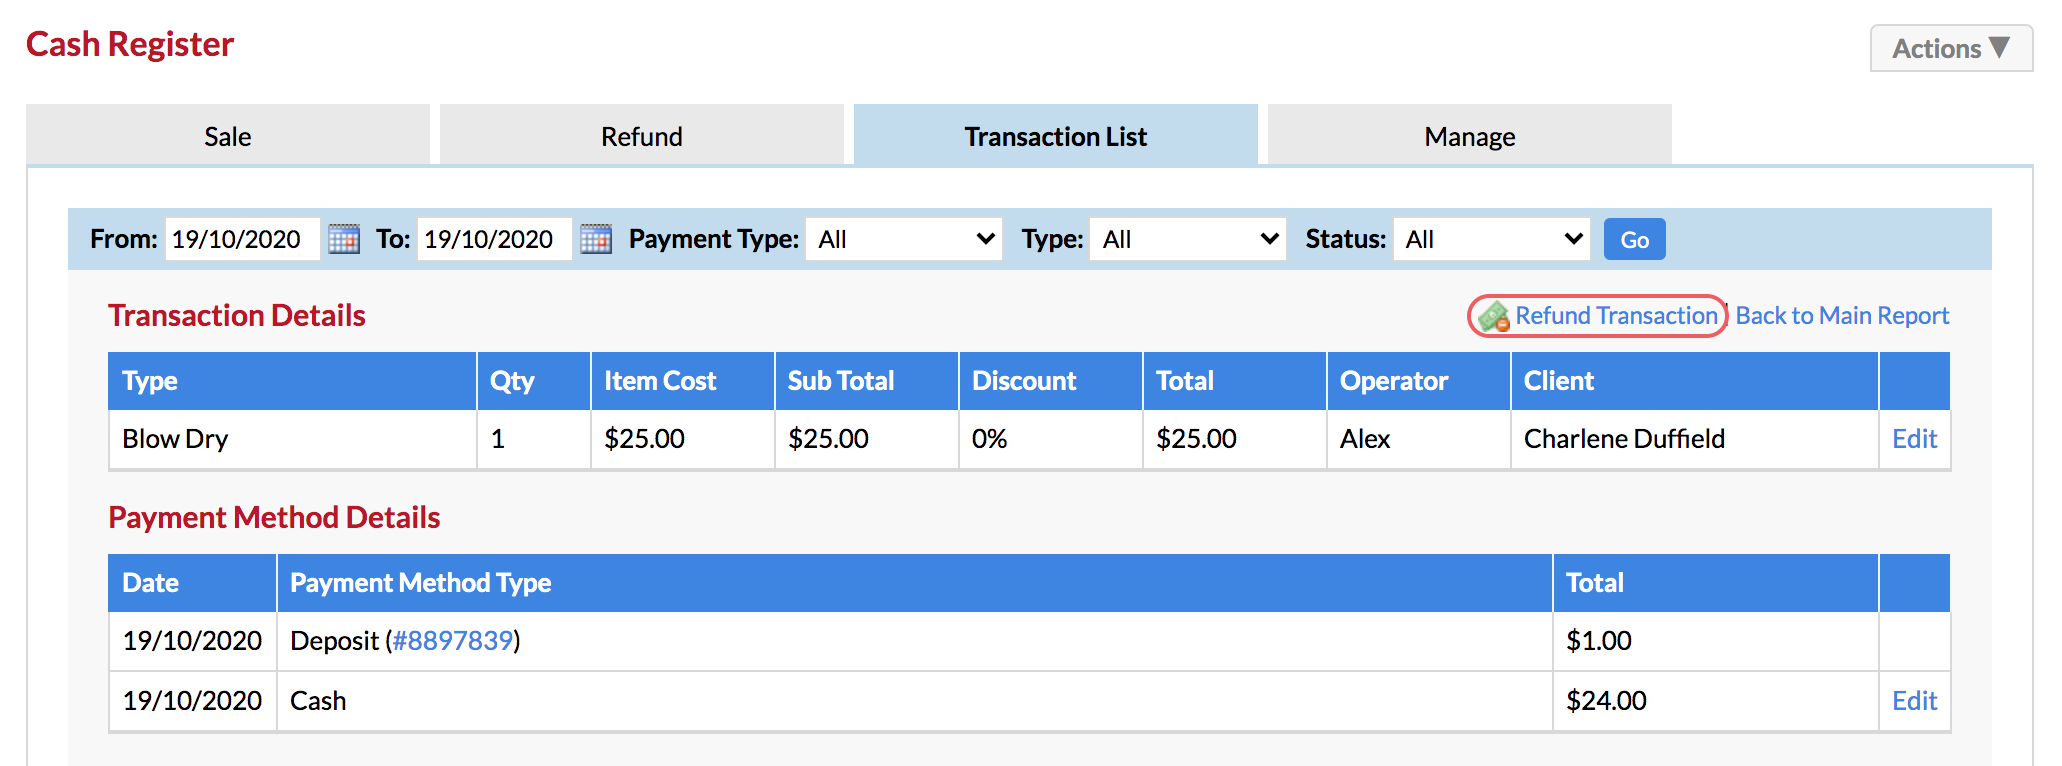
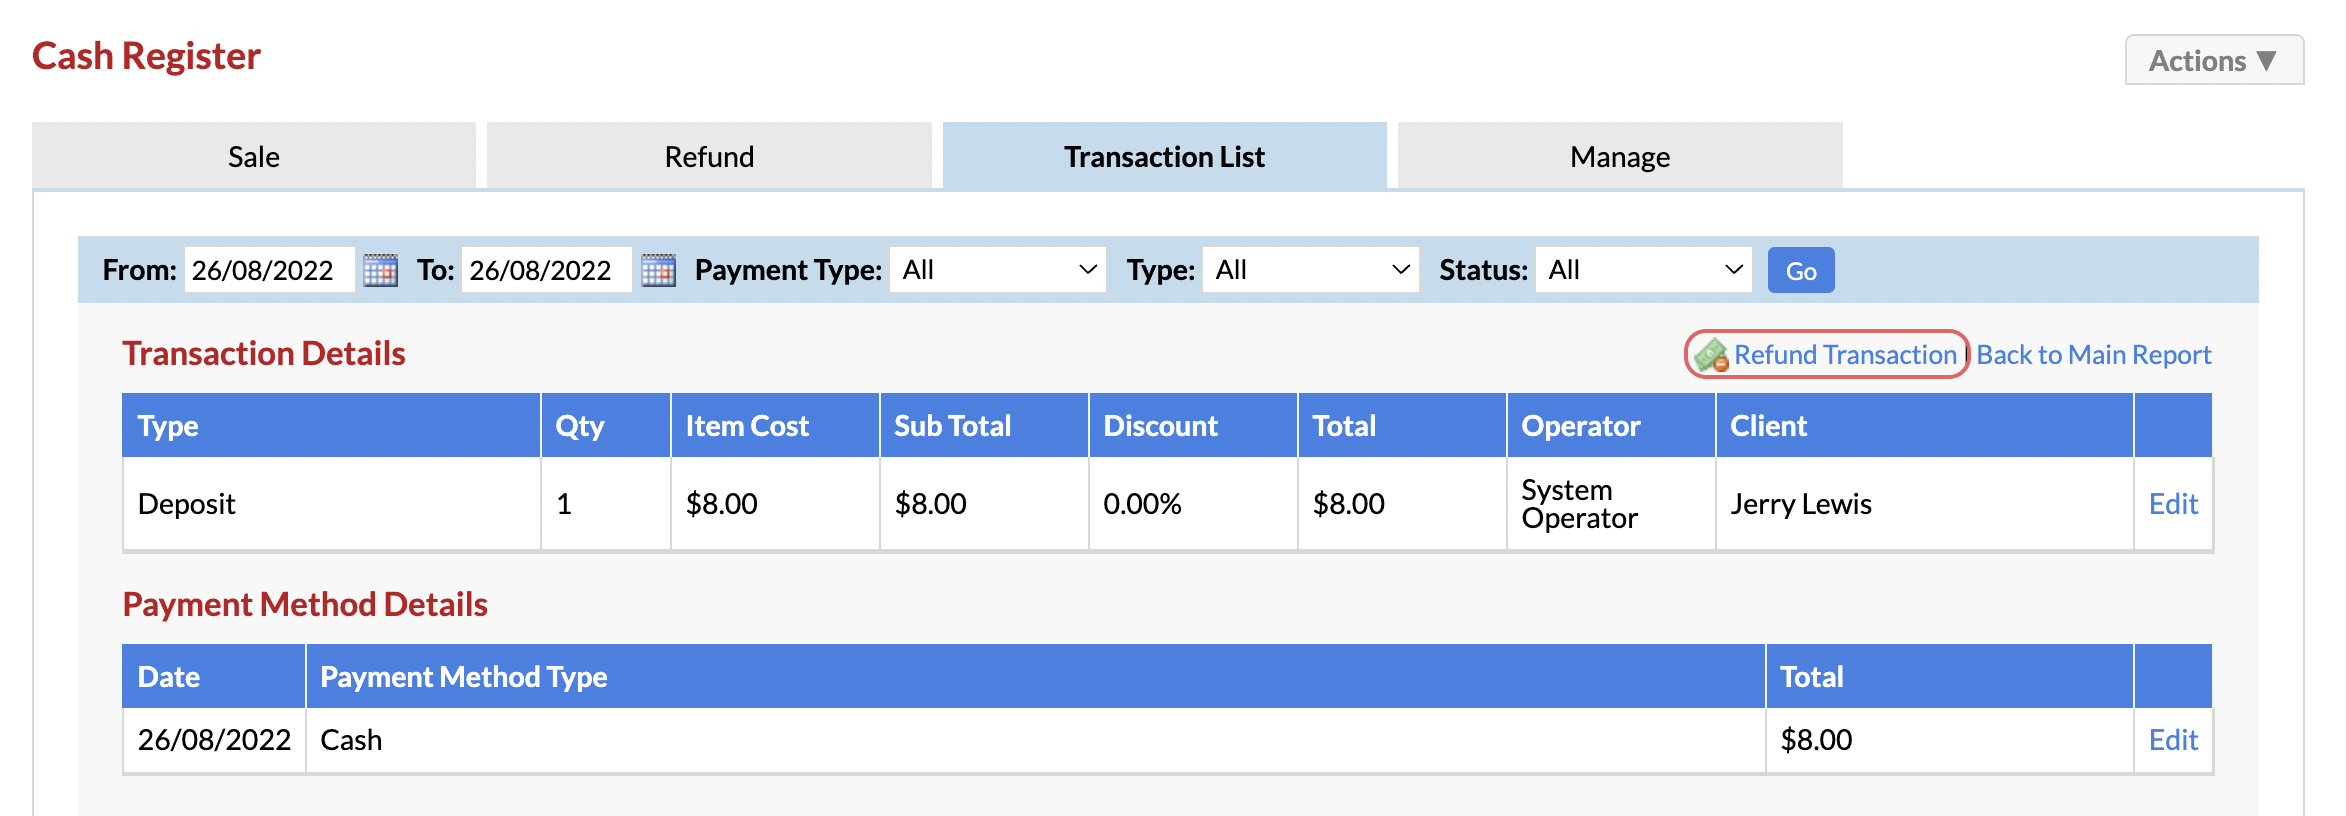
If you need to refund the whole transaction including their deposit, go to the Transaction List (via POS) and locate the original Sale.
This sale will have two payment types, i.e. Cash/EFTPOS and "Deposit used".
Click Details next to the sale with the deposit used that you are looking to refund:
Now select "Refund Transaction" to begin the refund process:
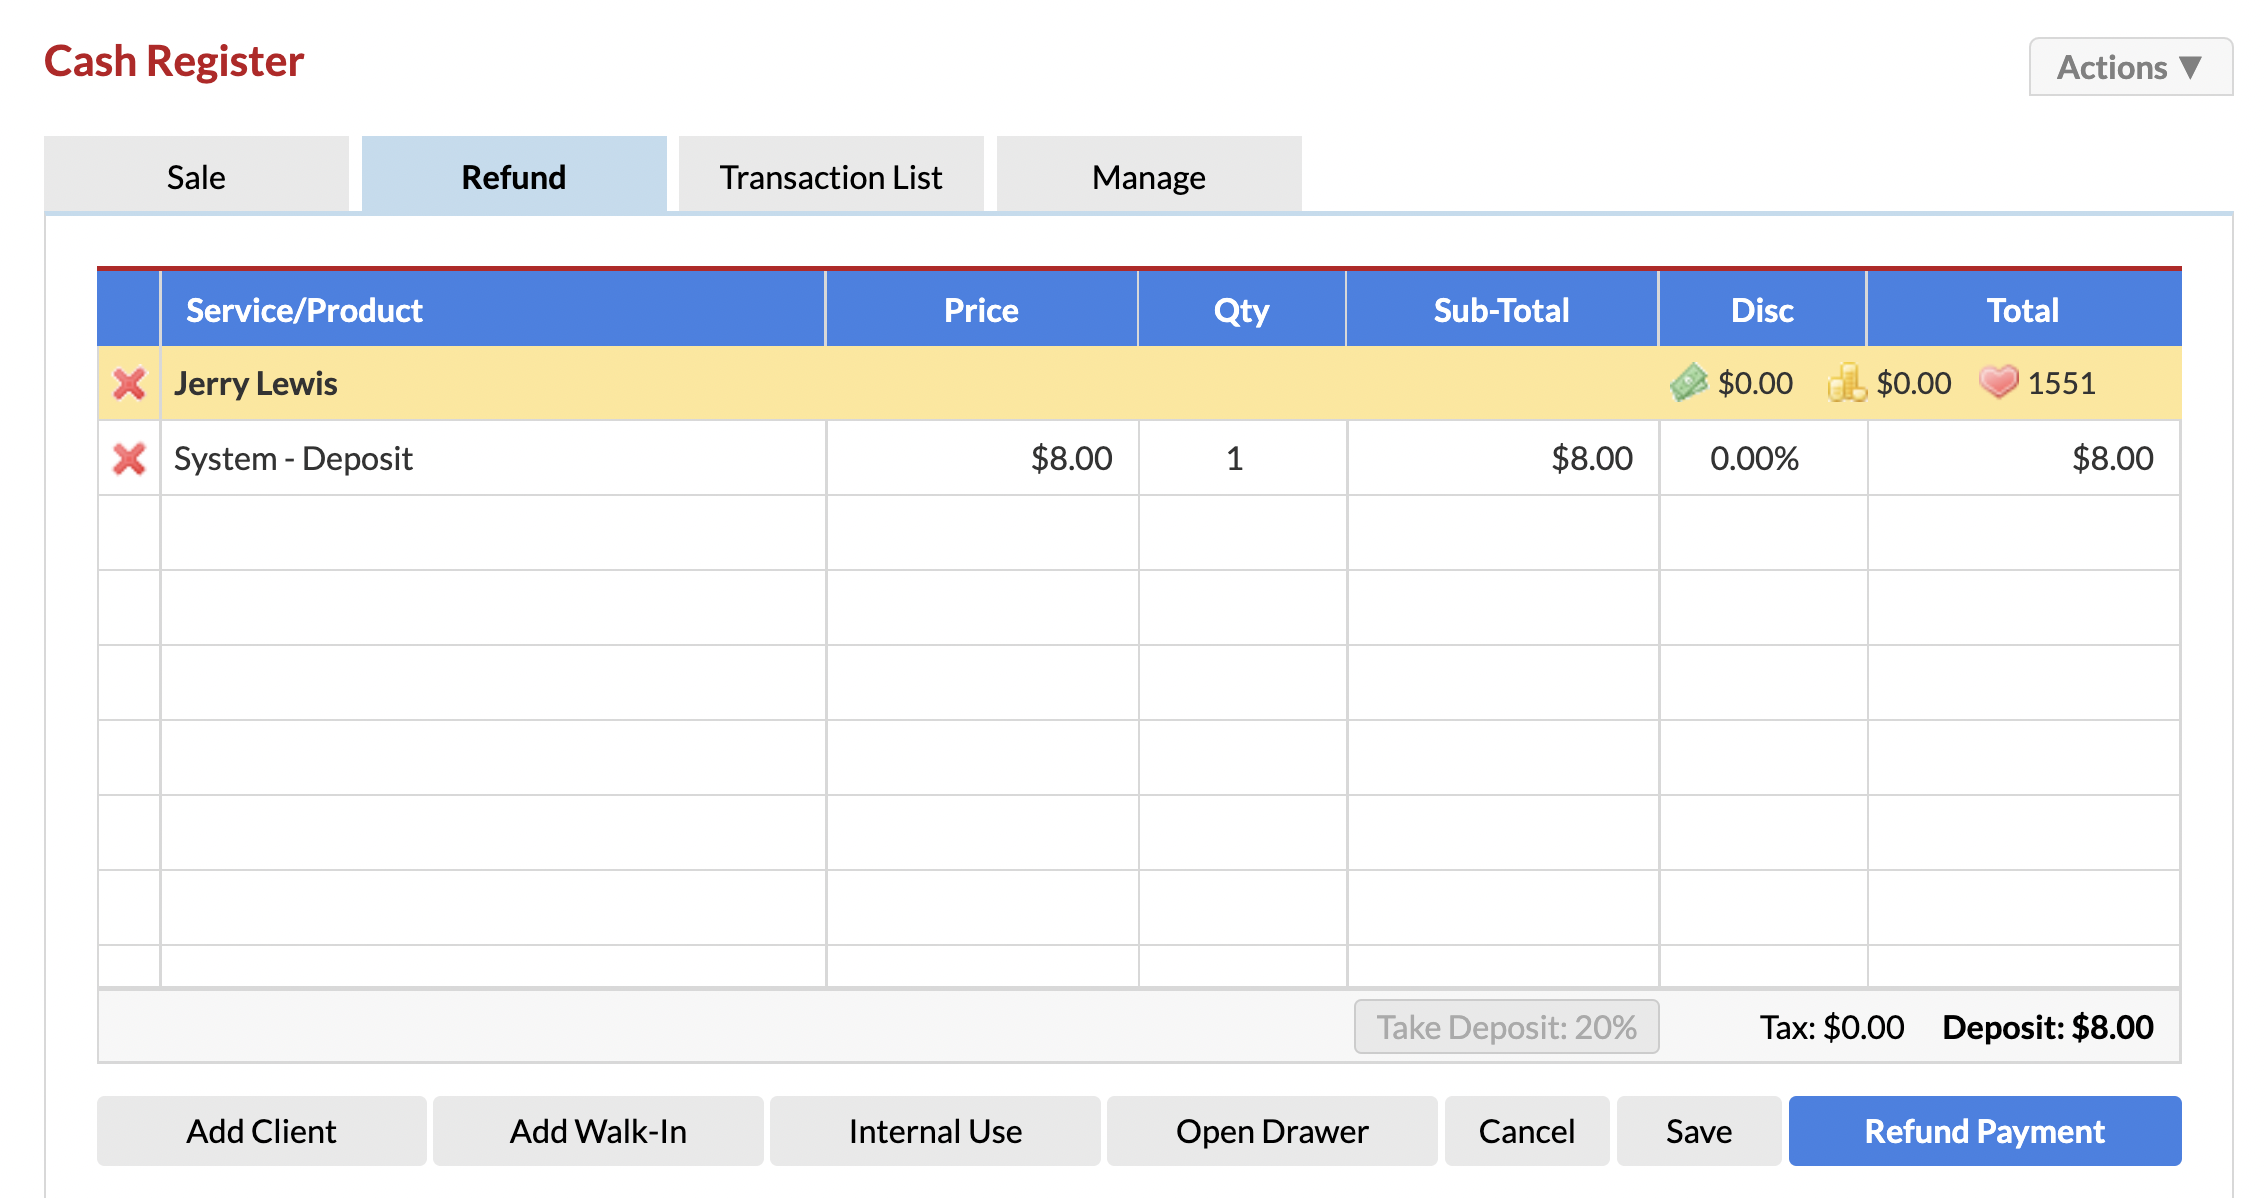
The items from the original transaction will appear in the POS Refund list:
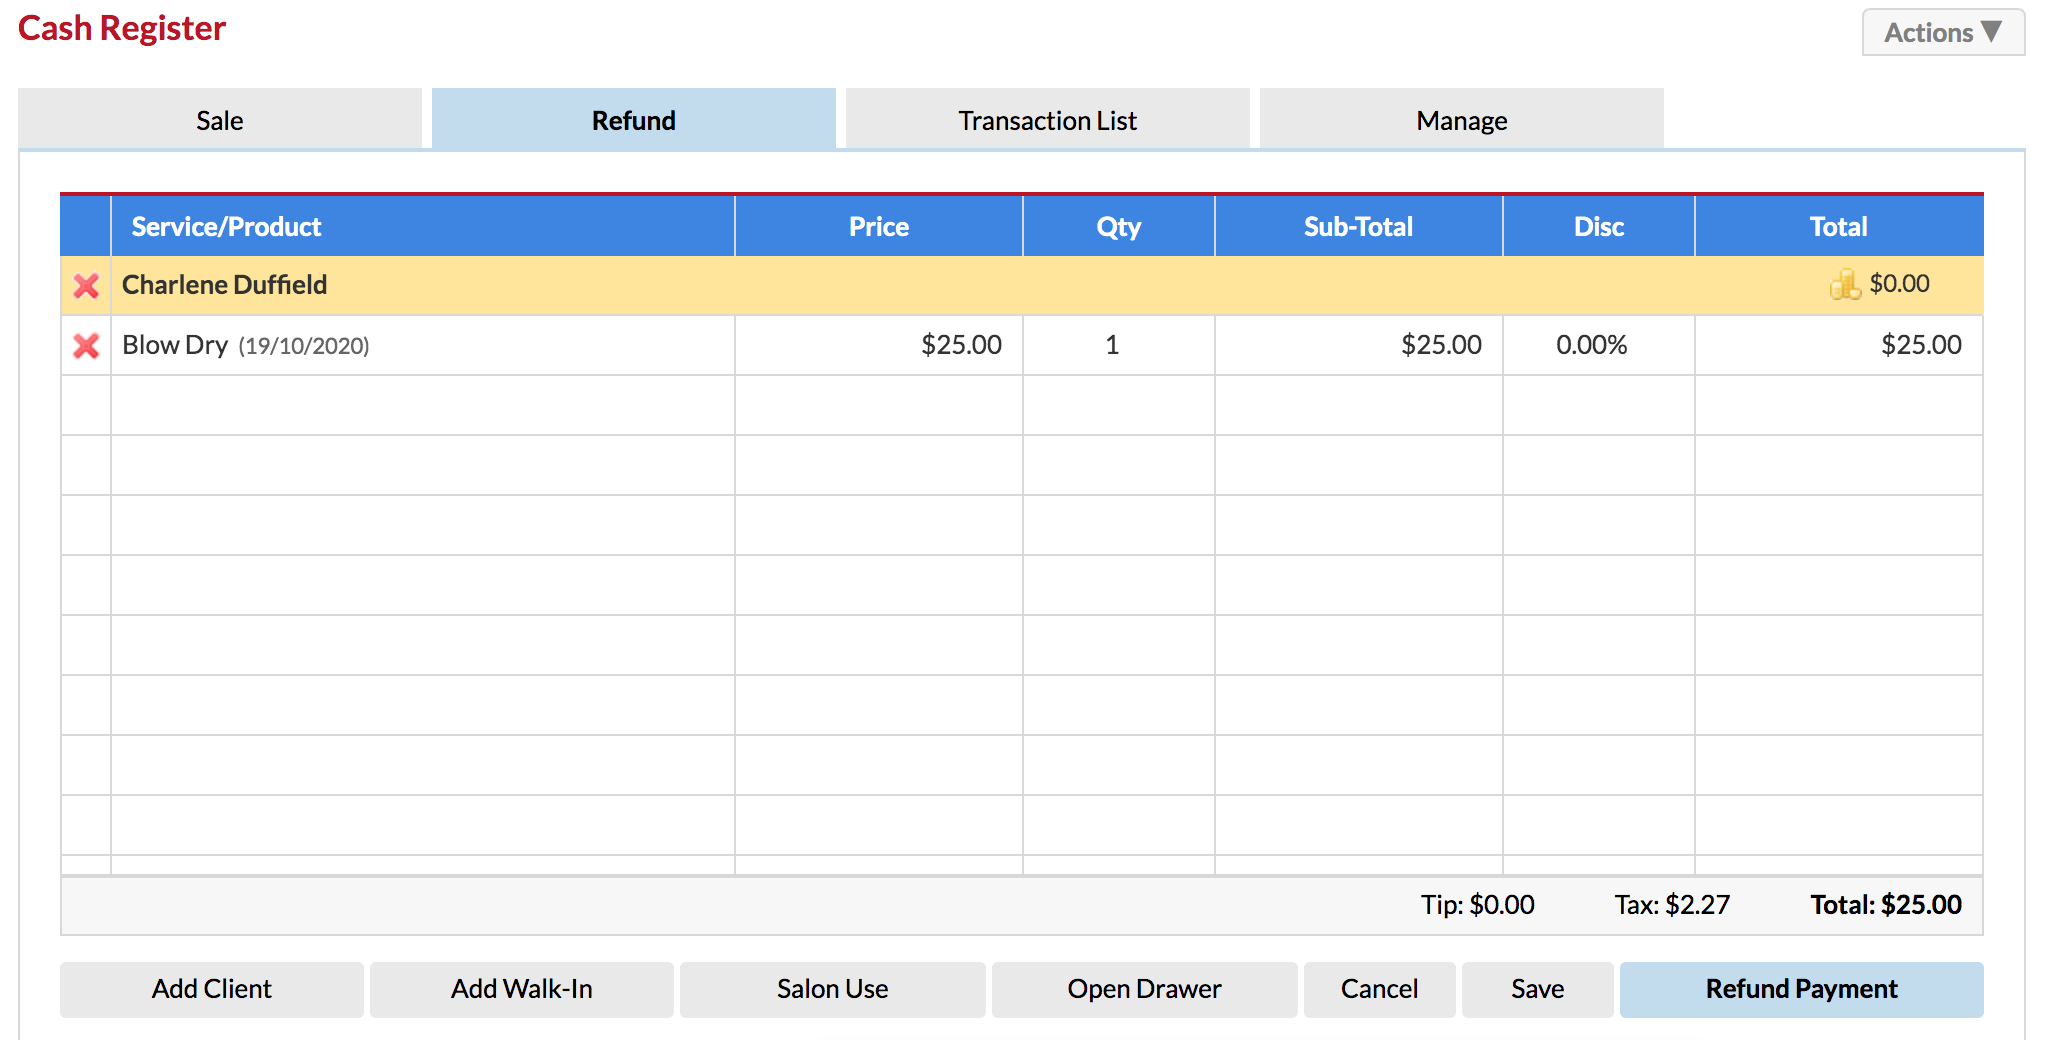
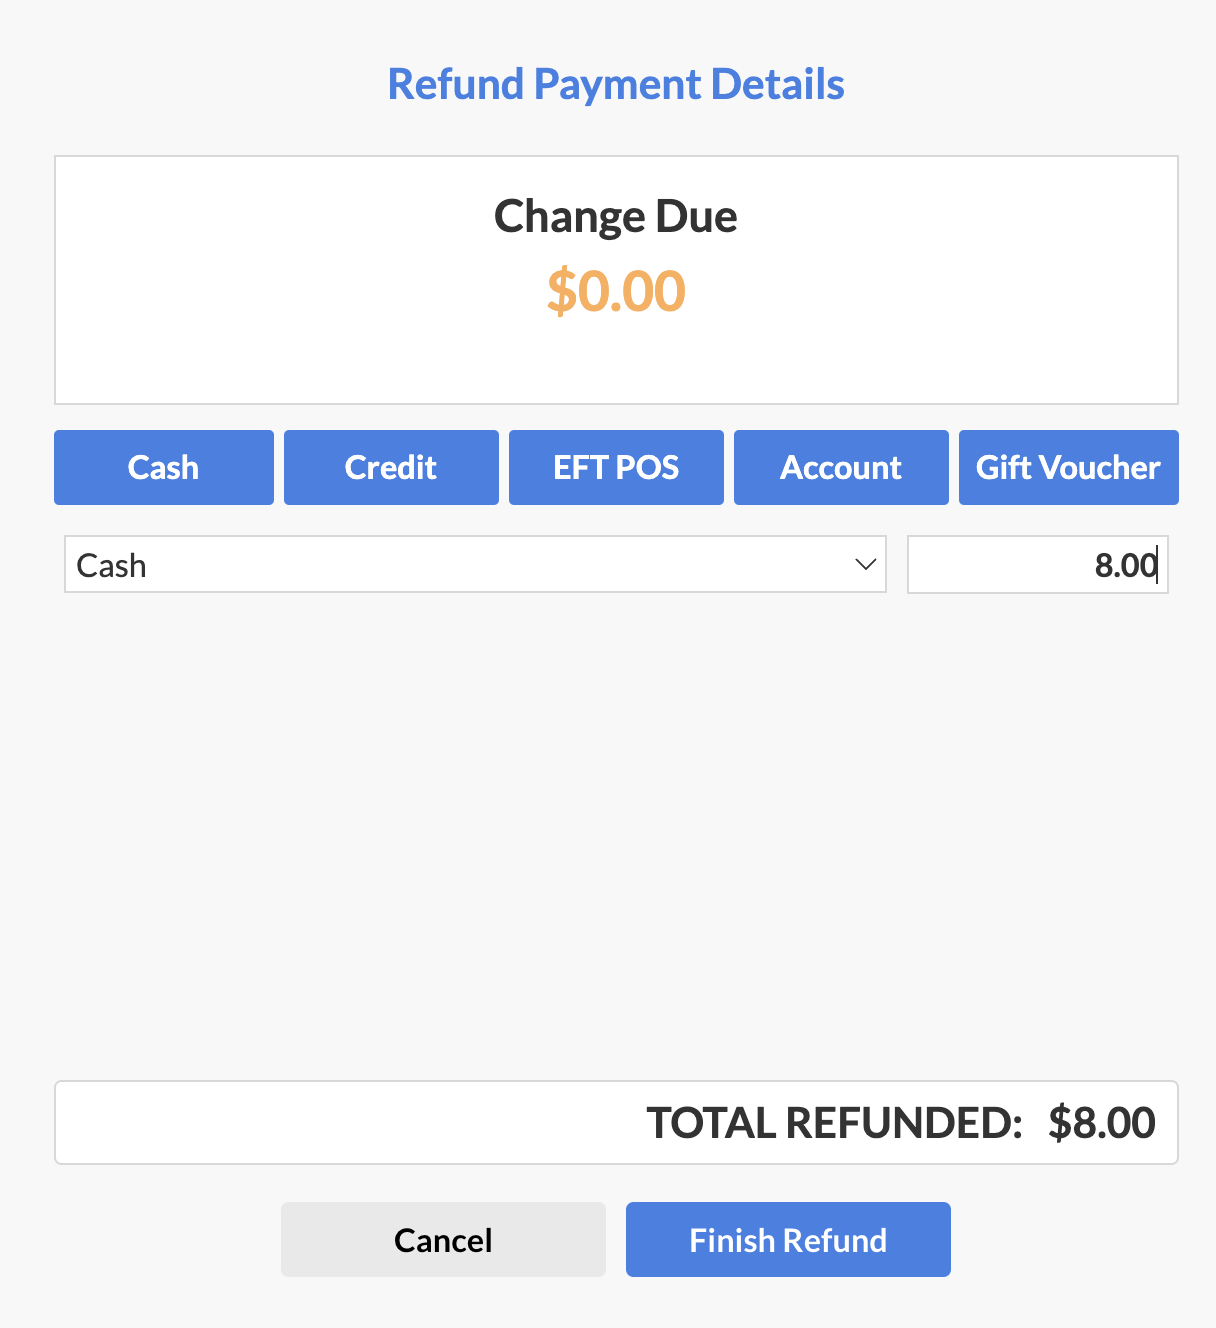
By selecting Refund Payment, you'll see the original way they paid, and the Deposit that was processed with the sale:
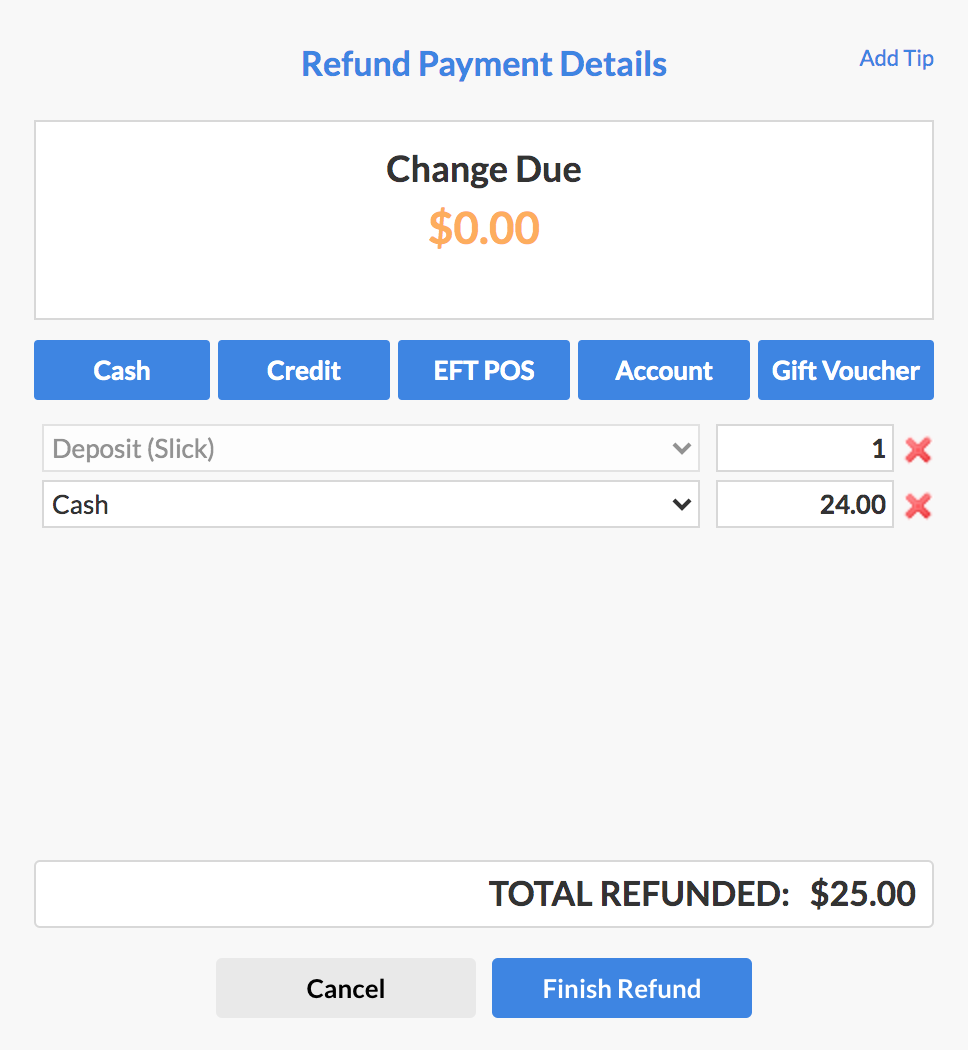
Select Finish Refund to complete the refund process. You can view this refund from the Transaction List (via POS).
If the client paid via Stripe Invoice, the deposit will be refunded back to the client's original deposit payment method.
Refunding the deposit only
If you are looking to refund a deposit that has not yet been used, you can navigate to the client's Client Card, go to the Actions menu and click on the Deposits ![]() option.
option.
Click "View" next to a deposit that has been "taken" (i.e. hasn't been "used" for an appointment yet):
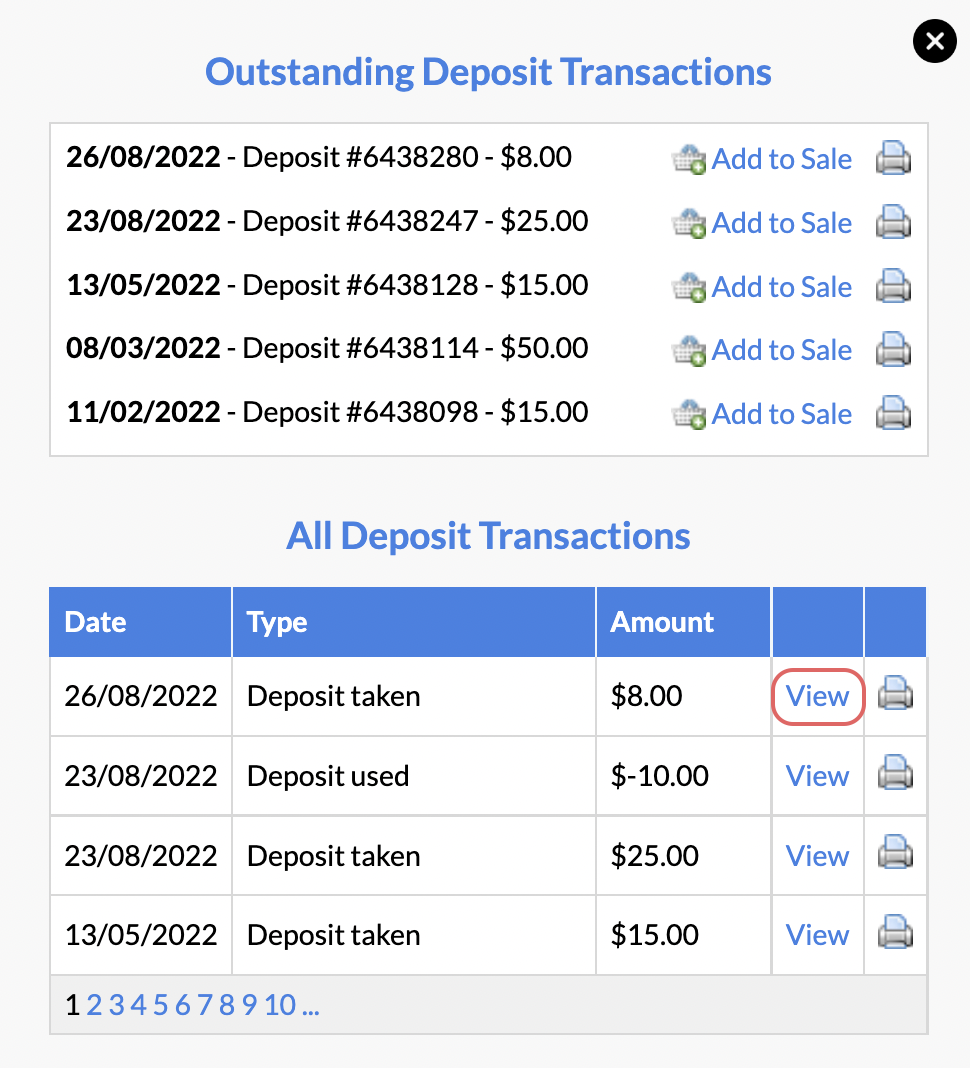
This will bring you to the original deposit transaction in your Transaction List, where you can go ahead and click Refund Transaction to refund the deposit back to their original payment method:
You'll be taken over to POS, where you can click Refund Payment. Their original payment method will already be selected:
Select Finish Refund and the deposit refund will process.
If they've paid via Stripe Invoice their deposit will be refunded back onto the original payment method.
Reporting
Liability Report
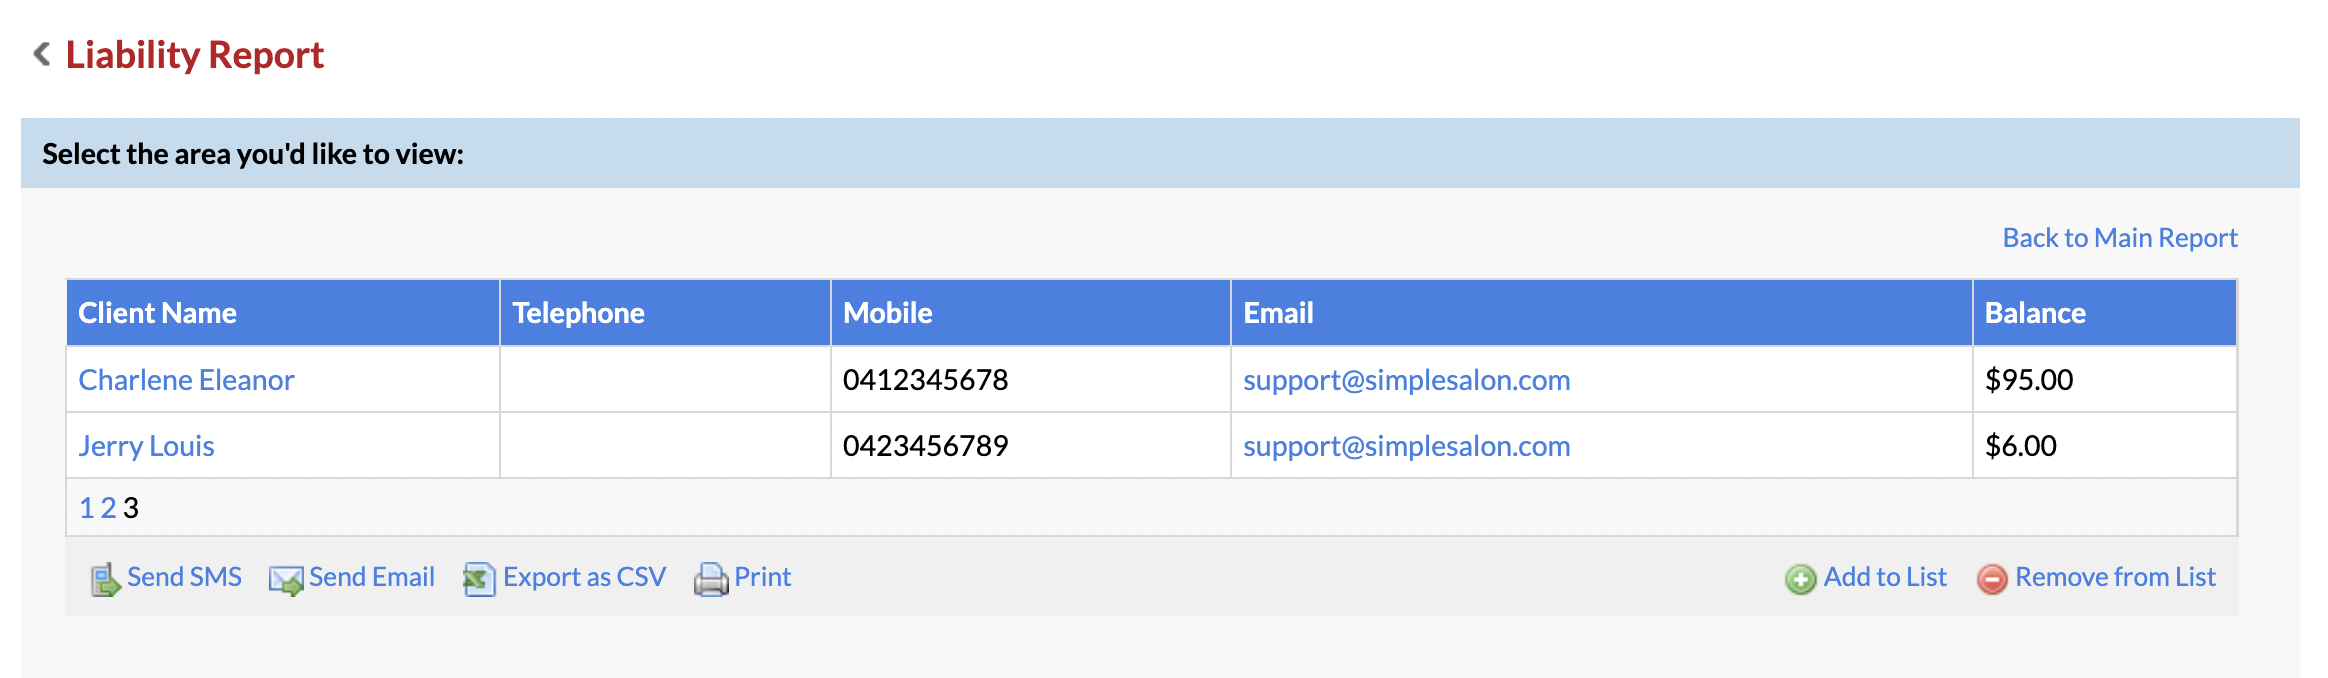
You can view a list of outstanding deposit balances from the Liability Report (from Reporting then in the Report List).
When in the Liability Report, click Show Details next to Deposit Liability:

This will give you a list of all clients that currently have an outstanding deposit balance. You can export from the Export as CSV button, or print this report via the Print button:
Sales Report
You can view Deposits figures via the Sales Report (Reporting > Report List). You will be able to view the following specific figures relating to your Deposit transactions:
- Total Revenue from Deposits Retained
- Total Deposits Received
- Total Deposits Used
Transaction Report
If you need to look for a specific Deposit transaction, you can go to the Transaction Report (via Reporting > Report List) and use the Payment Type and Type Filters:
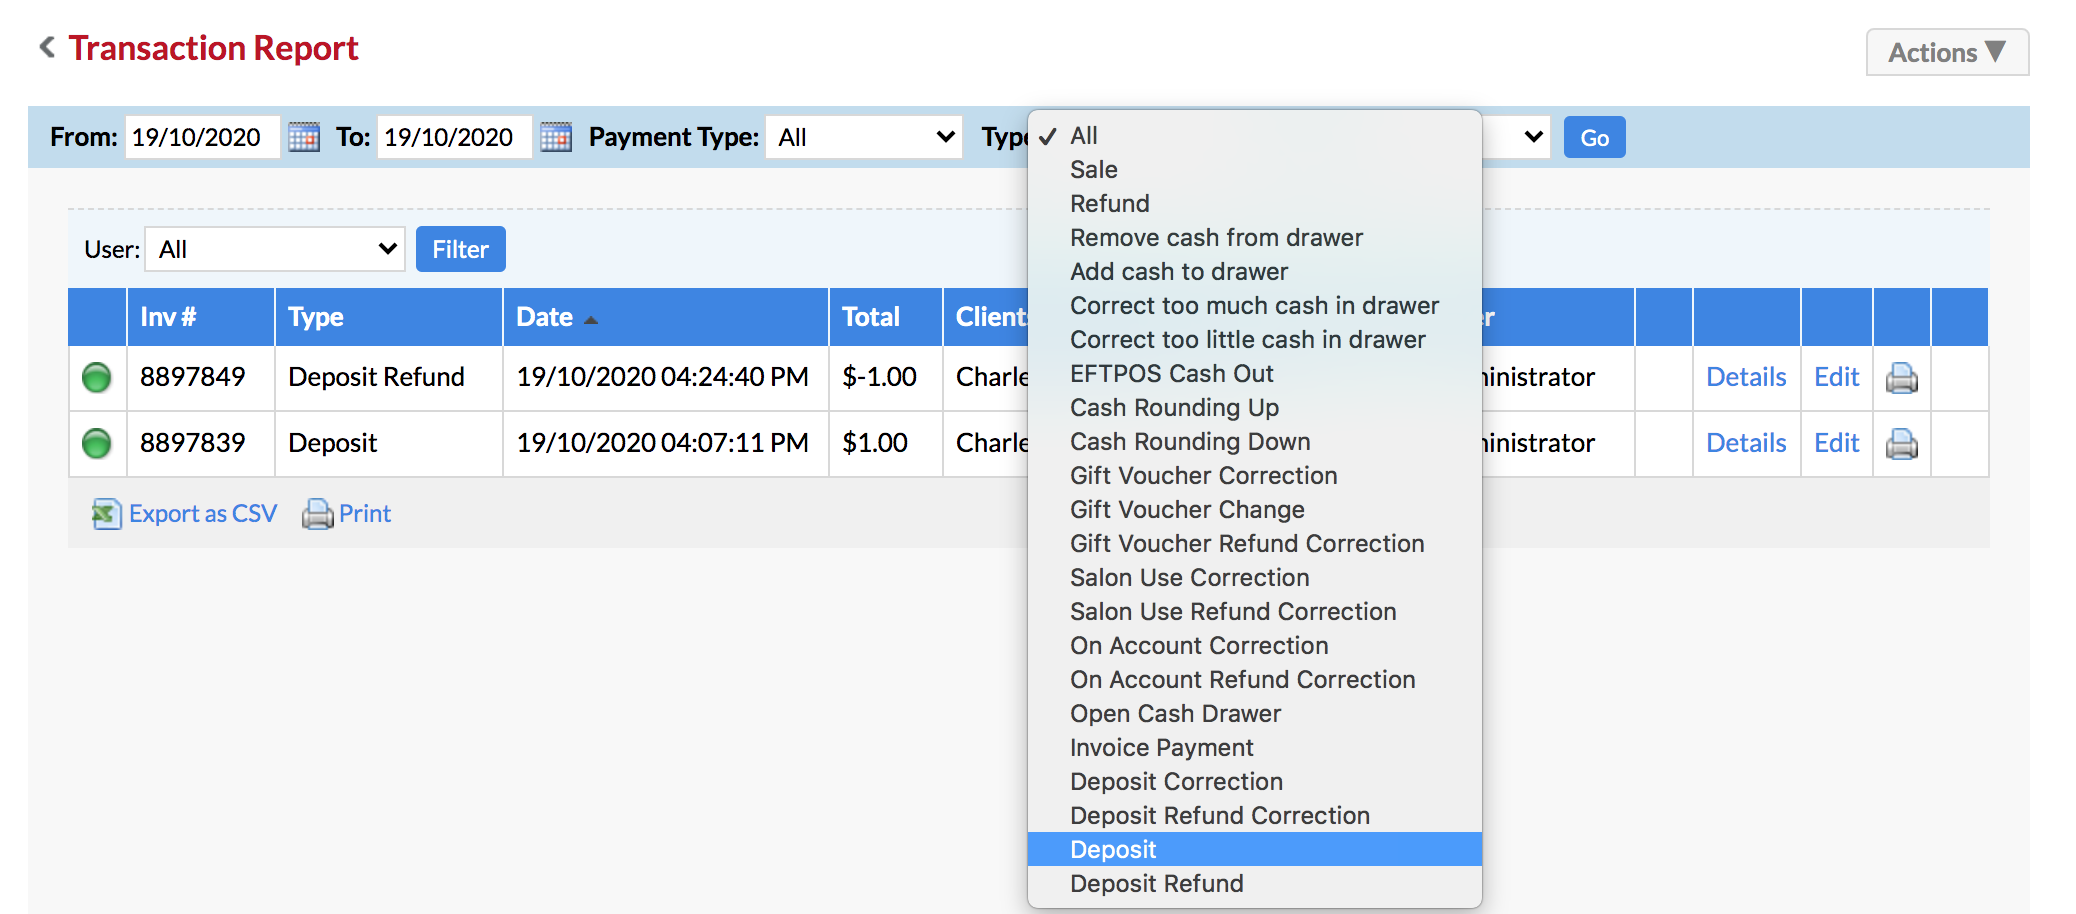
You can filter by the Payment Type, and filter the Type by either:
- Deposit
- Deposit Correction
- Deposit Refund Correction
- Deposit Refund
If you have any questions, please send them to us via the Submit a Request option in your Help & Support page.