Step One: Ensure your receipt printer is connected via USB to your computer.
Step Two: Ensure your receipt printer is connected to your cash drawer.
The next steps you take will be dependent on the Operating System you are currently running, i.e. Windows or Mac:
MacOS (iMac, MacBook Air, etc.)
The link below will begin downloading a PDF guide which will show you how to setup a Receipt Printer to open the Cash Drawer on a MAC:
https://www.starmicronics.com/help-center/knowledge-base/how-to-open-a-cash-drawer-on-mac/
Windows (PC i.e. Windows 10, Windows 8.1, Windows 8, Windows 7, etc.)
Epson has kindly provided us with some instructions on how to set the cash drawer to kick.
Please follow this guide to set the drawer kick on the Printer Driver settings:
- On the PC, go to Devices and Printers
- Right click on the printer icon (For example, your printer name might be TM-T20)
- Select Printing Preferences
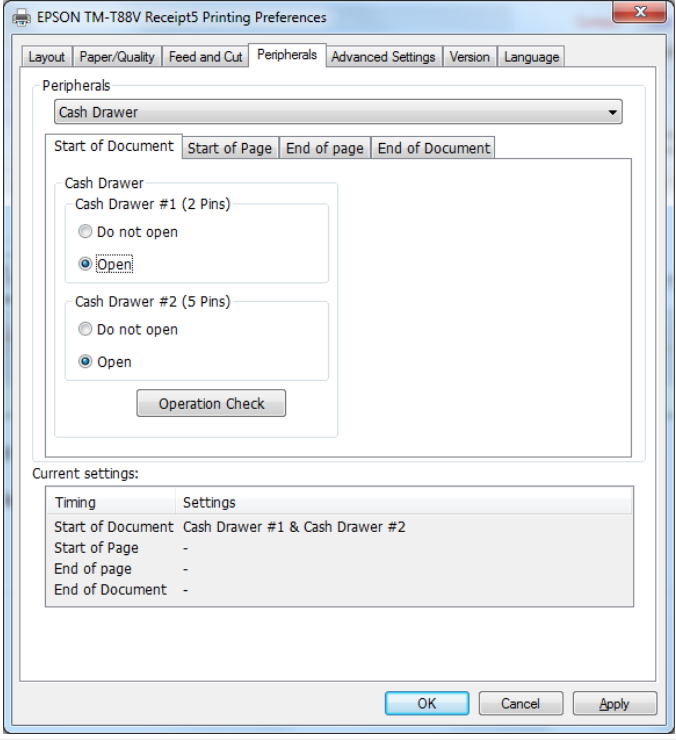
- Go to Peripherals tab
- Select 'Open' on both Cash Drawer #
- Hit Apply at the bottom, then OK to Close
***refer to the attached image

Still having trouble?
If you need any further assistance in connecting the POS Hardware, it's best to contact the supplier—they're the pros who are best equipped to assist you.
If you have any questions, please send them to us via the Submit a Request option in your Help & Support page.