If you need your clients to fill out a consultation form prior to their appointment, it is likely you want the form to be contactless. Our Development team is working on creating consultation forms that you can use through Simple Salon—but in the meantime you can still utilise third party programs in combination with Simple Salon to get information from your clients.
You can use a form making program, like Google Forms, which provides you with a URL link that can be sent seamlessly to your clients via 1 Touch Marketing. They will simply fill out the form on their device, and their answers will be sent back to you immediately.
To create a form using Google Forms, you will be required to make a Gmail account if you don't have one already. This allows you to view and share client responses. However it is not necessary for clients to have a Gmail account, as this is an optional setting. (Note: Google Forms will require the client to have access to internet to be able to fill out the form. Take this in to account if you choose to use Google Forms).
The following link will take you to the Google Forms homepage, where you can get started:
https://www.google.com.au/forms/about/
- Customising your Form
- Choosing Question Types
- Adding More Questions
- Form Settings
- Sharing Your Form
- Responses & Notifications
- Exporting Responses as a PDF then Uploading to Client Card
Customising Your Form
After you create a new blank form, you can give it a bit of personality! Google Forms lets you customise the theme—allowing you to change the header, background colour, and font style.
Click the palette at the top of the screen—the Theme Options menu you will appear, where you can customise:
- The header (choose a header image from one of the stock photos provided or upload one of your own)
- The main colour of the form
- The background colour (these colours are based off of your theme or the main colours in your header)
- Font style
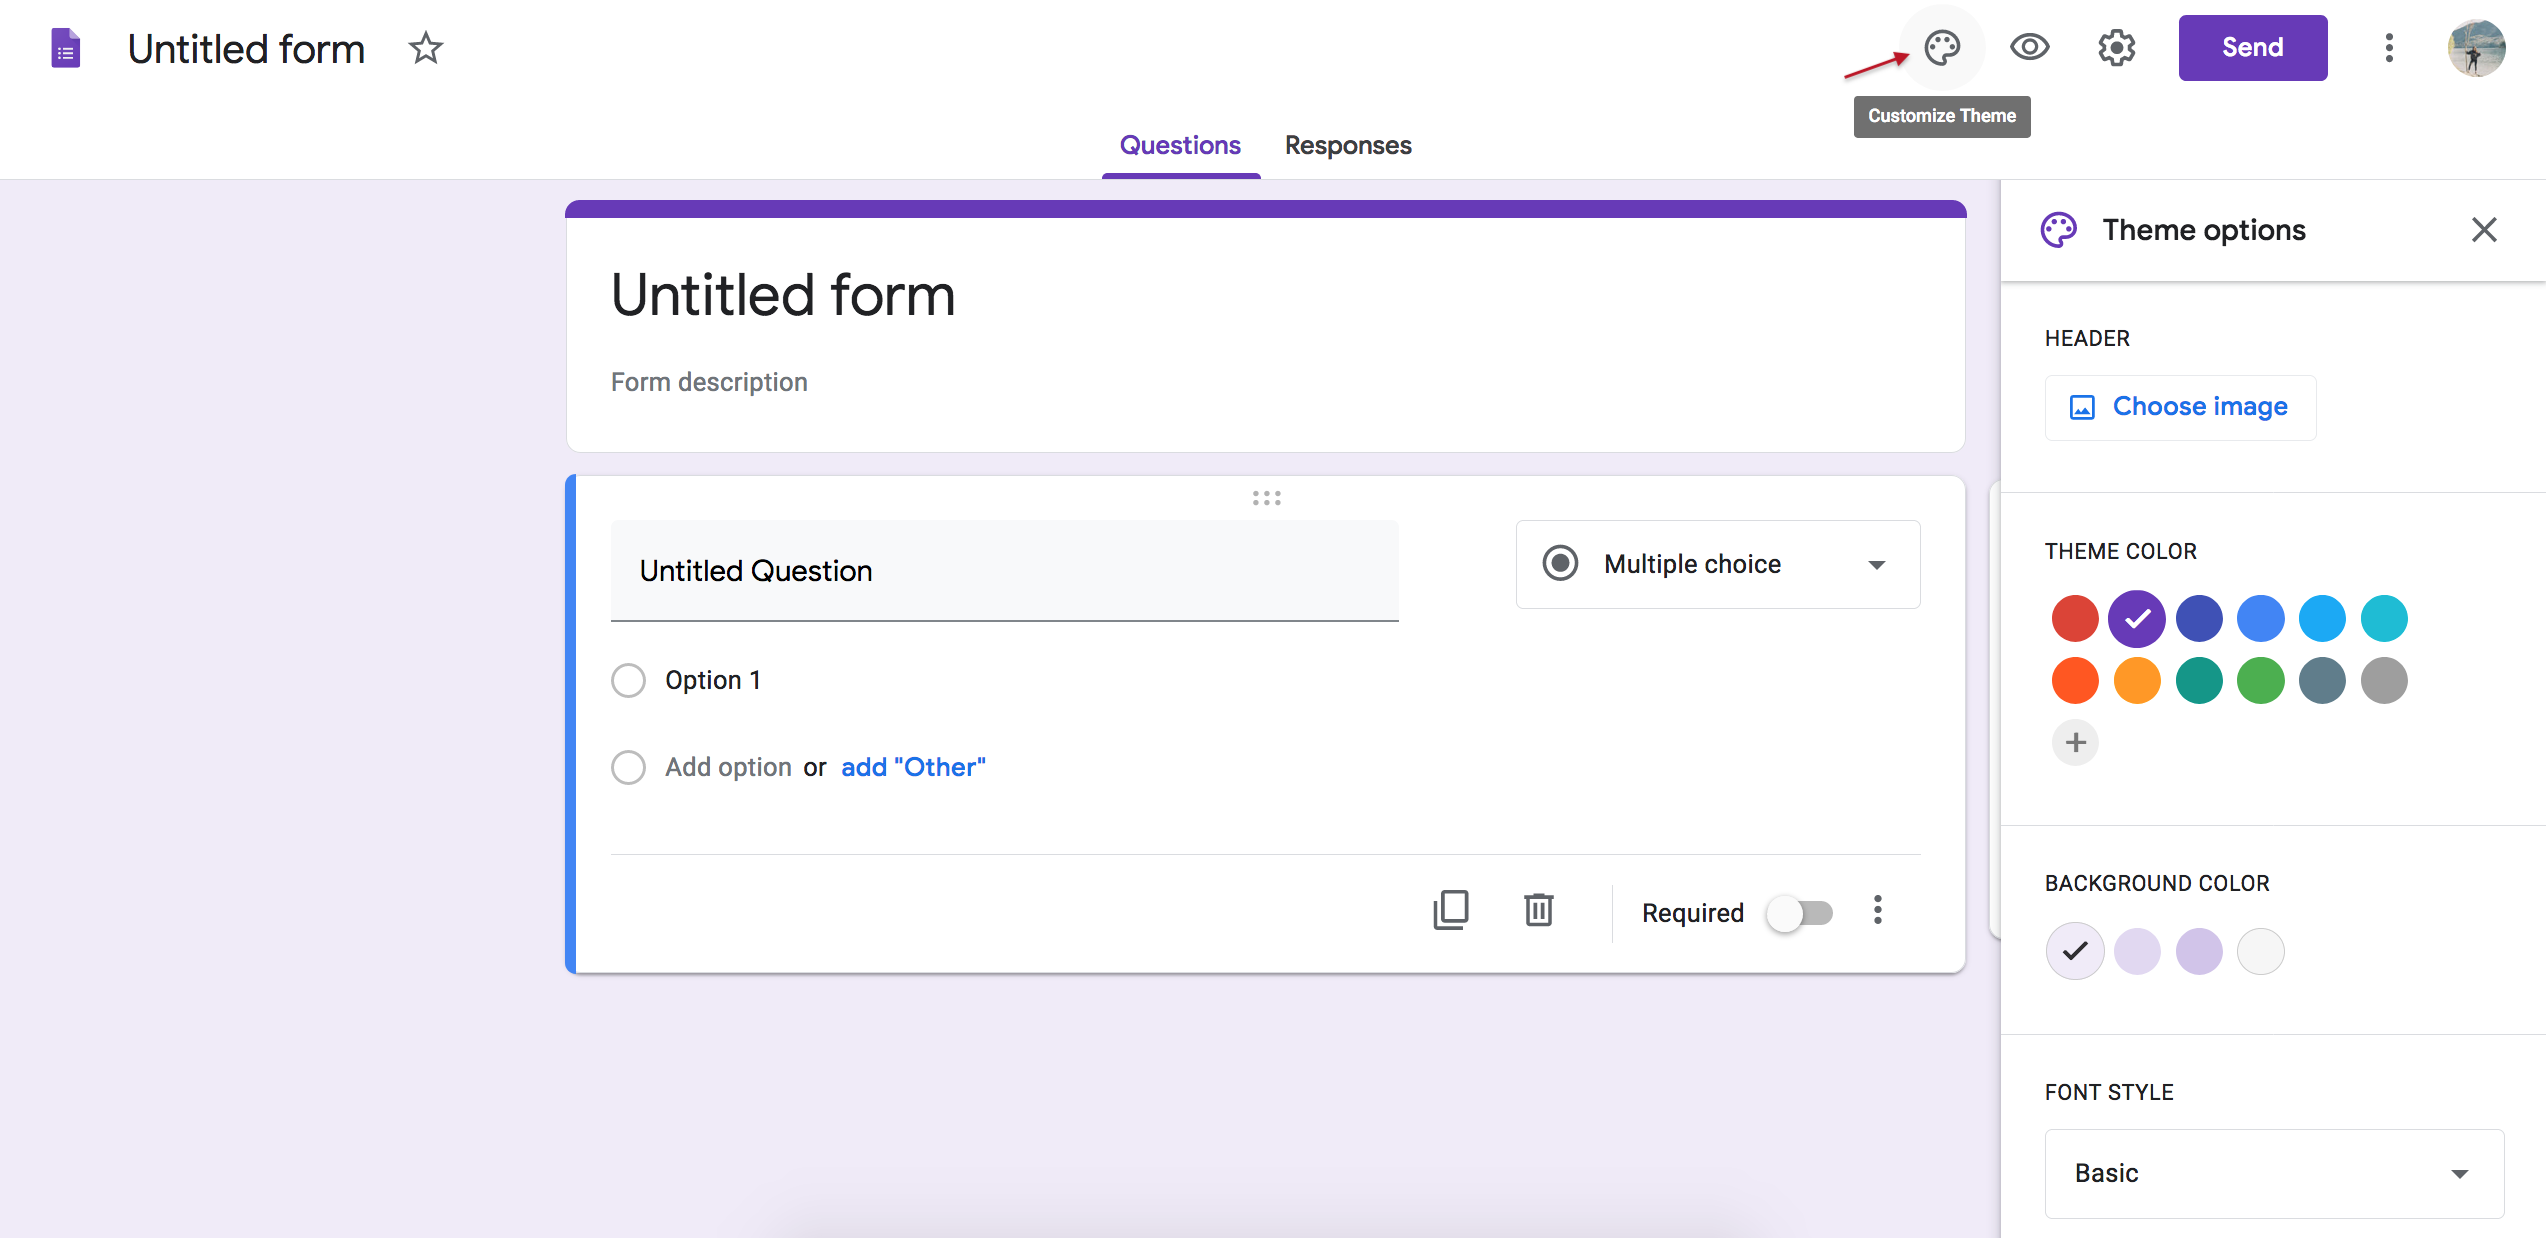
After you customise your form, close the theme options to return to your survey. These options will automatically save.
Choosing Question Types
When you create a Google Form, you can choose the types of questions you want your customers to answer. You could have essay-length responses or multiple choice—you can create your ideal form in just a few minutes.
Click the drop-down menu next to the question field:
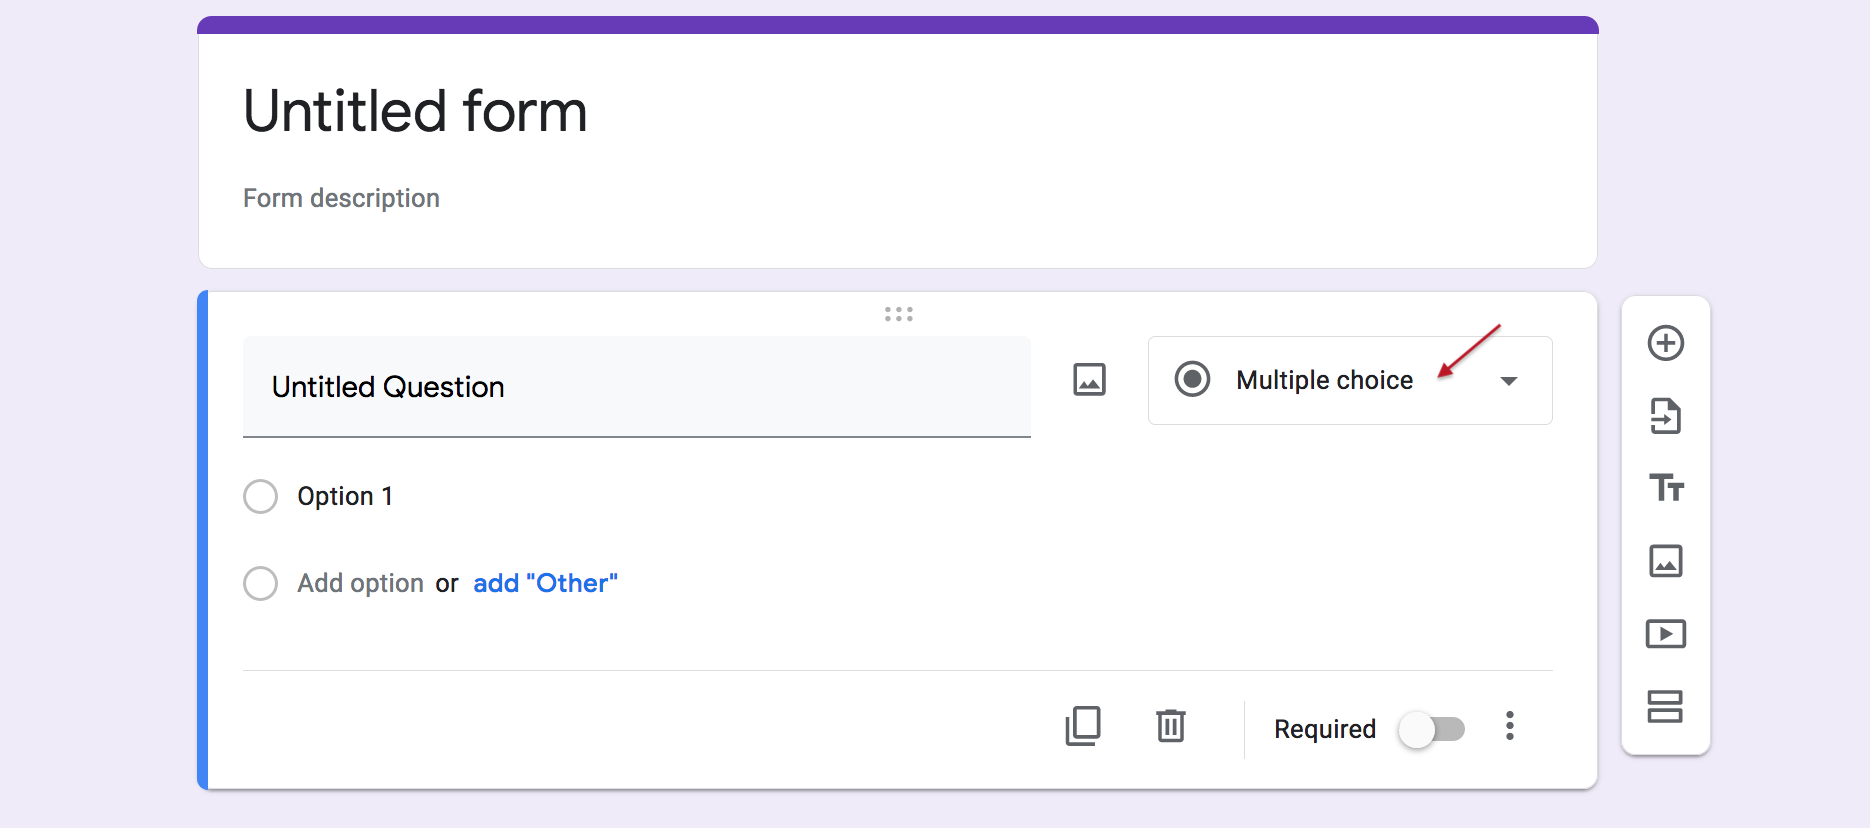
Then, select the type of question you want from the list:
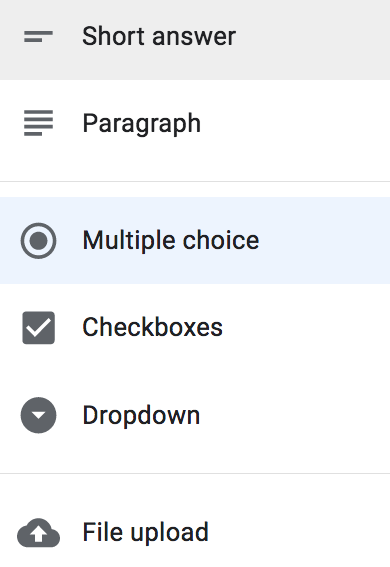
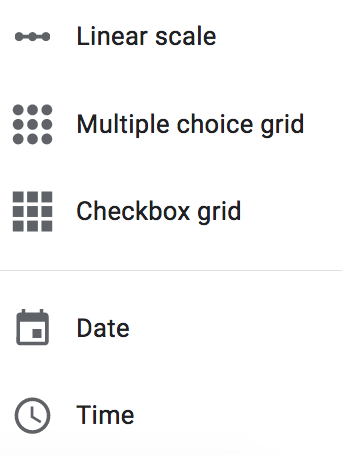
Your choices are:
- Date: Client must choose the date as an answer to the question. The default is day, month, and year.
- Time: Client must choose the time of day or a duration of time.
- Short Answer: Responses that only require a few words, e.g. an email address (you can set rules clients have to follow in their answer with data input validation).
- Paragraph: Responses that require long-form answers (one or more paragraphs). Data input validation is also available for this type of response.
- Multiple Choice: Choose between a set of options (one per question). You can include “Other” as an option so clients can input a short answer.
- Check box: Choose one or more of a set of options, including the “Other” option for a short answer (depending on a person’s answer, you can send them to a different section of the form).
- Drop-down: Choose answers from a set of options in a drop-down menu (one per question). (you can also send clients to another section of the form depending on the answer)
- File Upload: This allows your client to upload a file in response to a question. Uploaded files use Google Drive space for the survey owner. You can specify the size and type of files people can upload.
- Linear Scale: Question is rated on a scale that starts at 0 or 1, and ends on a whole number from 2 to 10.
- Multiple Choice Grid: This creates a grid from which clients can select one answer per row. Optionally, you can limit answers to one choice per column and shuffle the row order.
- Checkbox Grid: This option creates a grid from which clients can select one or more answer per row. Optionally, you can limit answers to one choice per column and shuffle the row order.
It is clear that some of these options may not be relevant for the type of form your creating, so just make sure you're choosing the most appropriate options. For example, in the case of a consultation form, it's unlikely you would use the Linear Scale.
In the below example, you can see that we've given our form a name, and have added in the first question. The answer we require shouldn't be too long, so we've given it a Short Answer question type:
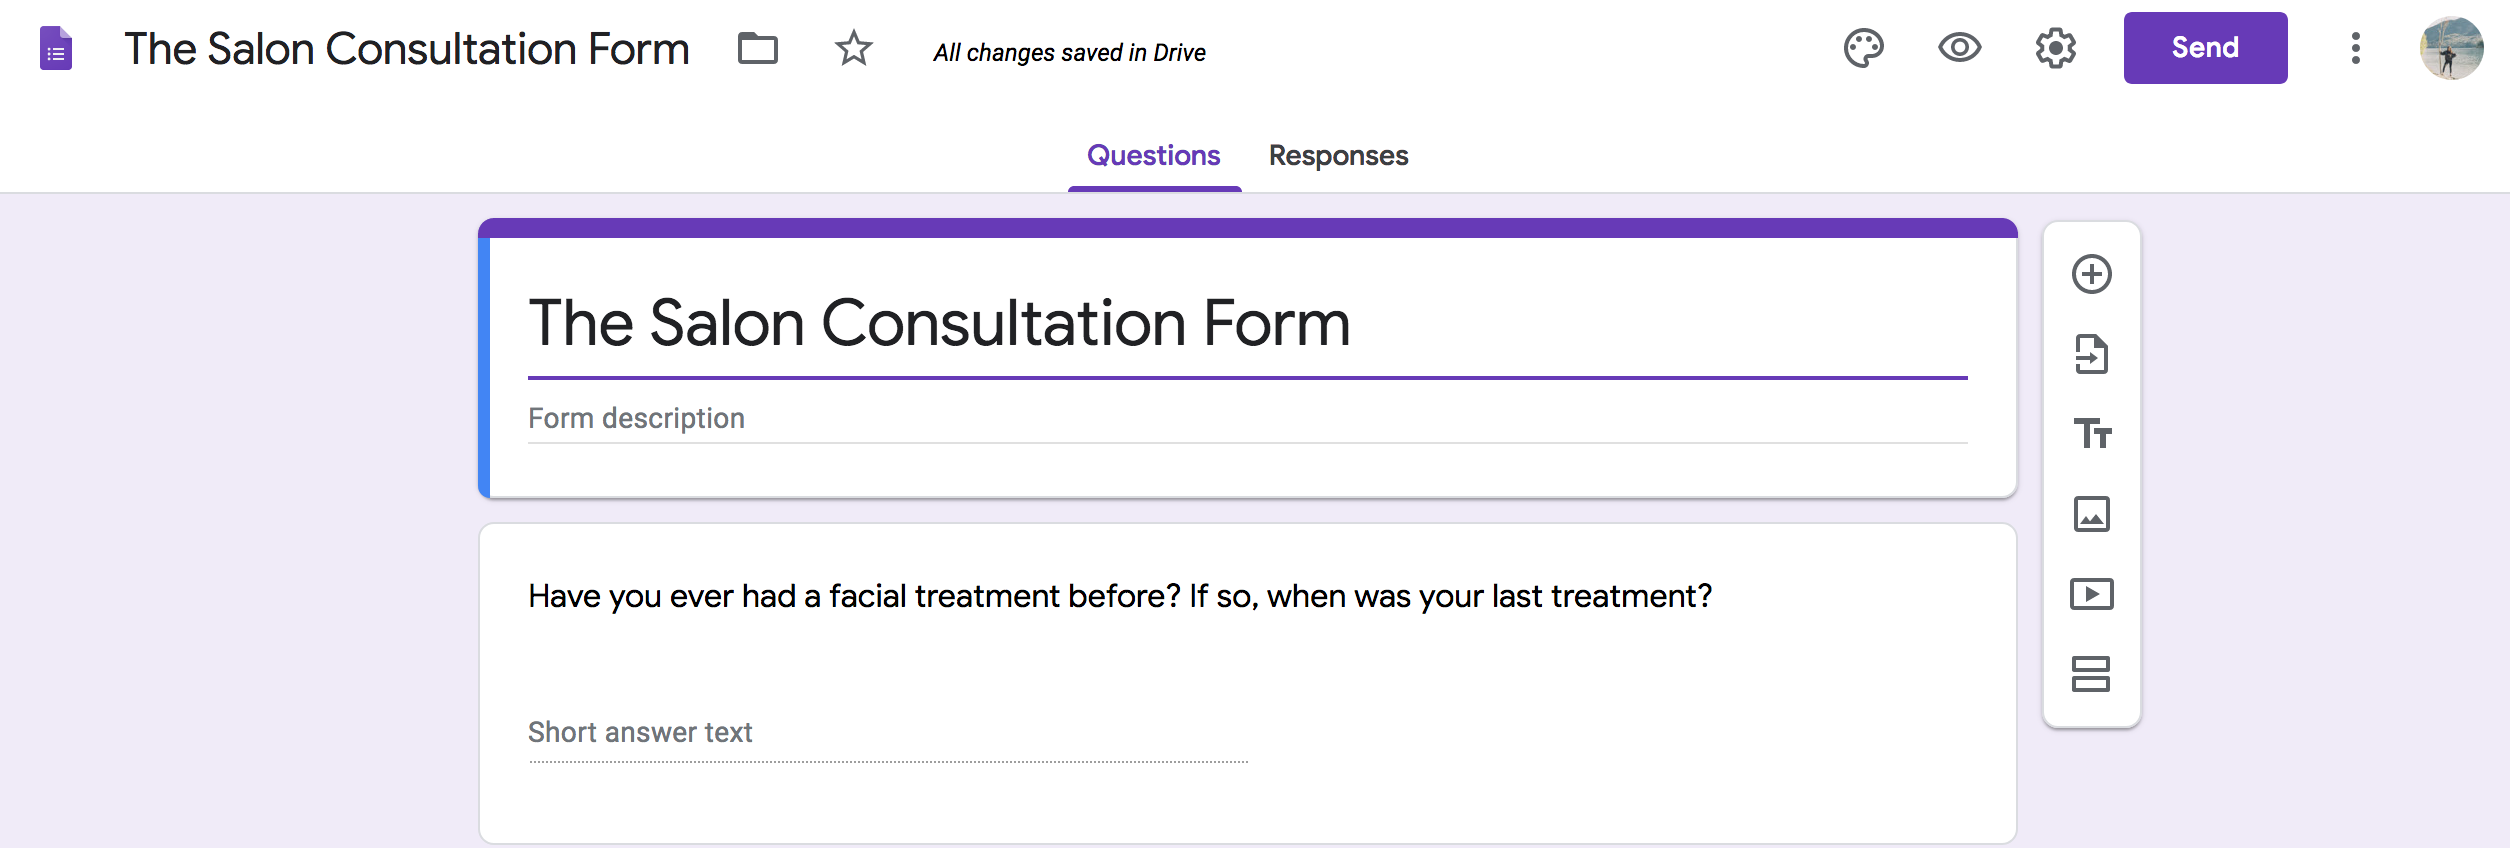
You may want to start the form off by getting the client's details, such as their Name, Date of Birth, etc. This will make it easier later on when you need to locate their response. We'll also show you later on how to automatically collect client's email addresses via settings.
Adding More Questions
Google Forms makes it super-easy to add as many questions as you want, and you can vary the types of questions. You can also separate them into sections, so everything doesn’t appear on a single page.
To add more questions to your form, click the plus sign (+). To add another section to separate your questions, click the icon that looks like two rectangles:
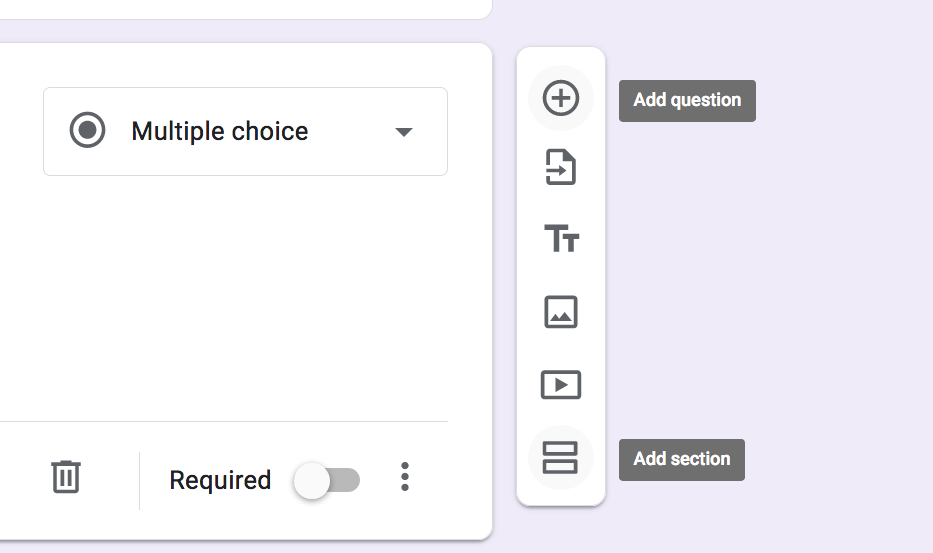
You can keep adding questions until you're satisfied:
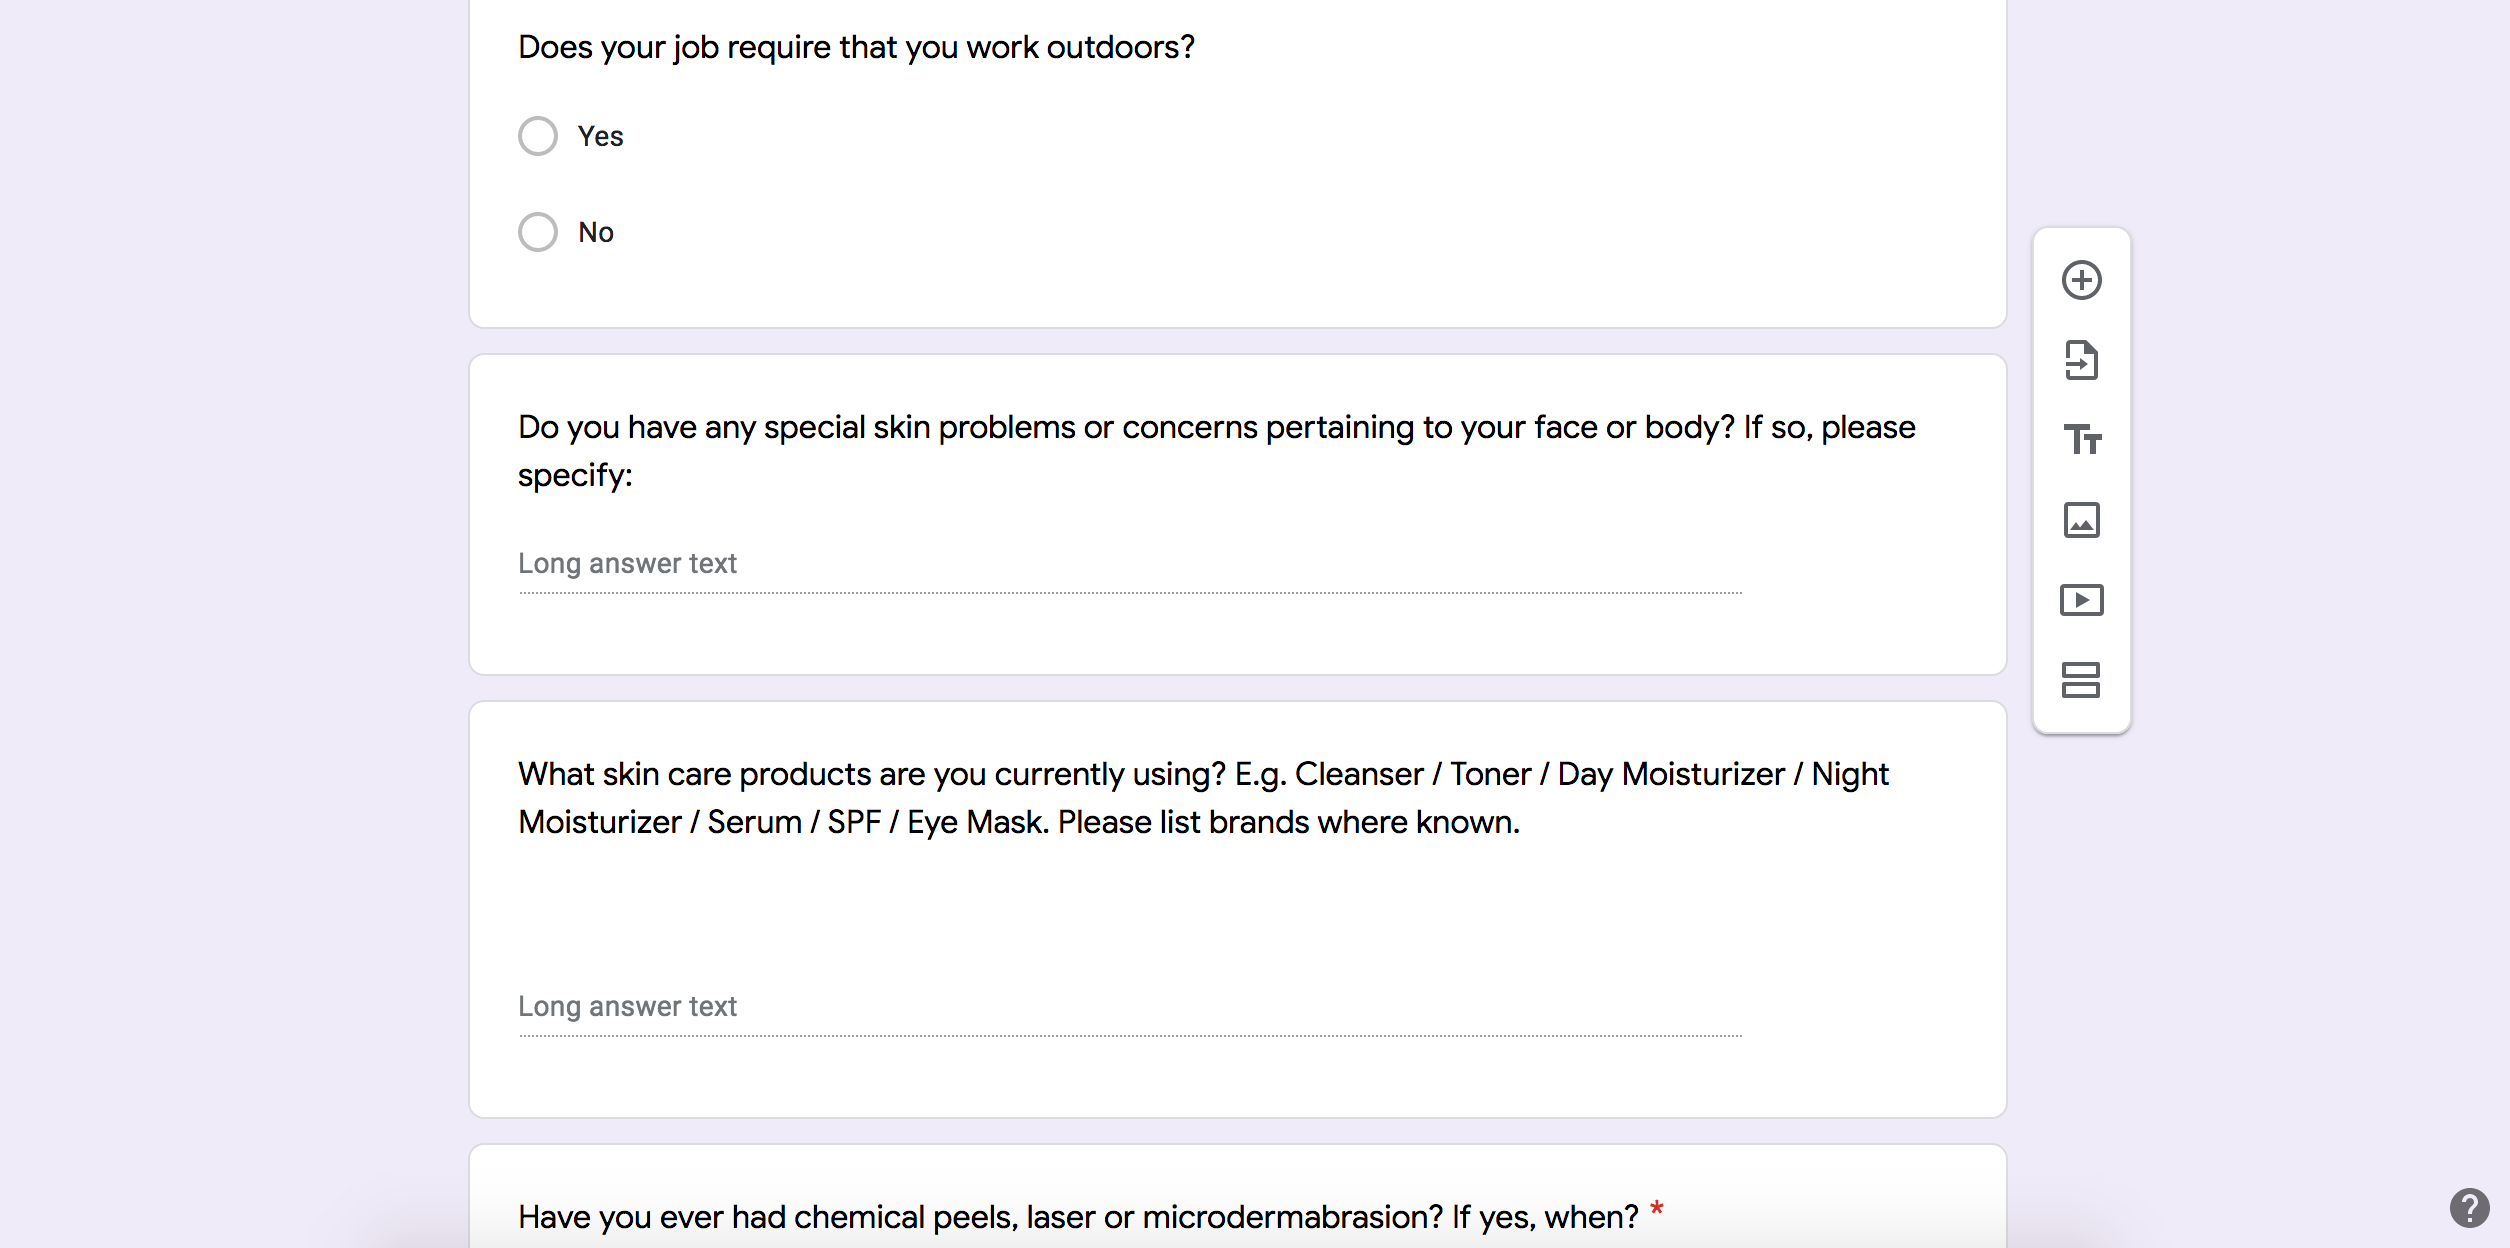
You can also tick whether or not you want the question to be required to be answered by the client:

Form Settings
Before you share your form with everyone, be sure to check out the settings via the cog wheel at the top of the page:

From here, you can collect email addresses, create a confirmation message, limit responses to one per person, and more.
The General tab has a few settings you can enable. From here, you can collect client email addresses and limit each person to one submission. You can also choose whether your clients can edit their answers after they’re submitted:
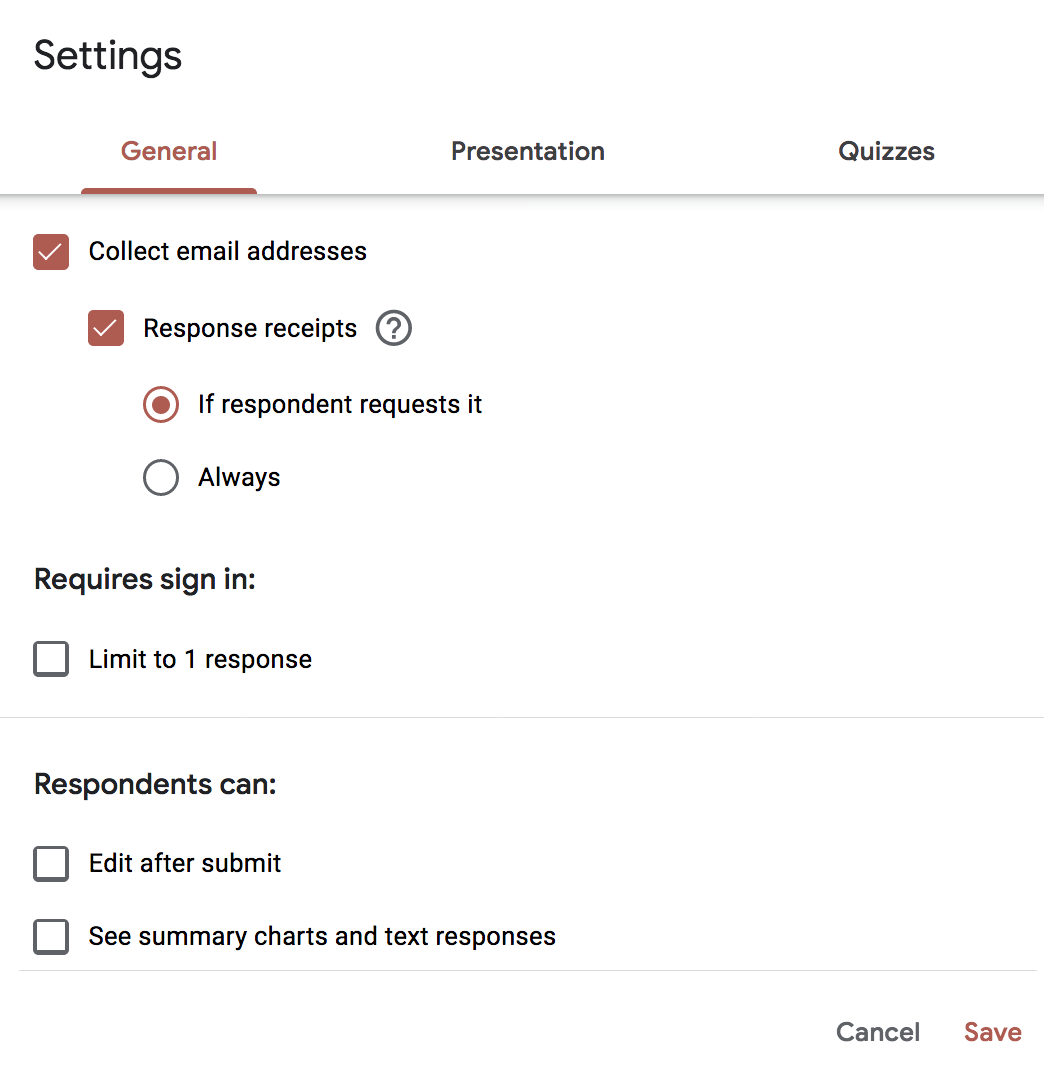
Note: If you enable “Limit to 1 response,” your client must log in with a Google account to access your form. Anyone without a Google account won’t be able to submit answers to your form. Unless you’re sure everyone has a Google account, leave this option disabled.
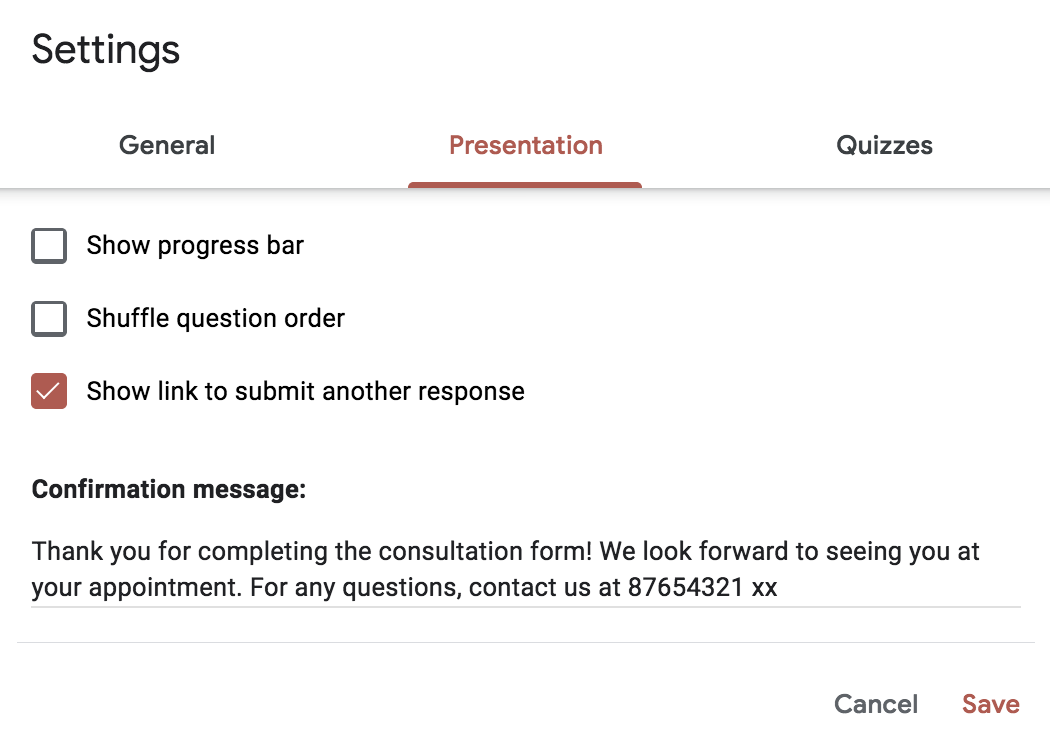
On the Presentation tab, this is where you can write your confirmation message that clients will read after they've completed the form:
Sharing Your Form
After you’ve completed creating your form, you can share it to your customers via email, a direct link, on your social media account, or you can embed it into your website.
In this case, we're opting to send them a URL link, which they can click to answer and send back to you. Google Forms is mobile friendly too, so it's easy for everyone to use.
To get sharing, open the form you want to share, and then click Send.

Choose how you want to share your form from the options at the top of the pane. From left to right, your choices are: email ![]() , direct link
, direct link ![]() , an embedded link for your website
, an embedded link for your website ![]() , Facebook
, Facebook ![]() , and Twitter
, and Twitter ![]()
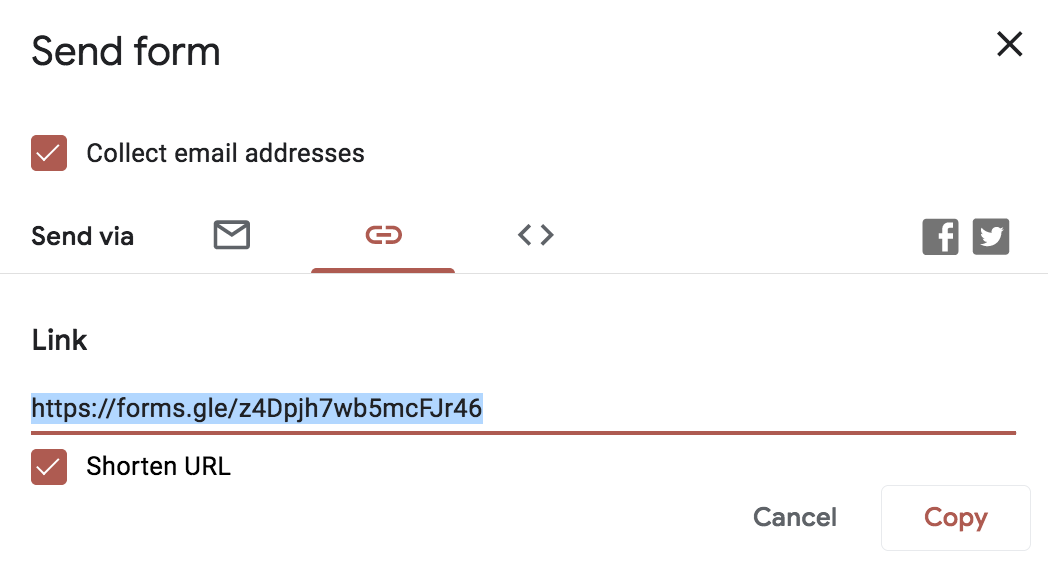
We've used the URL option, and have ticked the "Shorten URL" option so it uses less characters (this is important if you're going to be sending the link as an SMS). Now, we are going to add this link to our Appointment Reminders—so anytime a client receives an Appointment Reminder, the link will be included for them to fill out.
First we'll need to create the template, or edit an existing one to add in the URL link. If you don't yet know how to create custom templates, please checkout the following article:
Creating and Editing SMS & Email Templates
In the following example, we've edited an existing template to add an extra sentence for the URL link:
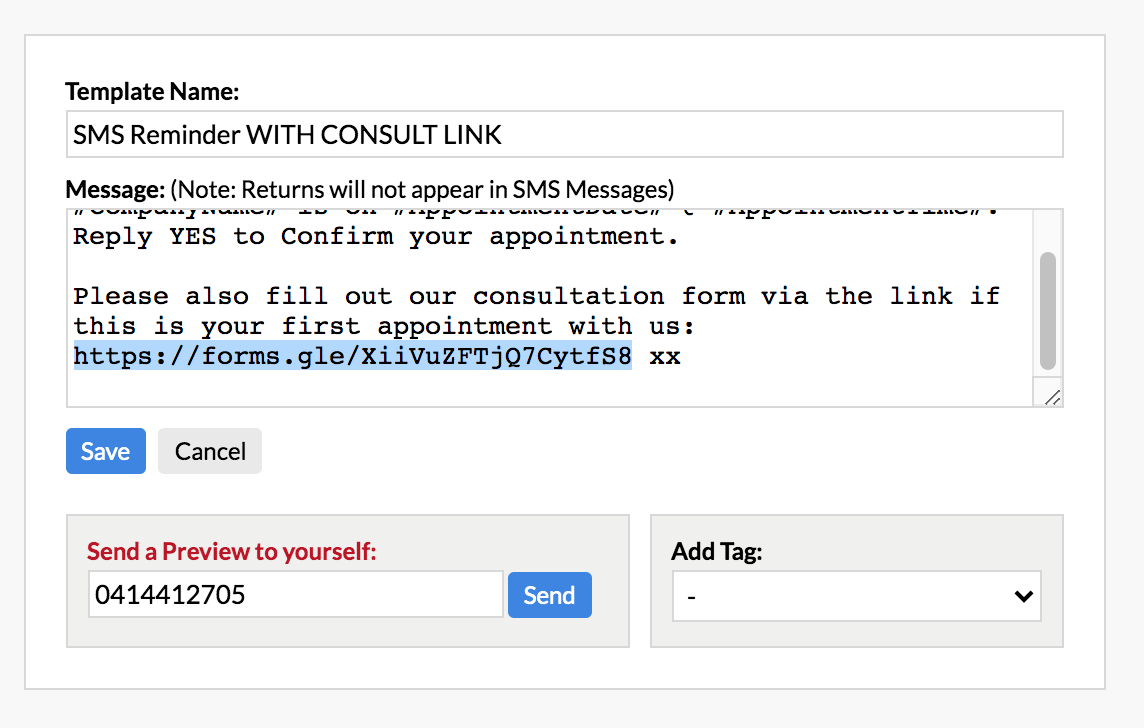
Make sure you send yourself a preview of your template with the URL, to ensure its working properly!
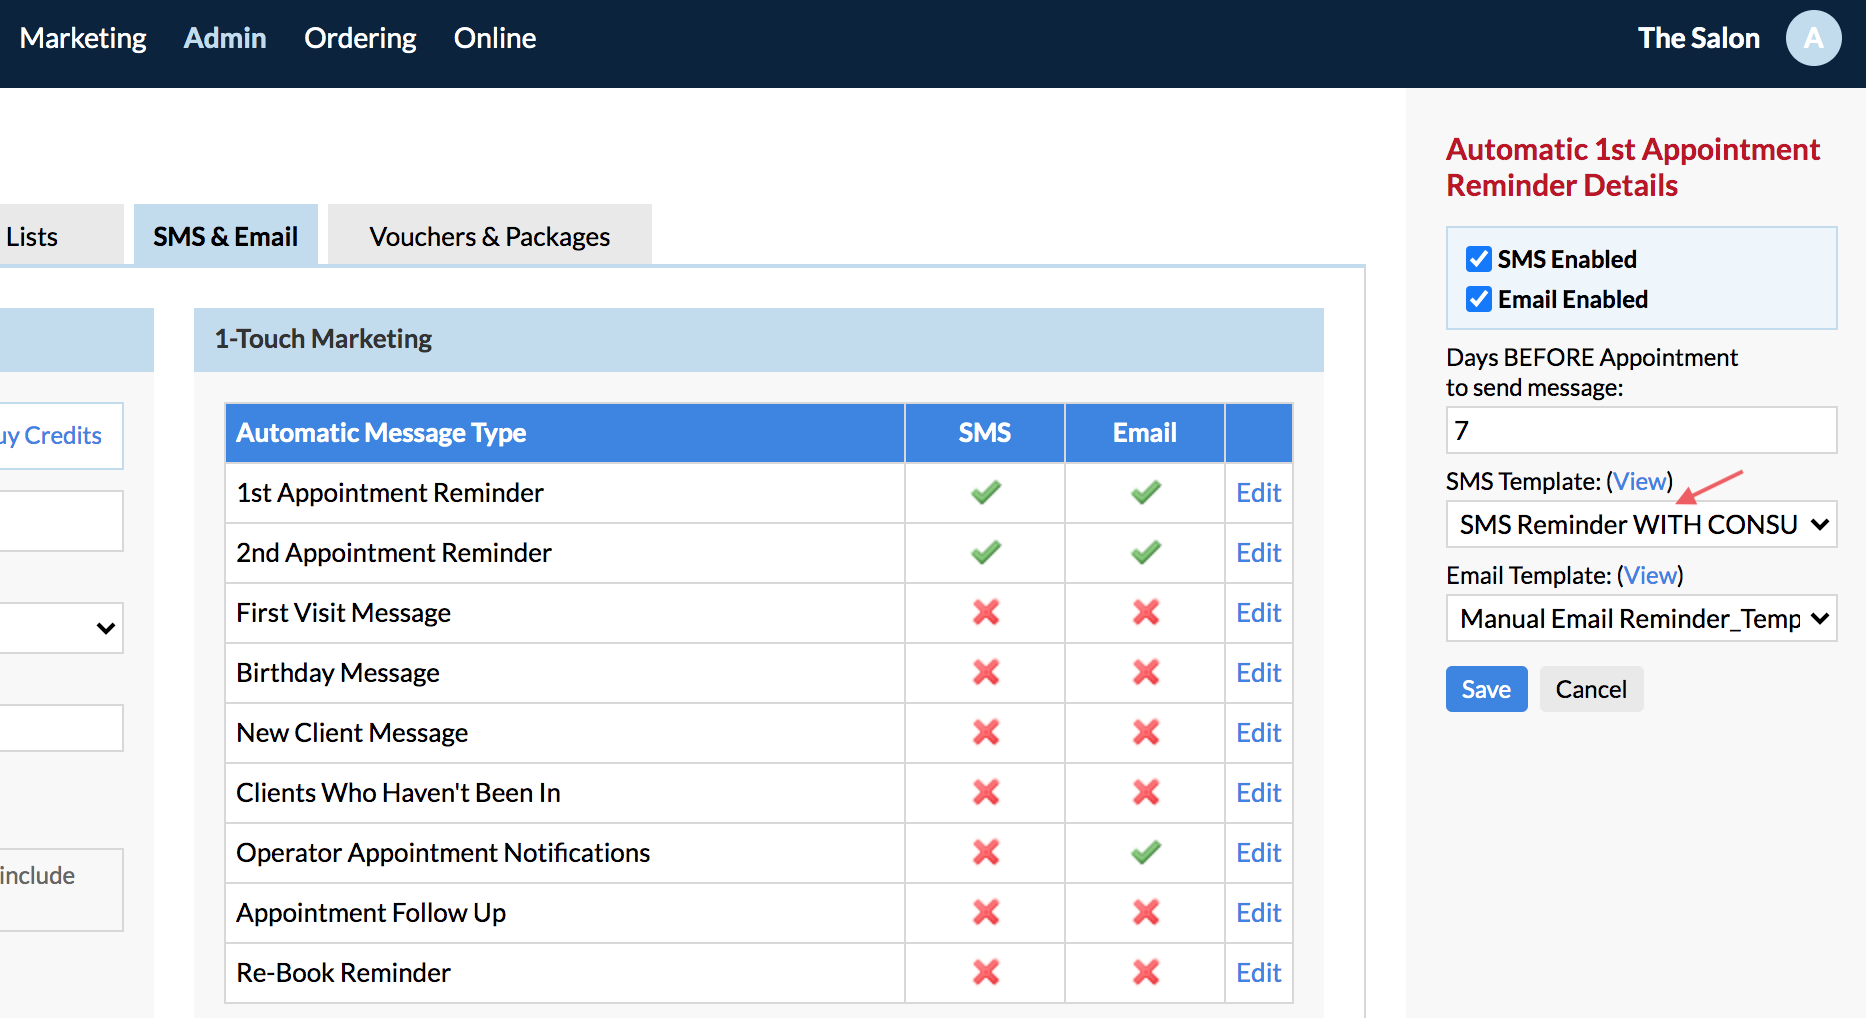
After you have created the template, you'll then need to go to Admin > SMS & Email > Edit the Appointment Reminder and choose the new SMS template (which you just created with the URL) from the right-side panel. This will become the template that is sent as the reminder instead of the default one. Then click Save.
Responses & Notifications
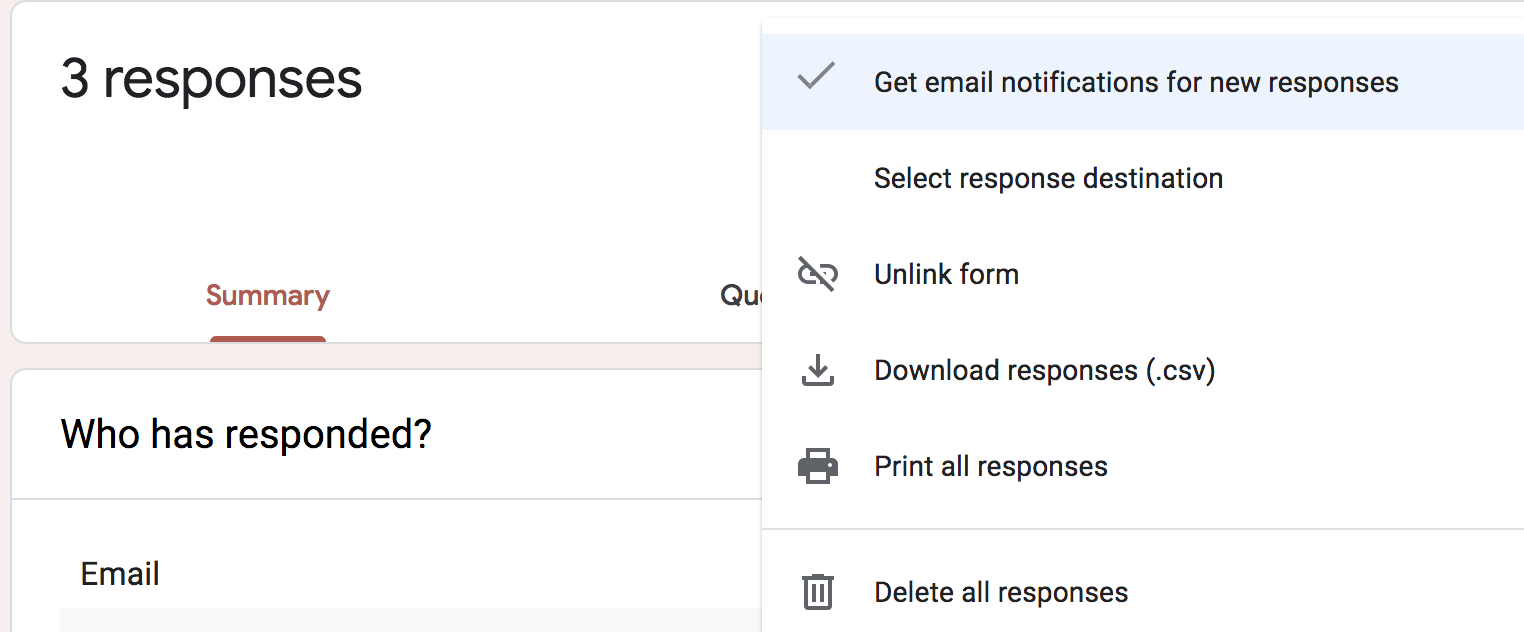
Google Forms gives you the ability to receive notifications and responses to your form directly via email:
1. Click on the Responses tab at the top of your Google Form.
2. Tap on the three dots on the right-hand side of the toolbar, next to the icon of a Google spreadsheet.
3. Choose Get email notifications for new responses from the drop down menu.

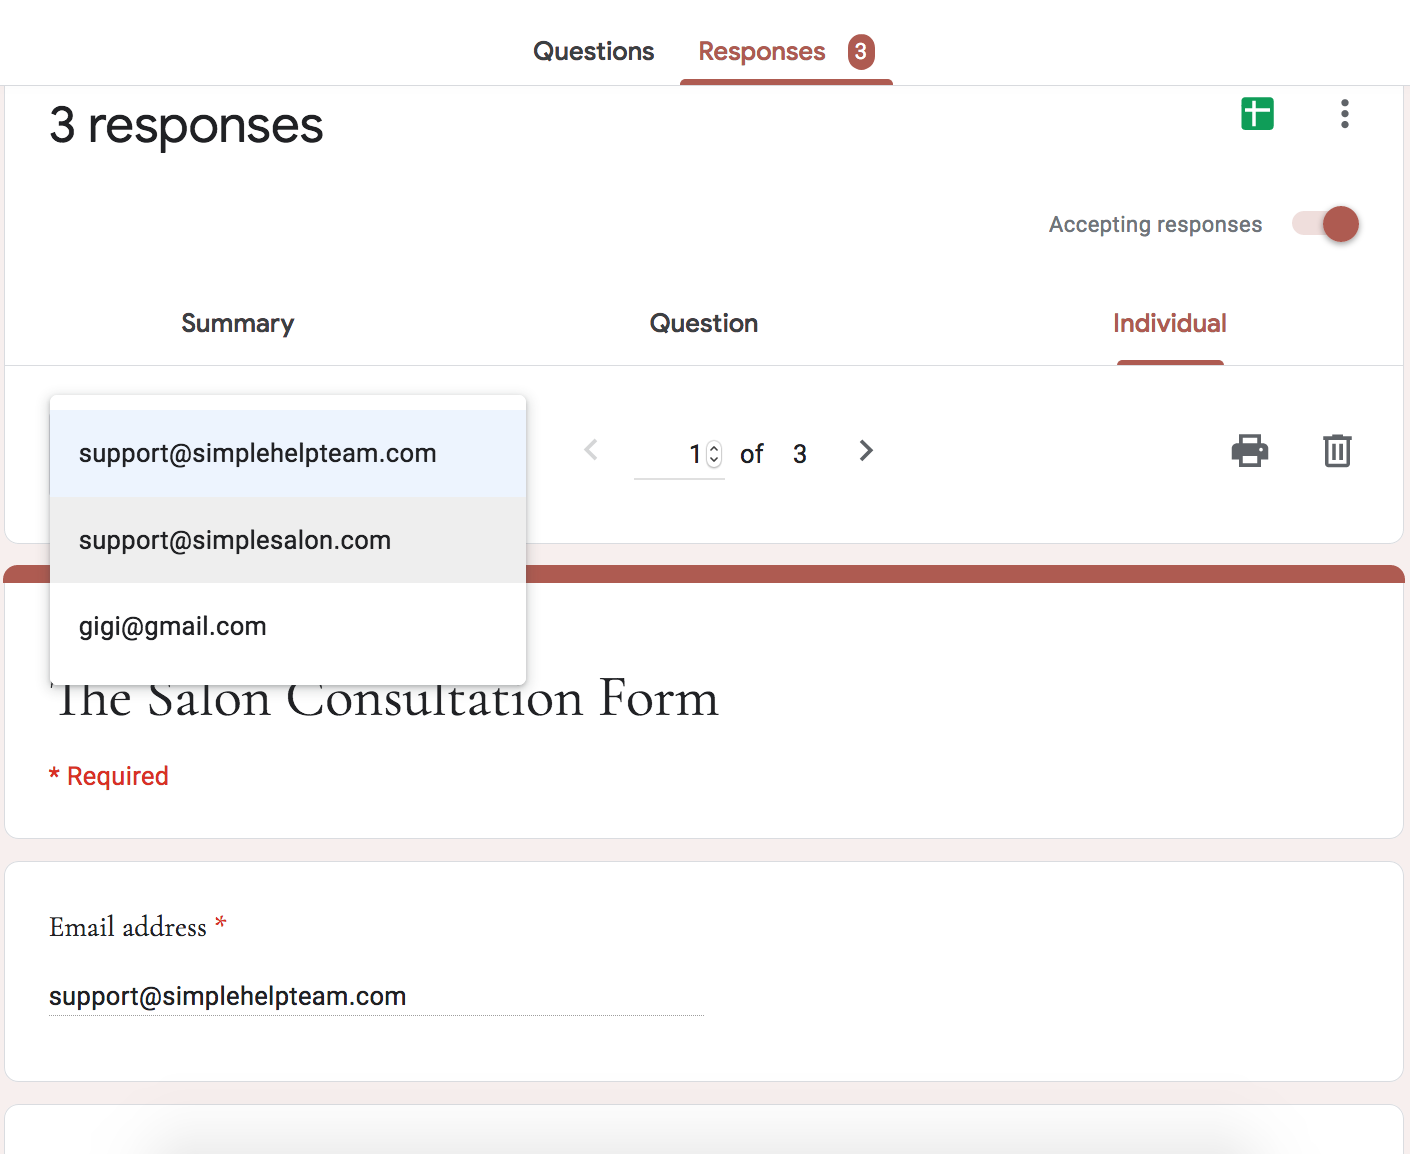
All client responses can be found on the Responses page. Via the Individual tab, you'll be able to flick through each client's responses:
Answers are also immediately added to a Google Sheet that will be created automatically when you make your form. This can be accessed via the Google Sheets icon:


One of the benefits of Google Forms is that you can share a form—along with the results of that form in a spreadsheet—with as many people as you'd like.
When you click Share for your form, all collaborators that you add can view. Give staff the permission to edit, and also see the edits that others have made. This means everyone can have up to date access to any client that fills out a form.
If you have notifications turned on, you'll be notified via email as shown below:
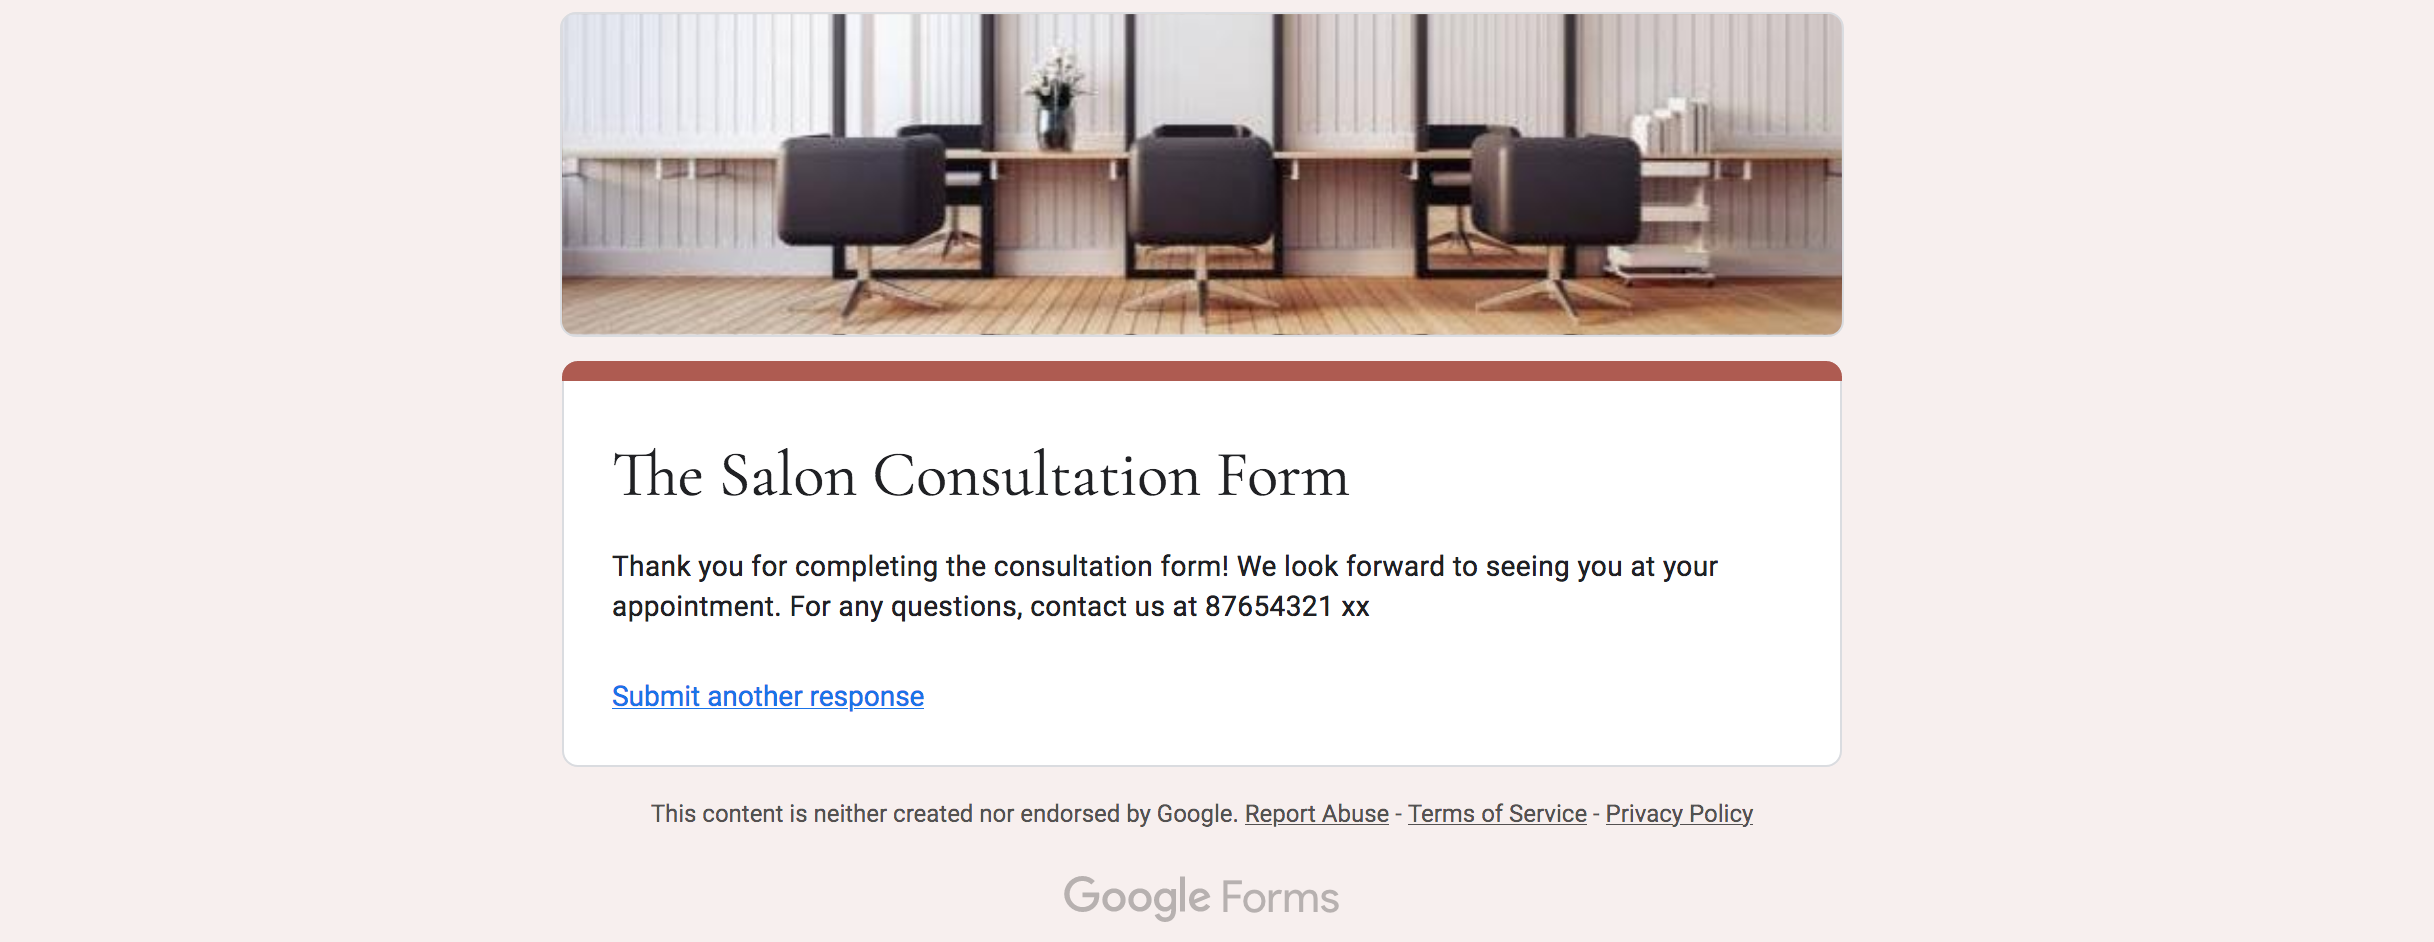
Once the client has successfully completed the form, they will receive a confirmation message (which you would have customised already via Settings > Presentation):
Exporting Form Responses as a PDF then Uploading to Client Card
You can export your client's responses as a PDF, which then can be uploaded to the respective client's Client Card in Simple Salon:
First open up your Google Form and click on the Responses tab:
To download an individual client's response, click on the Individual Tab, then click on the Print icon:
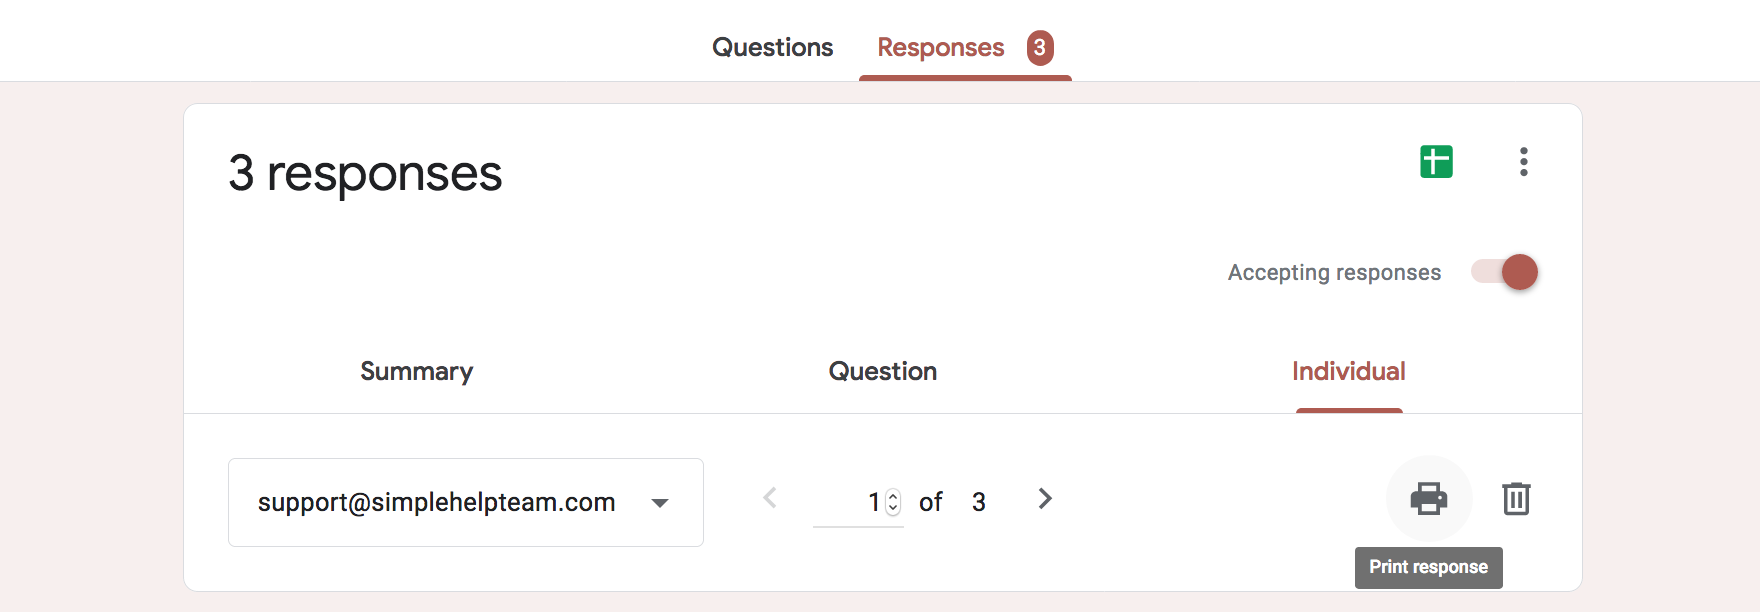
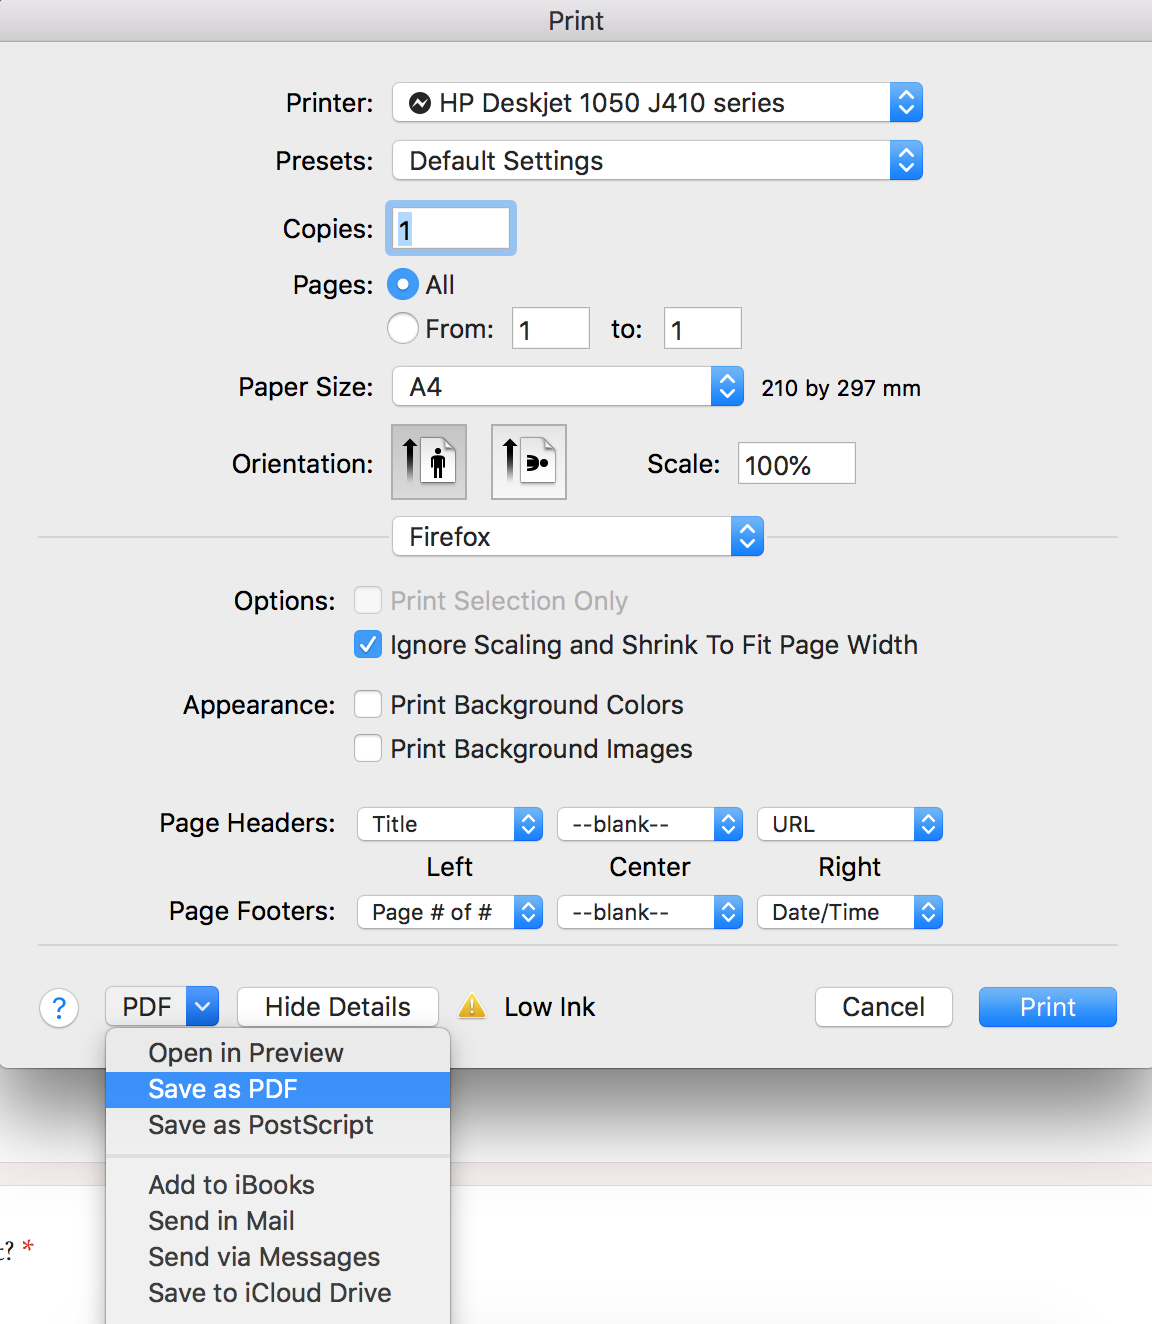
The print window will open, at which point you can Save as PDF:
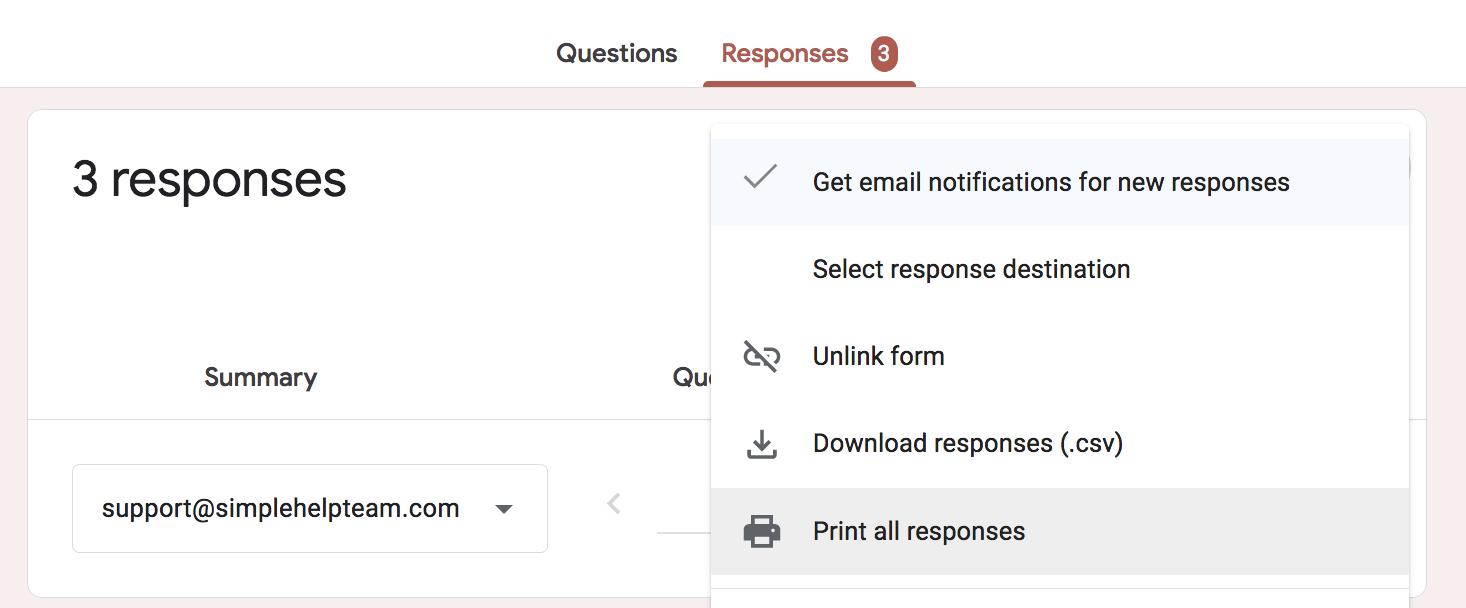
Alternatively, you can download all client responses by clicking the 3 dots, then selecting the Print all responses option:

In the Print Preview, choose from the PDF drop-down and select Open in Preview:
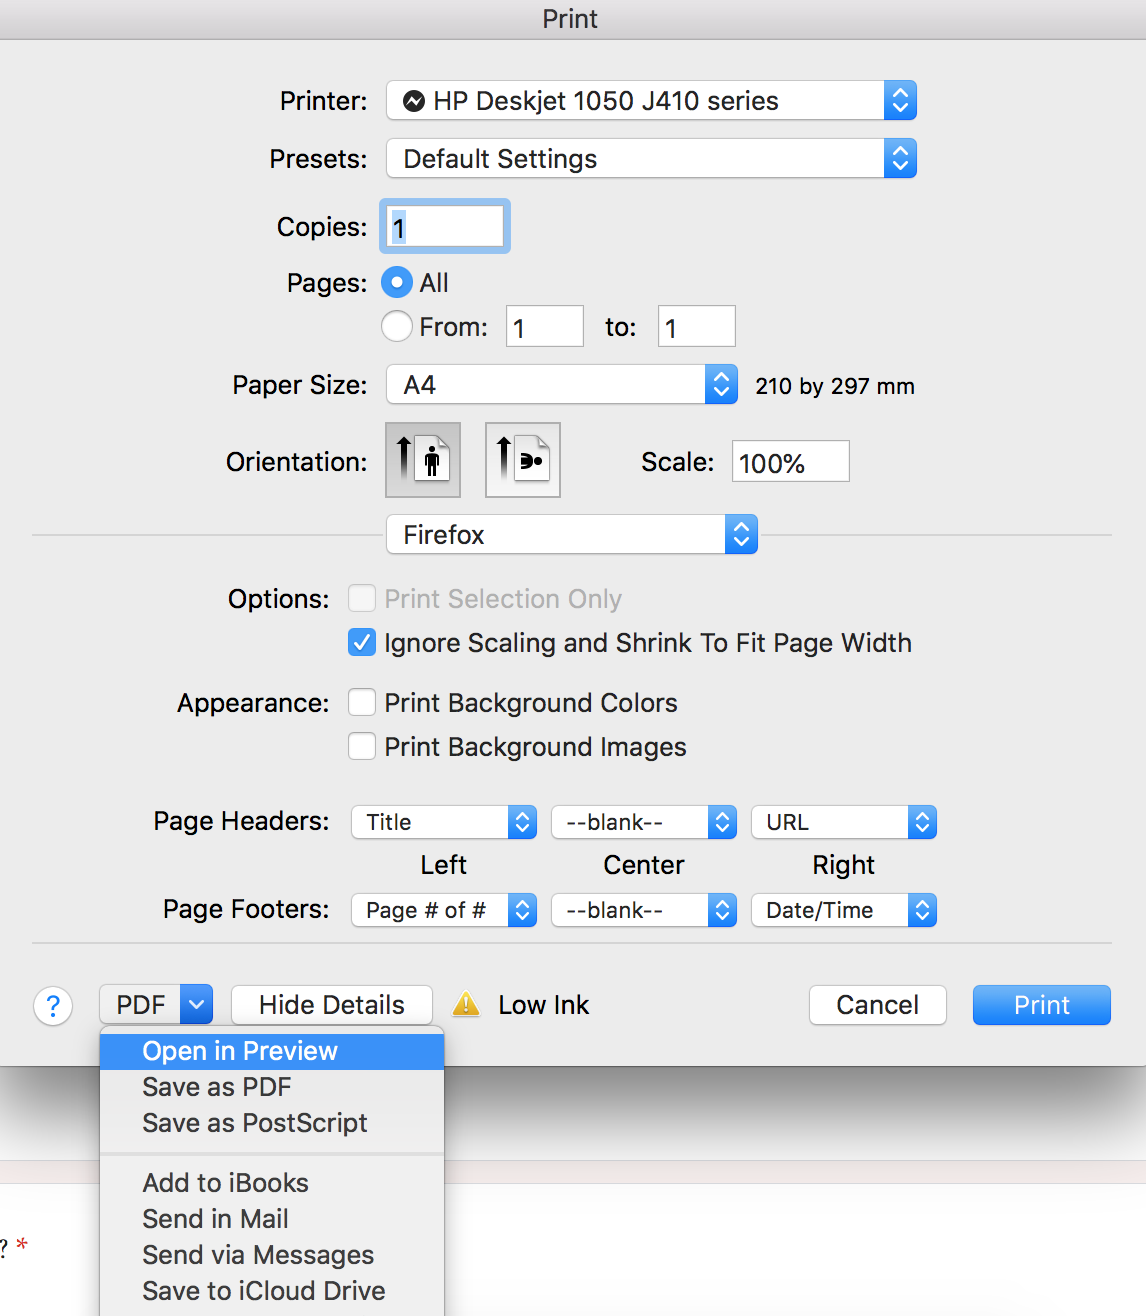
All responses will open as a PDF in the Preview app. If you don’t see a list of pages on the left side column, click the View menu and choose Thumbnails.
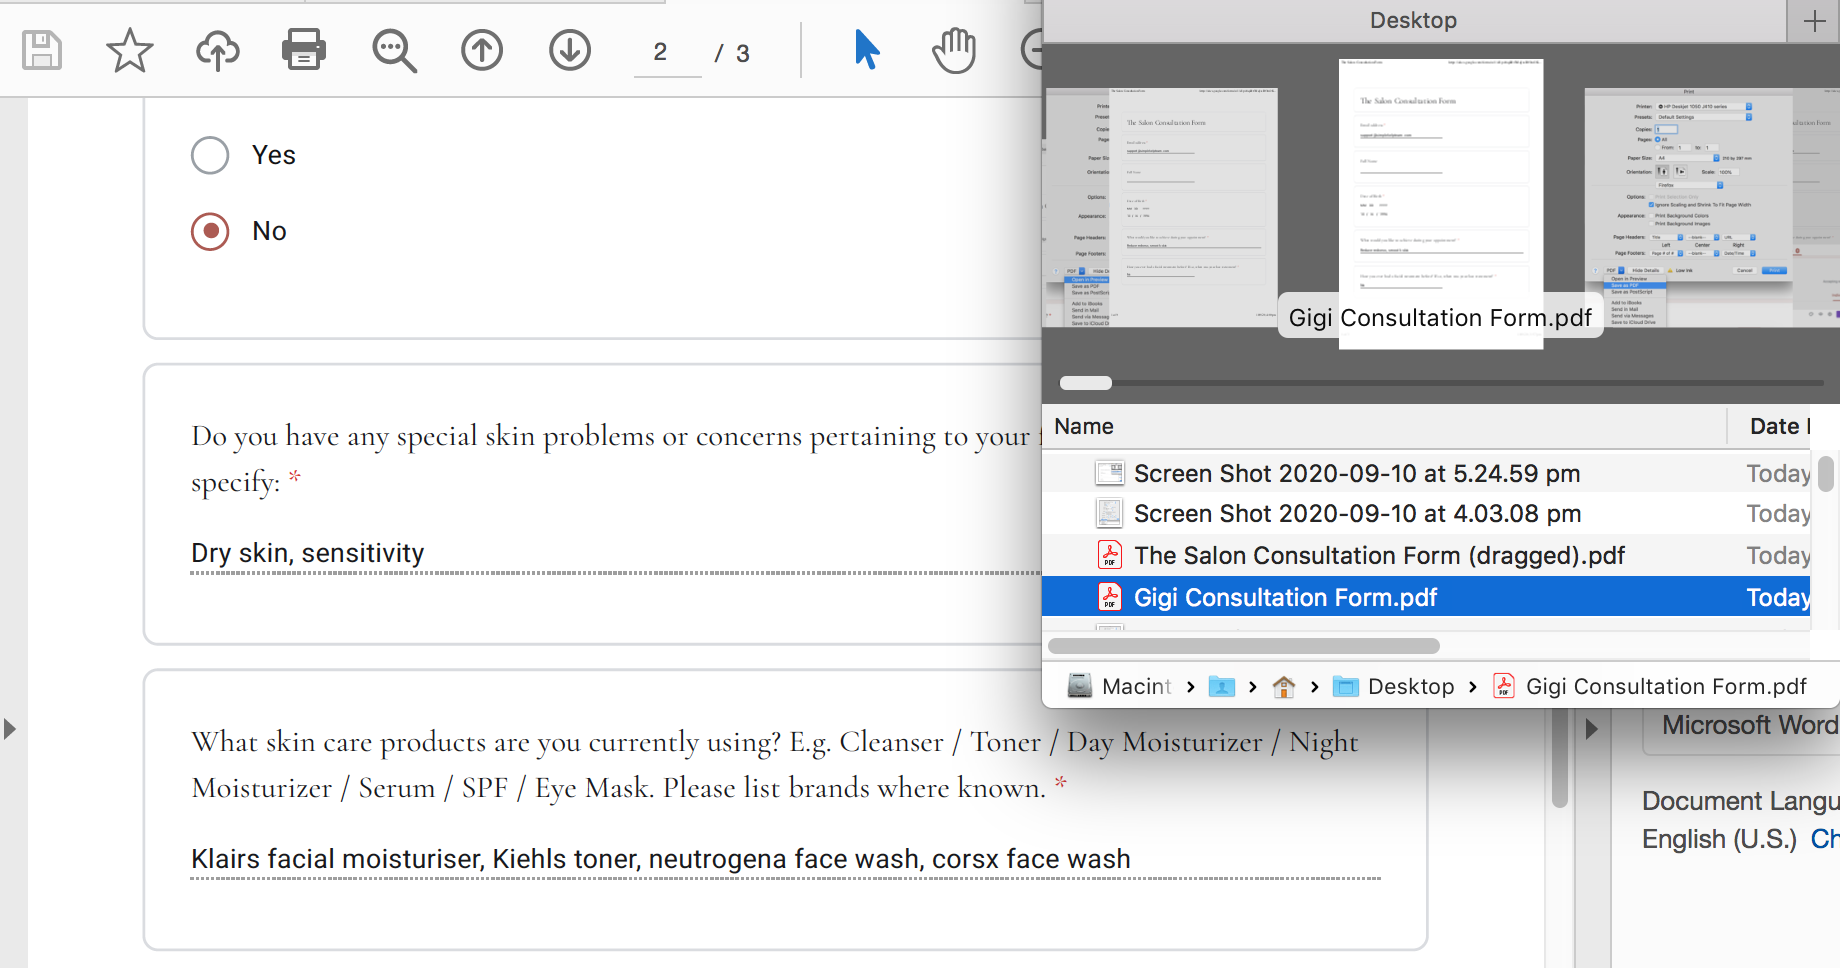
To separate the PDF files, click and drag each page to your desktop or to a Finder window folder. Each page will be a separate PDF (we'd recommend renaming each page as you drag it to your desktop).
If your form results cover more than one page, you can recombine multiple page PDFs by double-clicking the first page on your desktop to open it in Preview. Be sure thumbnails are showing (View > Thumbnails), and drag the additional pages from your desktop to the thumbnail sidebar. Pages can also be re-arranged by dragging and dropping in the sidebar.
Choose File > Export as PDF to rename and save the combined file.
Once you've successfully exported the forms as PDF's, you can then go ahead and upload the files to your client's Client Card! The follow article will show you how to upload files or images to a Client Card:
Uploading Files or Images to a Client's Client Card
If you're tech savvy (or just have a little patience), you could also use a script to create and email a PDF Form submission automatically. This script will be triggered by a response being submitted, which will convert the sheet in PDF. Then, the script is going to save the PDF in your Drive and send it as an attachment in an email. If this sounds like something you're interested in, the following article will show you how:
Google Spreadsheet Script to Create and Email a PDF on Form Submission
Google Forms is great because of it's cross-platform compatibility, ranging from desktop browsers to smartphones. Text fields are easy fill out by clients, no matter which device they use it on.
This tends to be the downside of sending a form to client's that they can't edit. That usually means they need to use an external program, or print out the form to fill it out, then send it back. Using a Forms programs makes it a lot easier on your clients—especially since a vast percentage of the world's web traffic filters through smartphones!
Click here to view our help article which discusses creating a Salon Review Form via Google Forms.
If you have any questions, please send them to us via the Submit a Request option in your Help & Support page.