Simple Salon has two rostering systems that you can utilise—Simple Rostering and Advanced Rostering.
Simple Rostering is a simple but effective roster to set up your salon hours, public holidays and your operator's hours. This version works off a one week roster. This means the roster times that are set for your operators will be the same each week.
Advanced Rostering gives you more versatility as you can have different items for each week. It allows you to create different Roster Types (such as Rostered On, Annual Leave, Sick Days etc), as well as add pay rates to track staff wages.
This overview will go through both to get you familiar with their functions. We will link to further set up articles where necessary. Feel free to skip ahead, we will be covering the following:
Simple Rostering
- Opening Hours, Public Holidays & Alternate Trading Hours
- Operator Hours
- Only Show Rostered on Operators
- Exporting or Emailing an Operator's Roster
Advanced Rostering
- Roster Types & Operator Hours
- Creating and Assigning Roster Rates
- Rostering Using Rates
- Repeating the Roster
- Using the Wages Report
- Scheduling Lunch in the Roster
Setting Up Opening Hours in Simple Rostering
Simple Rostering is the default when you first create your Simple Salon account, and setting up your opening hours will be one of the first things you'll want to get set up.
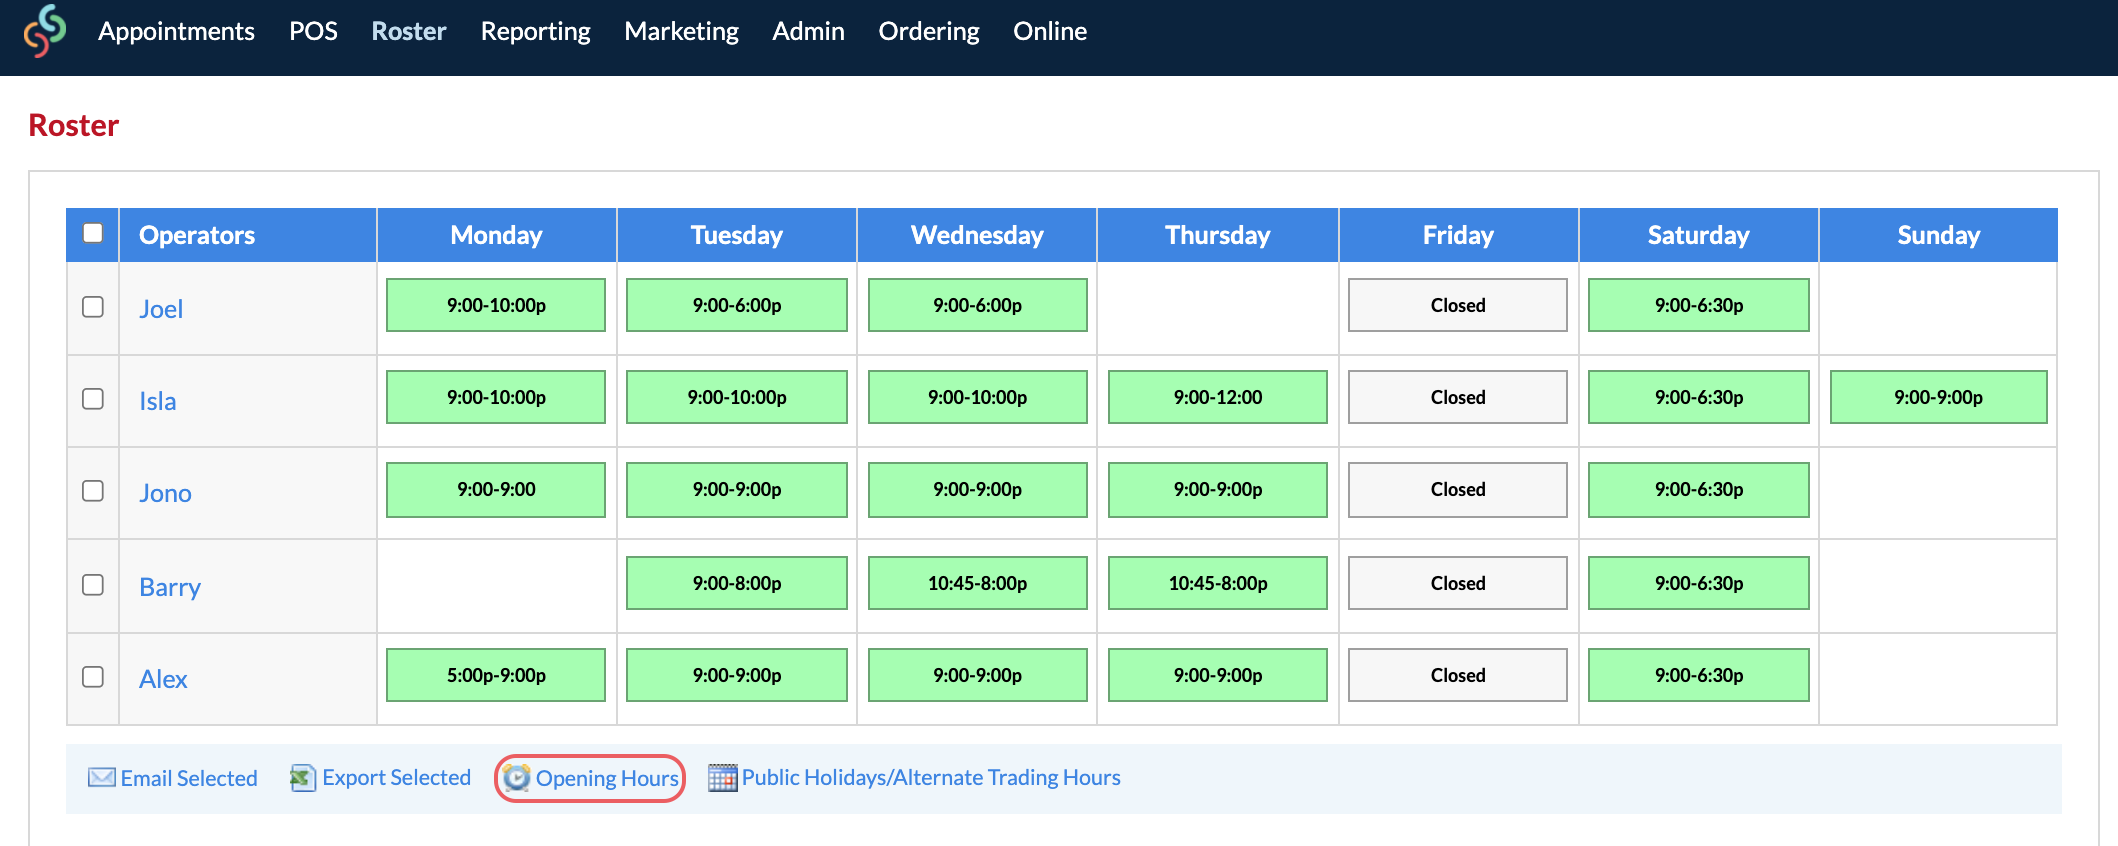
This can can be updated directly from the Roster tab:
Roster > Opening Hours
You will need to set your opening hours for each day and tick Closed on the days you're not open.
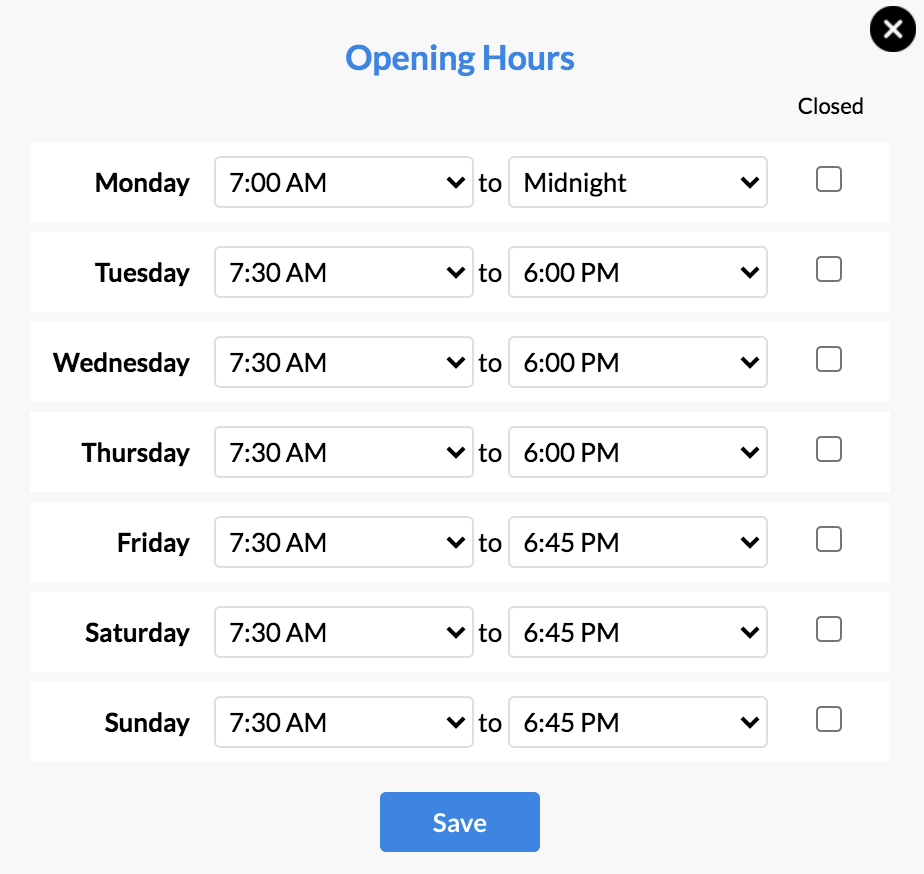
Always Save when complete!
Public Holidays & Alternate Trading Hours
While in your Roster, clicking the Public Holidays/Alternate Trading Hours link (next to Opening Hours) will take you to Public Holiday & Alternate Trading Hour setup:
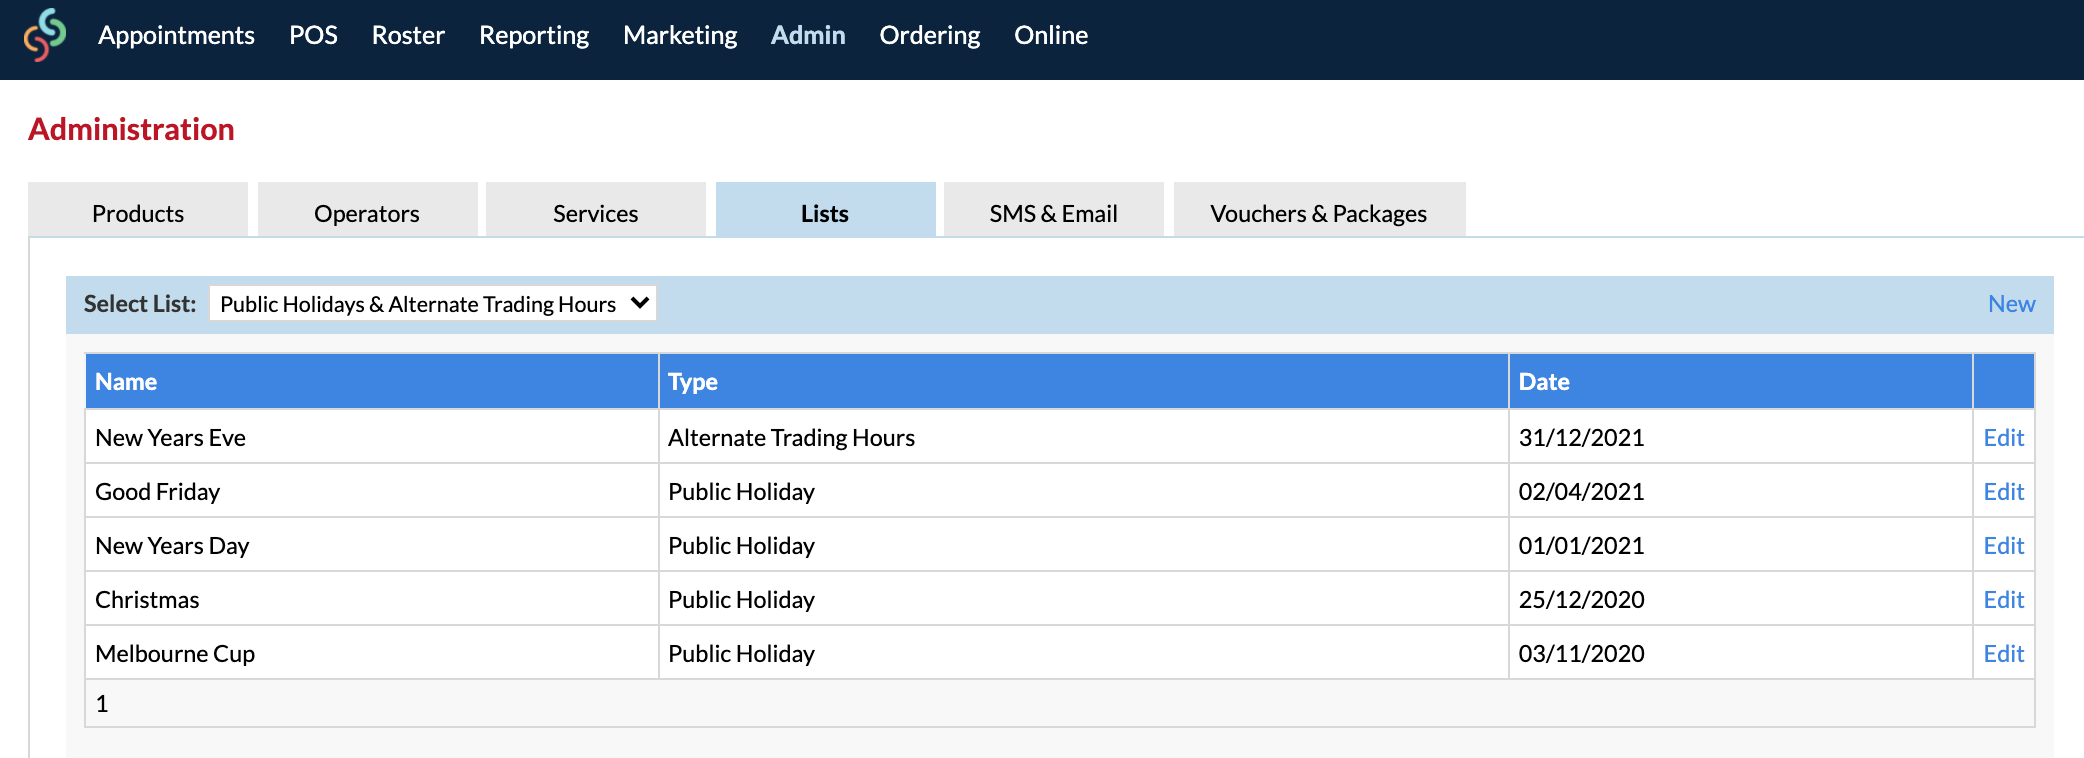
Note: This page can also be accessed via Admin > Lists > Select List > Public Holidays & Alternate Trading Hours
- Public Holiday: This will automatically close off your Appointments Page for the date that you've set, even if you are normally open on that day.
- Alternate Trading Hours: This allows you to open up your Appointments page on a day that's normally set to closed; and allows you to set the hours that you will be trading that day
Whenever you have days that you want to open up even though you're normally closed, you can come to this page and create your 'Alternate Trading Hours'.
Setting Operator Hours
With Simple Rostering, you can set your Operator hours either in the Roster or in Admin.
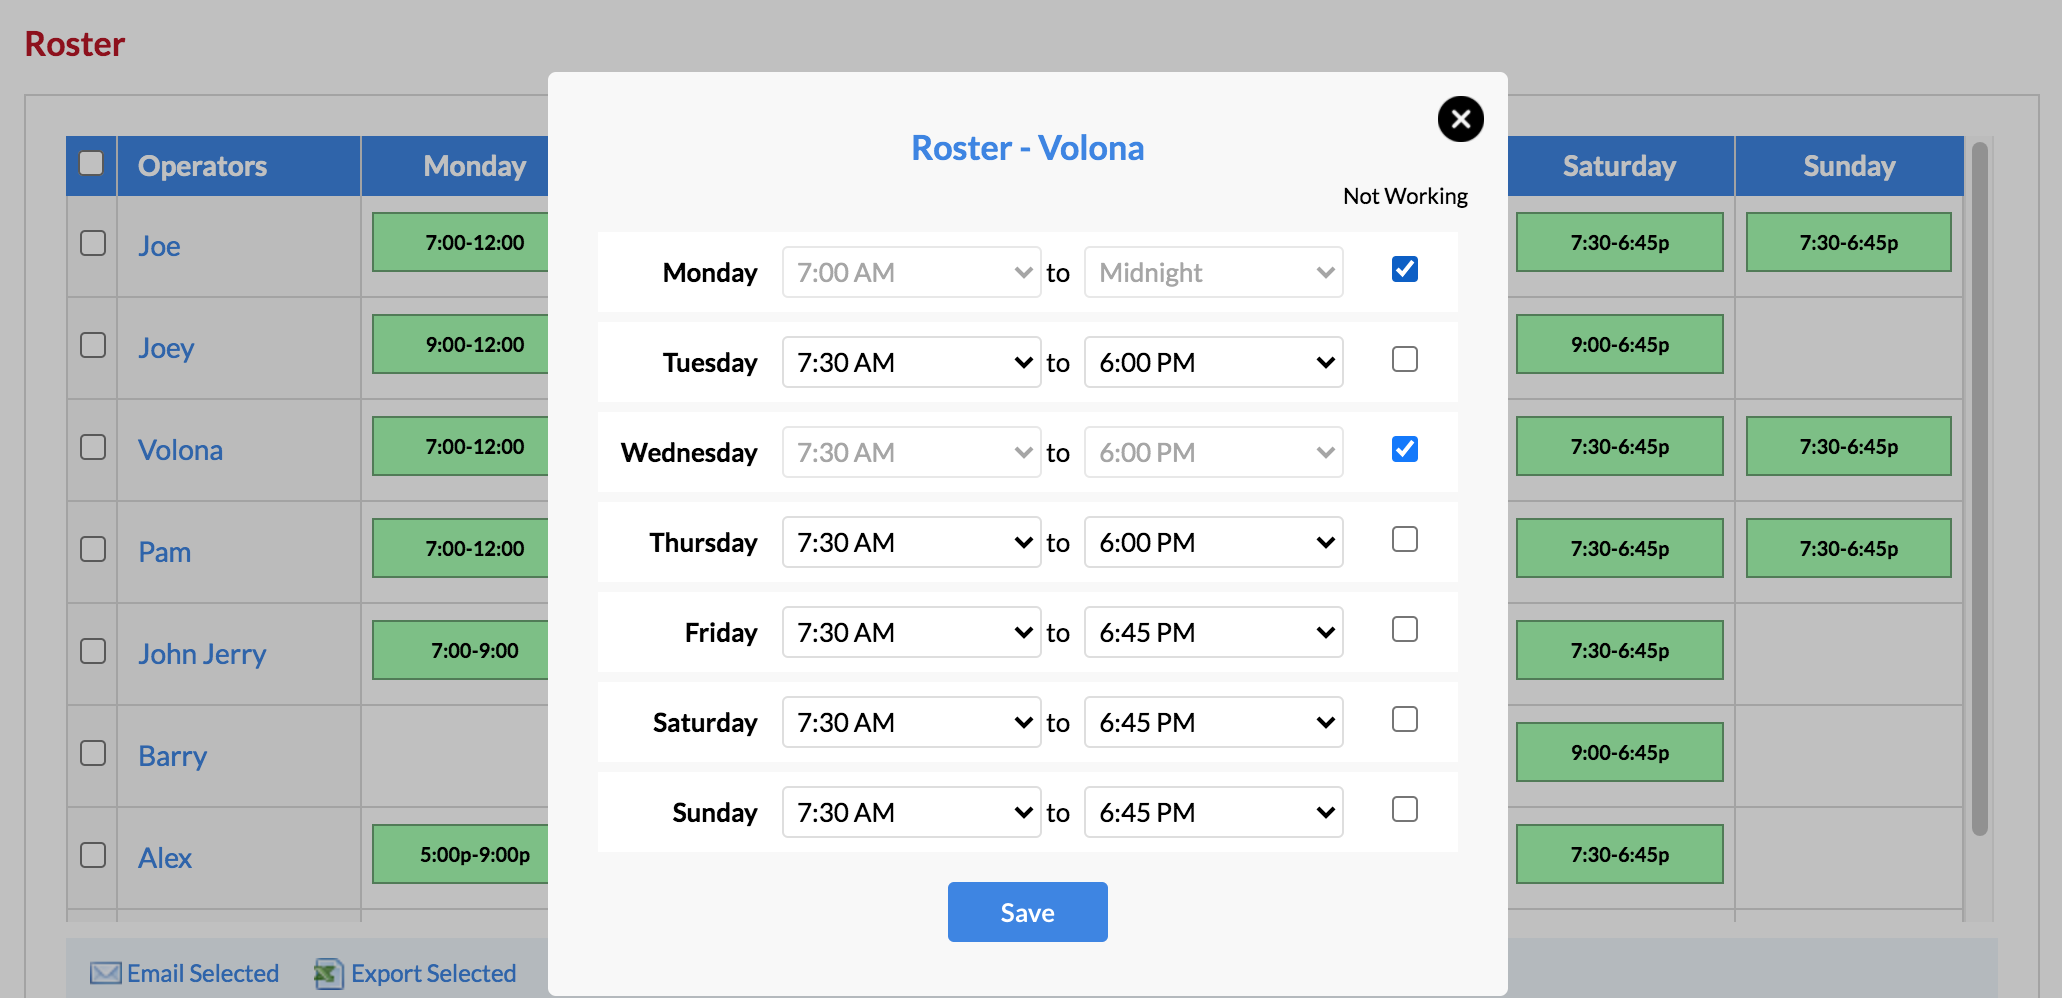
In the Roster, you can click an operator's name. A pop-up window will appear and you'll be able to set the hours your staff works, and tick the days that they are not working.
In Admin, this can be done via the Operators tab, then by selecting the Roster link next to an operator:

If you need further details on setting up Simple Rostering, please checkout the following article:
Simple Rostering—Setting Salon Hours, Public Holidays, Alternate Trading Hours & Operator Hours
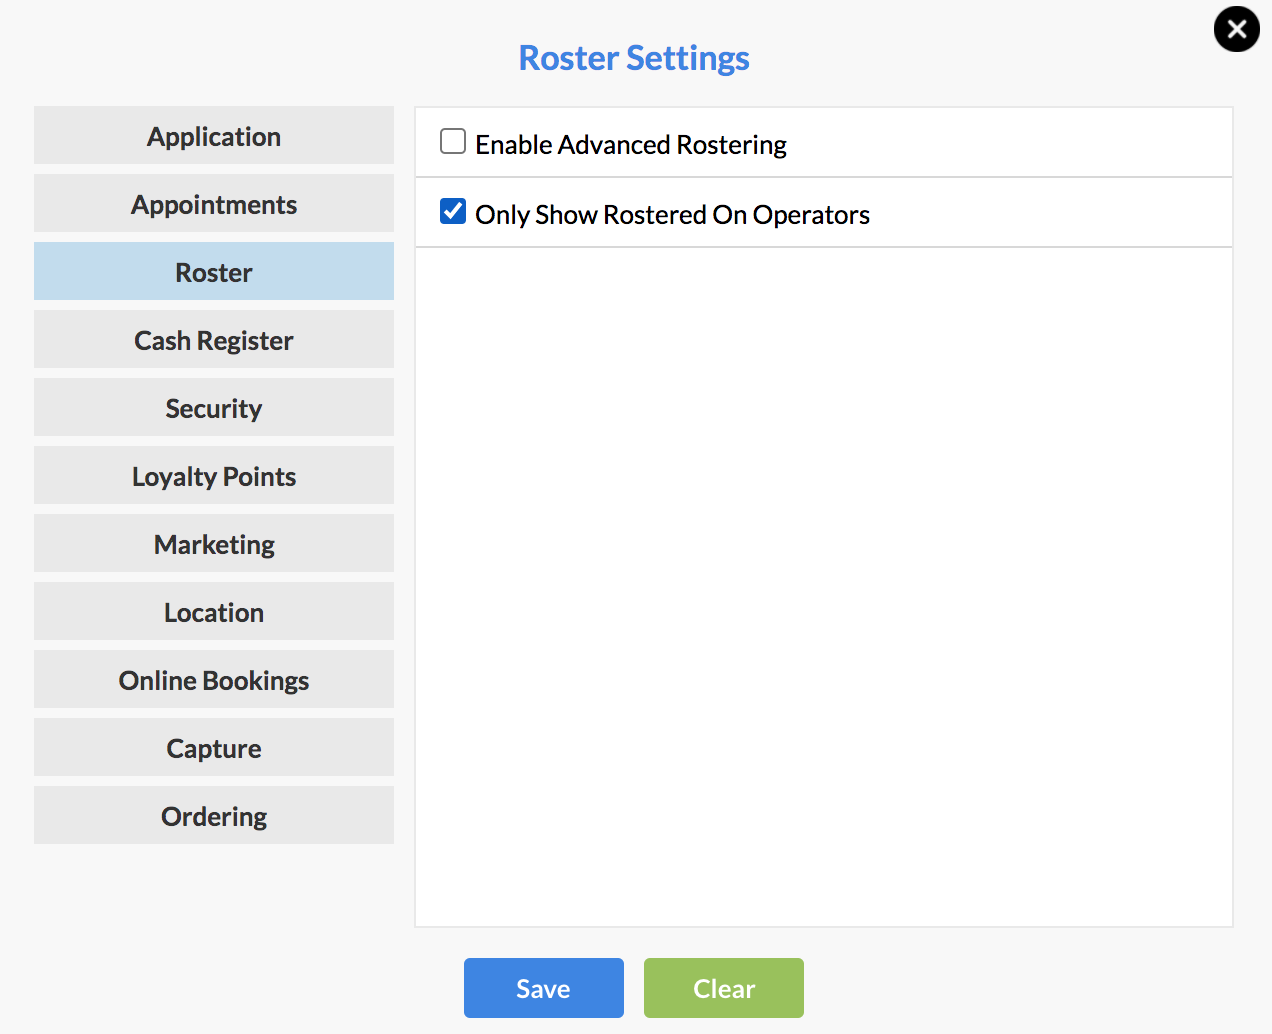
Only Show Rostered On Operators
For operators who are not rostered on that day, you can tick a setting to hide their column. This means that only rostered on operator columns will display in Appointments.
Settings > Roster Settings > Only Show Rostered On Operators > Save
Exporting or Emailing an Operator's Roster
While on Roster, you will see the Email Selected and Export Selected buttons.

If you select your Operators (via the tick box) then click Email Selected, the roster will be sent to the Operator's email address. This can be updated via Admin > Operators > Edit > Contact Details.
Advanced Rostering
If you would like to go a step further and have a fluctuating roster, as well as manage roster types and wages, then Advanced Rostering is your best option.
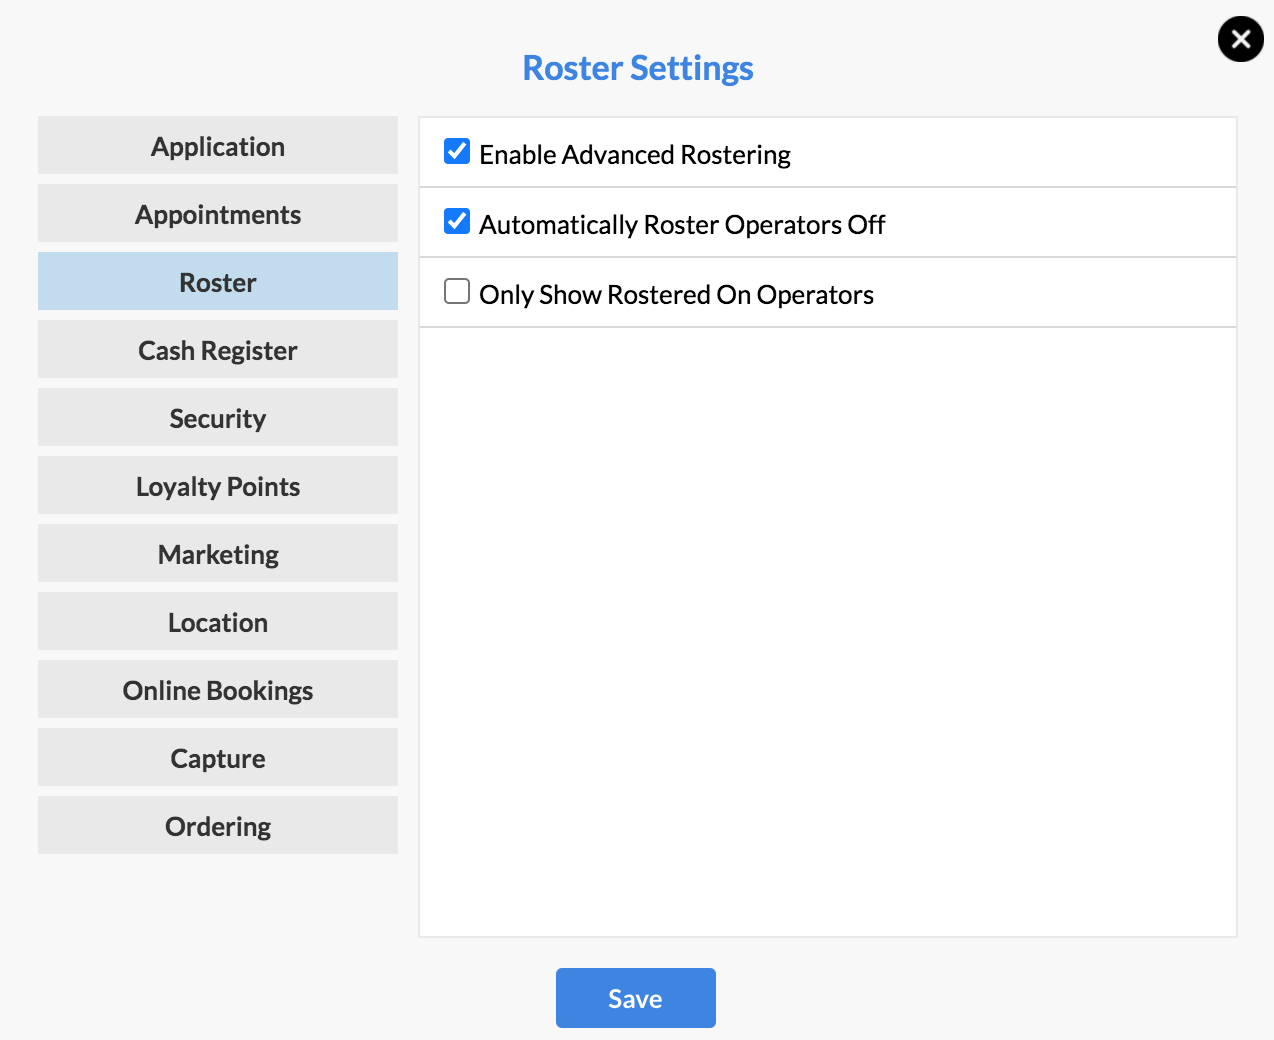
This needs to be first enabled via Settings:
Settings > Roster Settings > Enable Advanced Rostering > Save
Make sure you also set your Salon's Opening Hours!
Like Simple Rostering, this can be done via Opening Hours in your Roster.
Roster Types
Before you start rostering, you'll need to create your Roster Types.
These are what you apply to your Roster i.e. Annual Leave, Sick Day, Rostered On etc. You can create types that are relevant to your business.
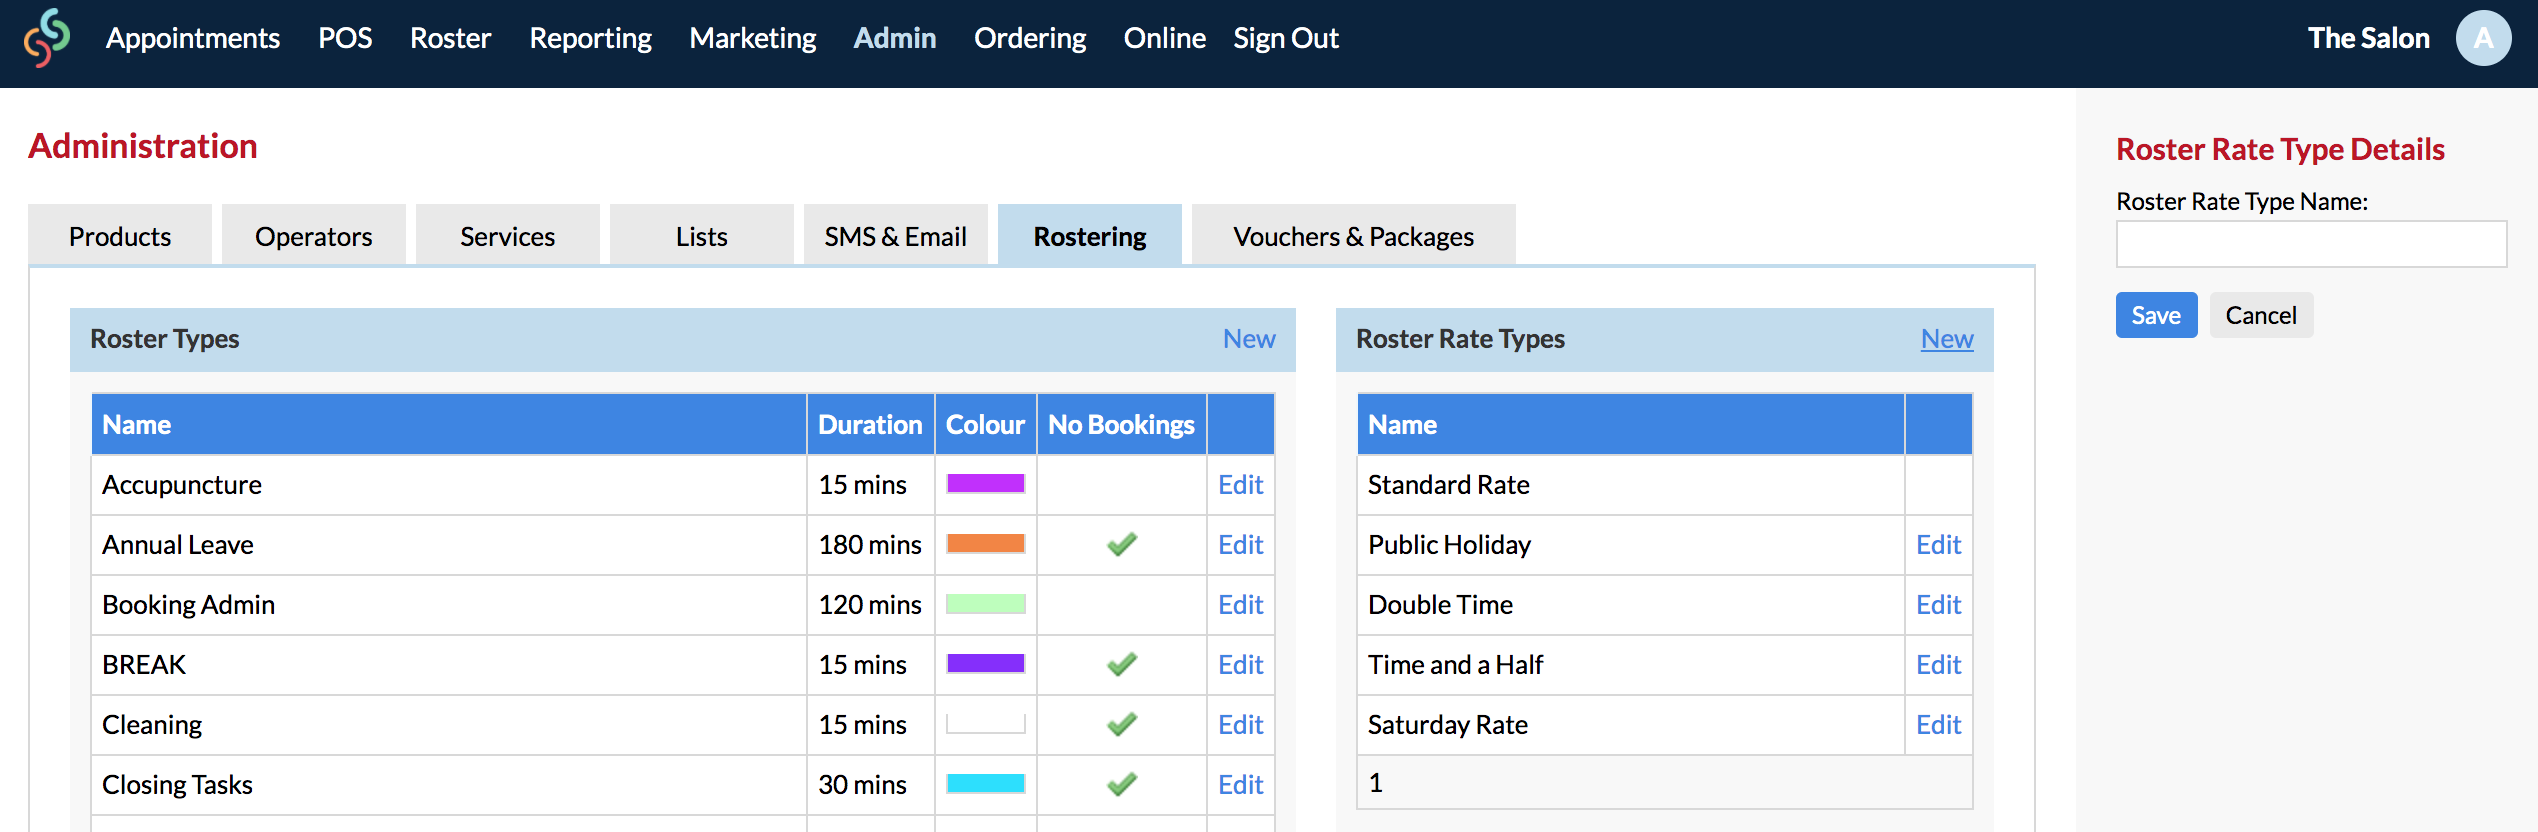
When you enable Advanced Rostering, you get a Rostering tab in Admin. This is where you can create your Roster Types:
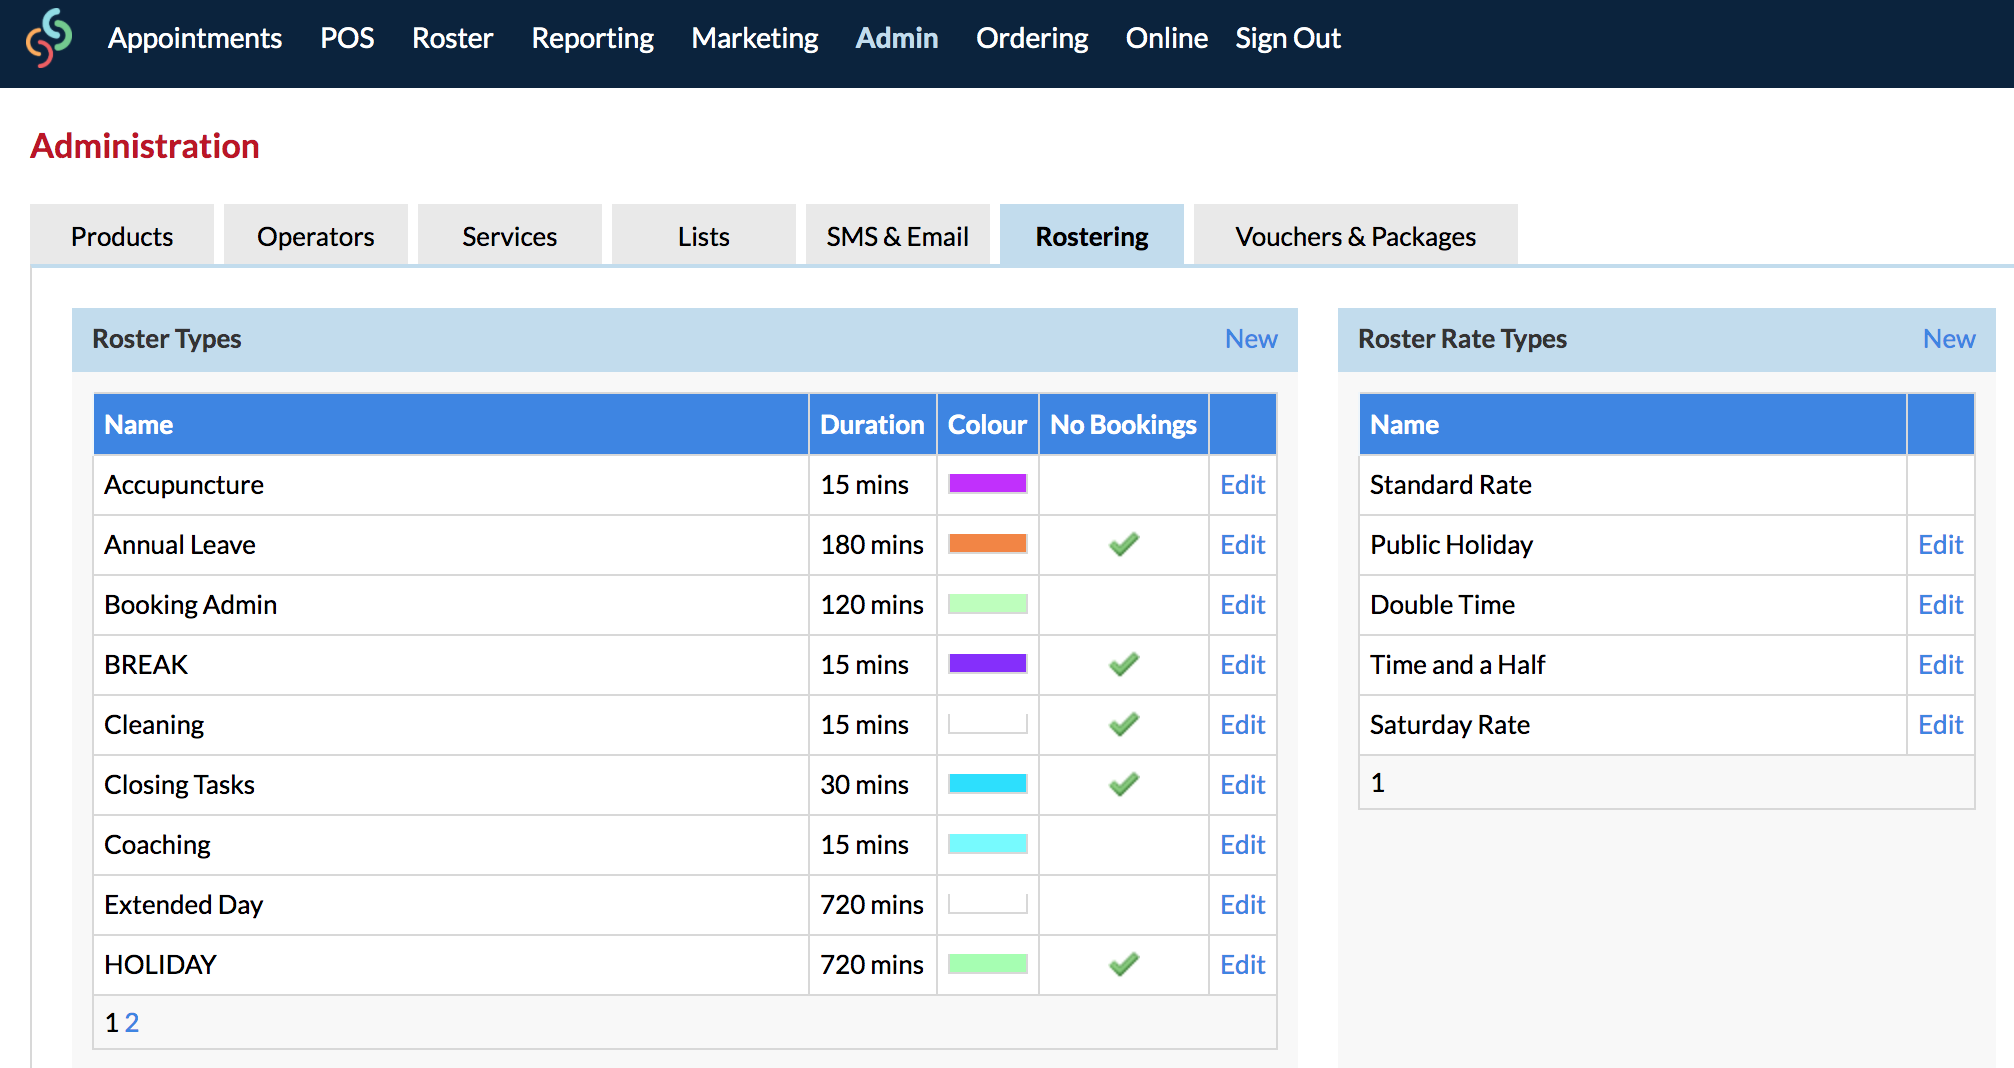
For more information on creating Roster Types, please click here.
Operator Hours in the Roster
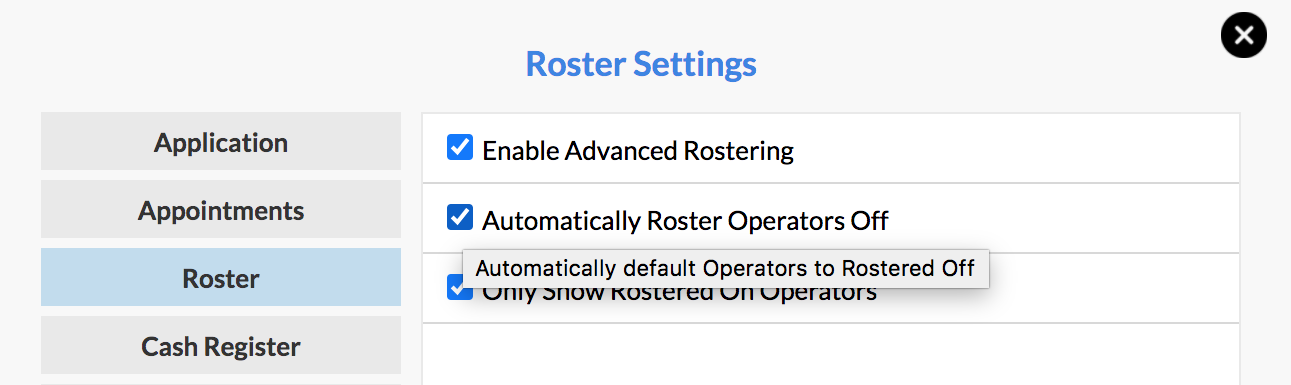
The simplest way to roster your operators on, is to first roster everyone off.
Settings > Roster Settings > Automatically Roster Operators Off > Save
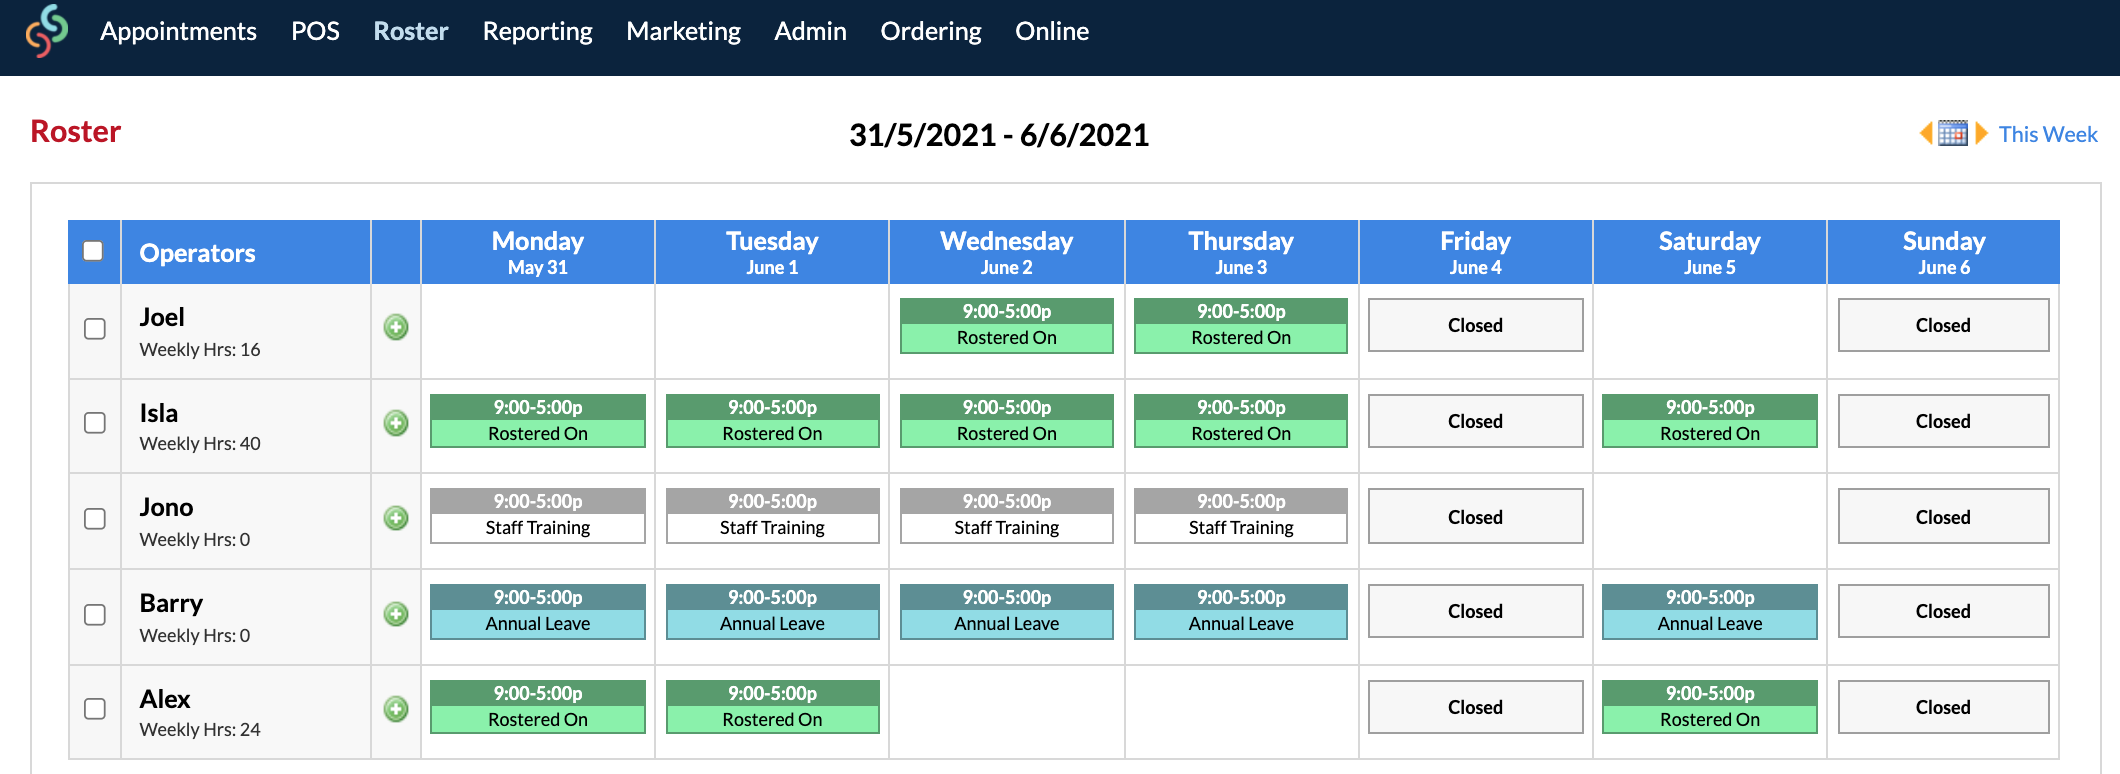
Clicking the little green plus button next to an operator (or simply clicking on a time slot) will open up the Roster Item Details to the right. You can choose from your created Roster Types, as well as the time and date for each option:
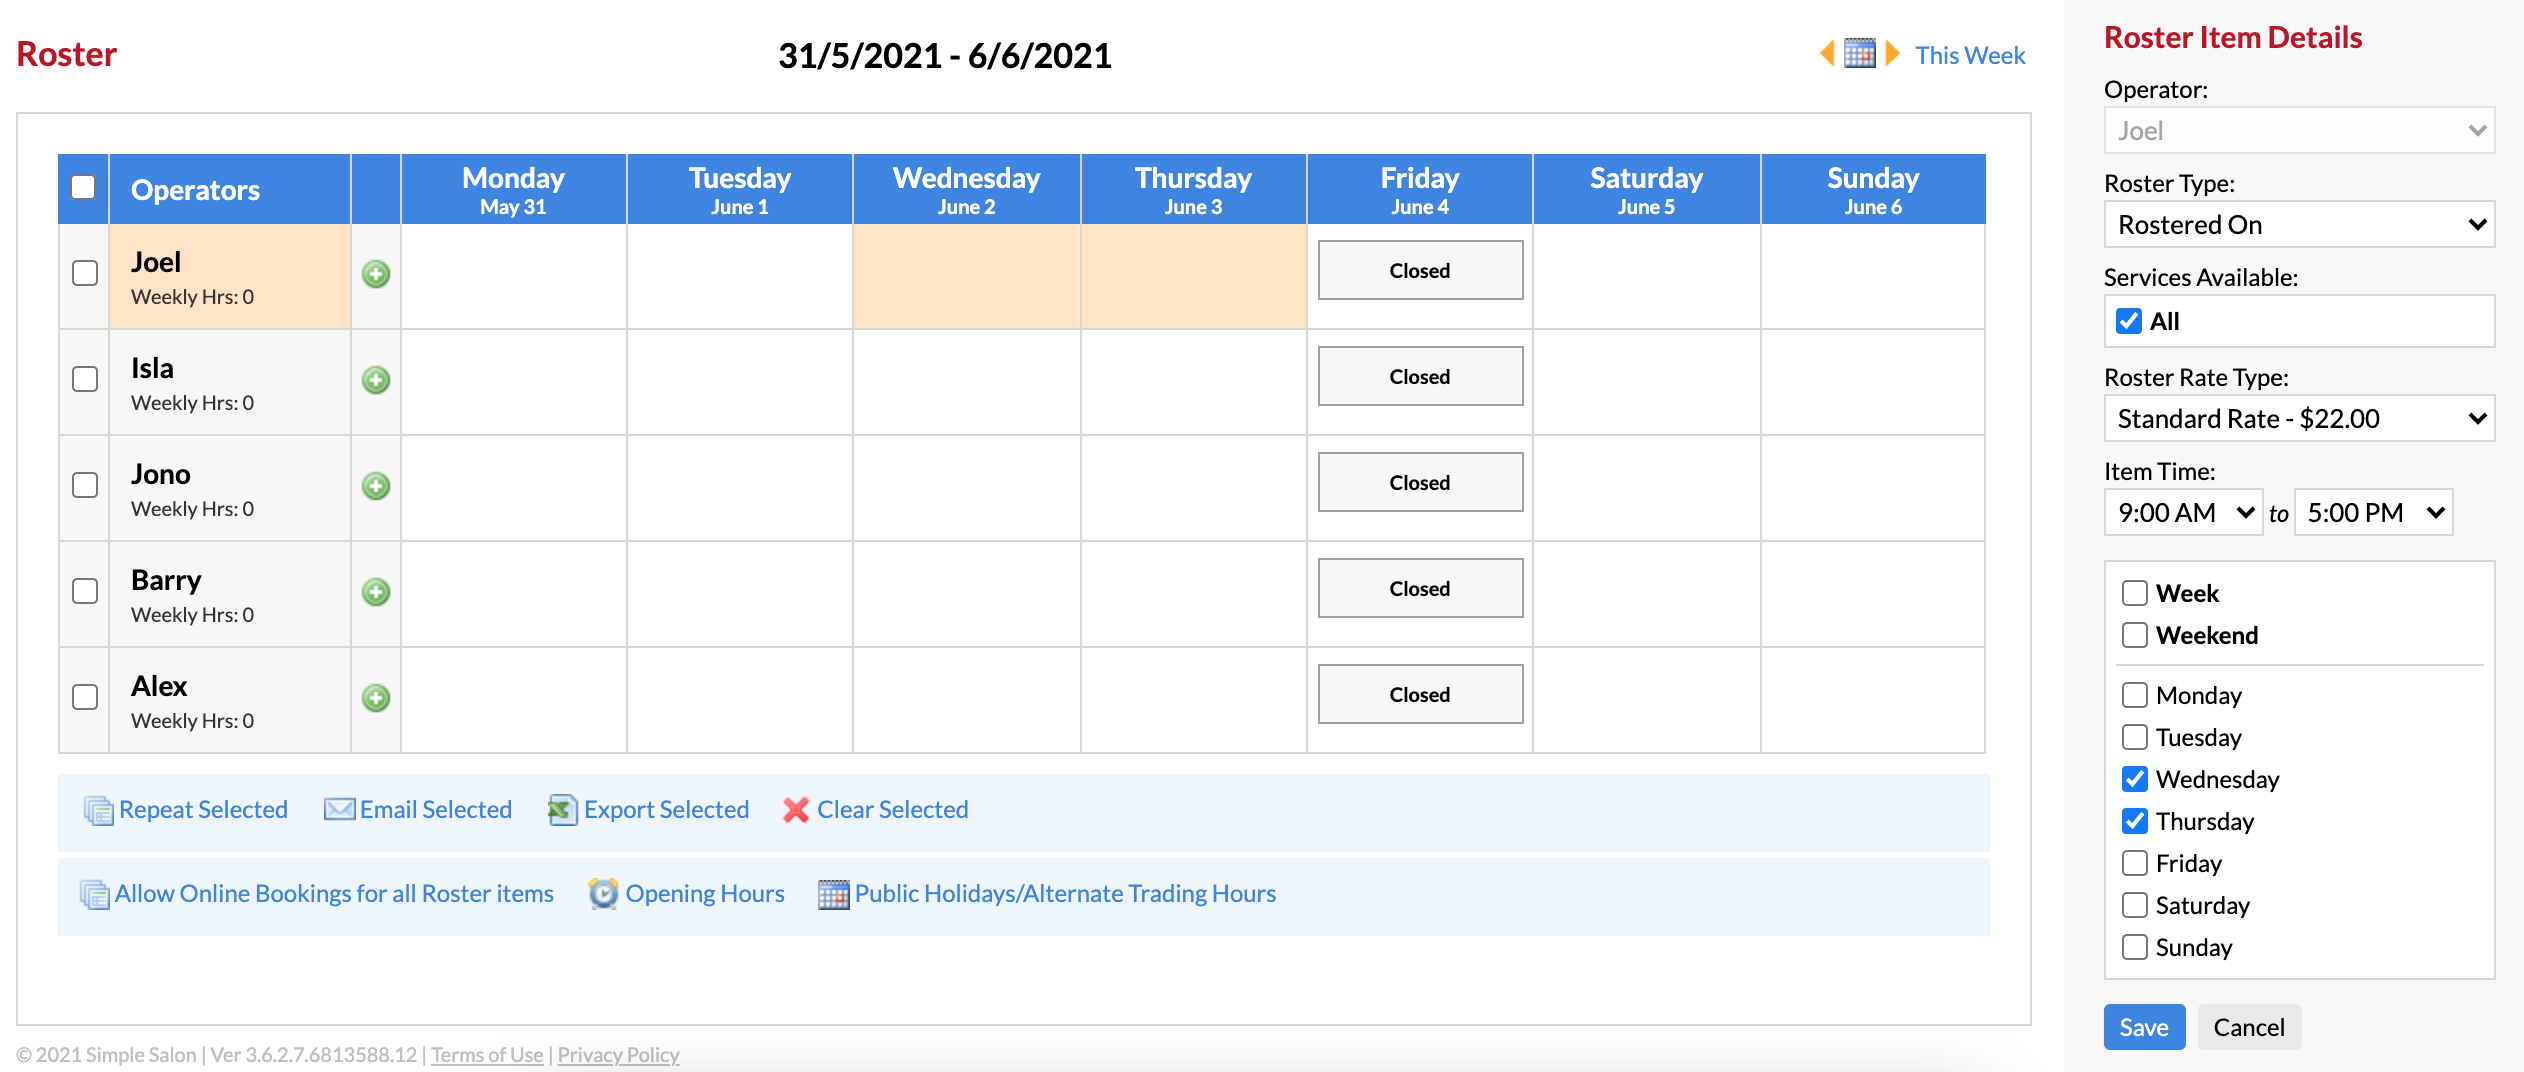
This is what the Advanced Roster can look like when it's all set up—but it can vary a lot depending on how you choose to customise:
For an in depth setup article on Operator Hours, please check out the following:
Advanced Rostering—Roster Types & Operator Hours
Creating and Assigning Roster Rate Types
With Advanced Rostering, you can record the hours your operators work along with their hourly rates. This generates for you the Wages Report.
Before the Wages Report will work however, you need to create your Roster Rate Types. This is located next to the Roster Types that were set up earlier:
Admin > Rostering > Roster Rates Type > New
You will need to keep adding in all of your Roster Rates until you've covered all rates you have available to your staff.
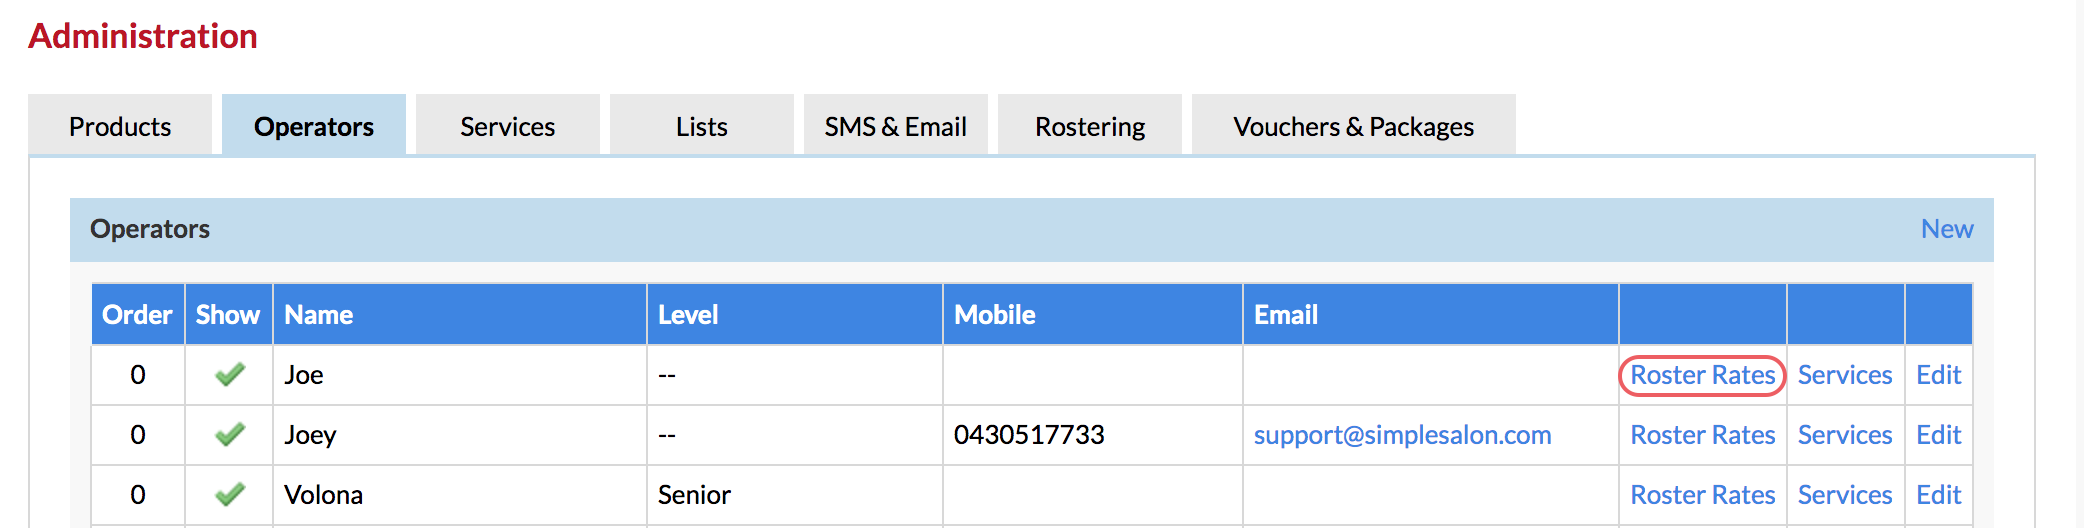
Once Roster Rates are created, they need to be assigned to your Operators:
Admin > Operators > Roster Rates
Edit the Standard Rate first to enter in the operator's normal wage.
If this operator also has the ability to earn a different rate (i.e. Public Holiday, Double Time etc) click the New Roster Rate link to add another one for this operator.
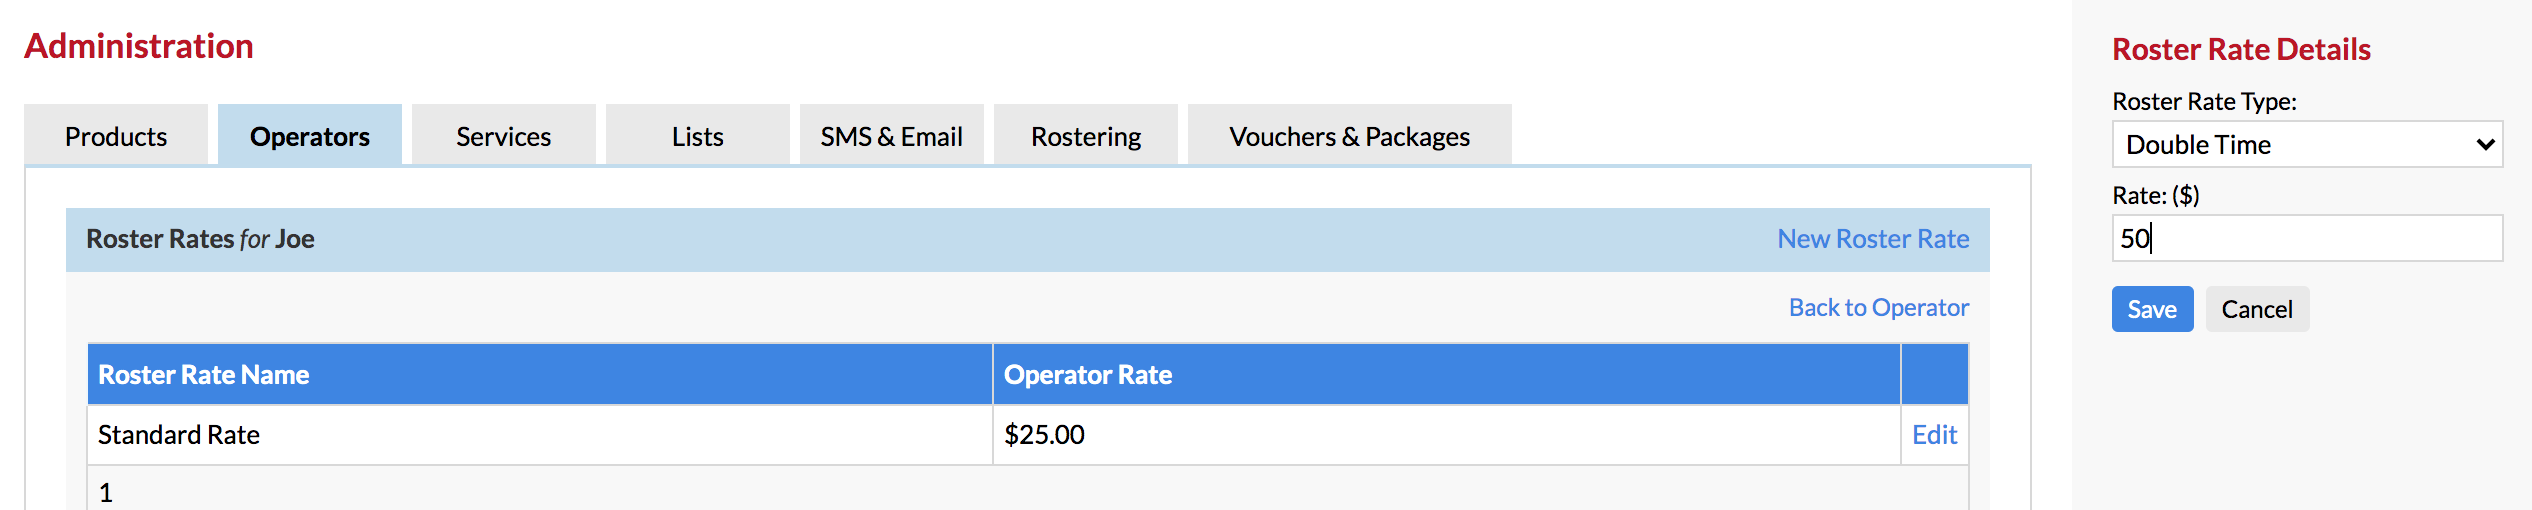
This needs to be repeated until this operator has been assigned all of their possible hourly rates. Then the whole process would need to be done for any other operators.
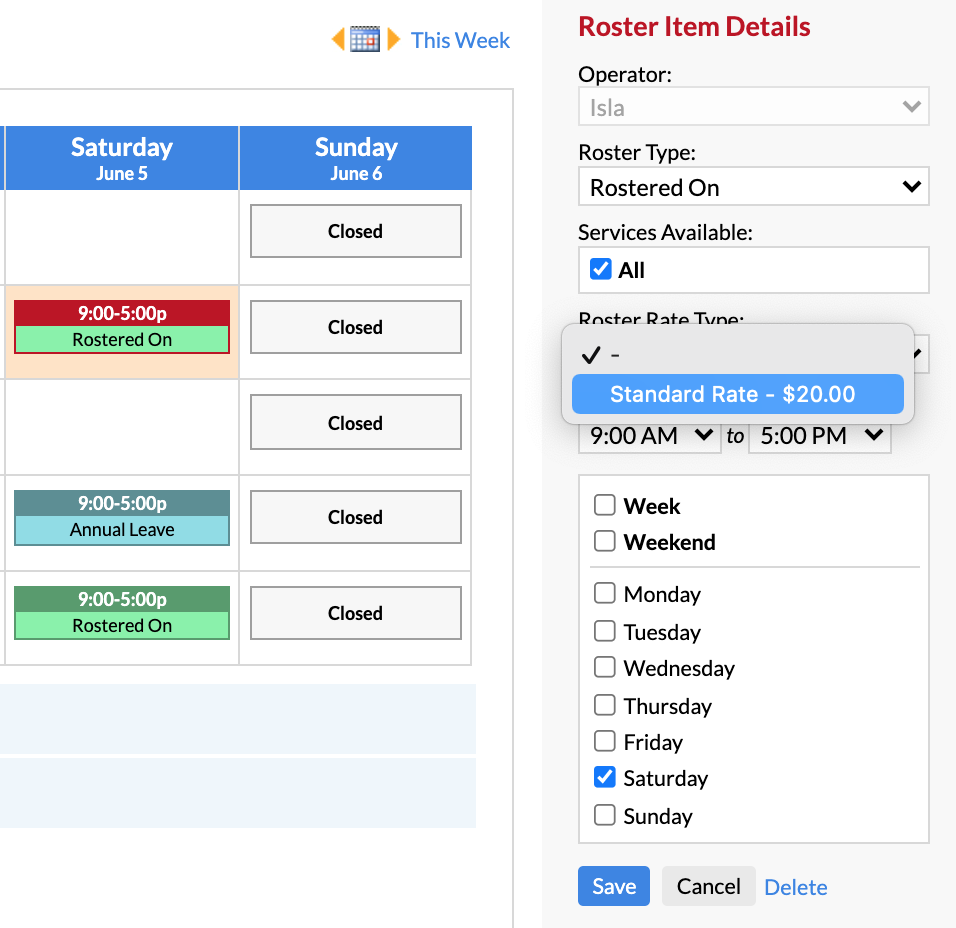
Rostering Using Roster Rates
Now that your Roster Rates are created, these can be added in when rostering your operators.
The process is the same as before, except you'll need to select their wages from the Roster Rate Type drop-down menu:
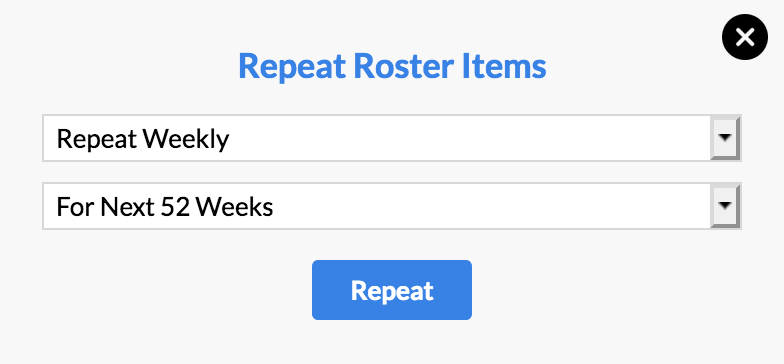
Repeating the Roster
You will notice in Roster the Repeat Selected link.
You can choose to have an operator's roster repeat on a weekly to monthly basis (this includes fortnightly and every 3 weeks). This can be repeated up to 52 weeks in advance:
Using the Wages Report
You can now utilise the Wages Report to track operator's hours worked and their wages earned.
Reporting > Report List > Wages Report
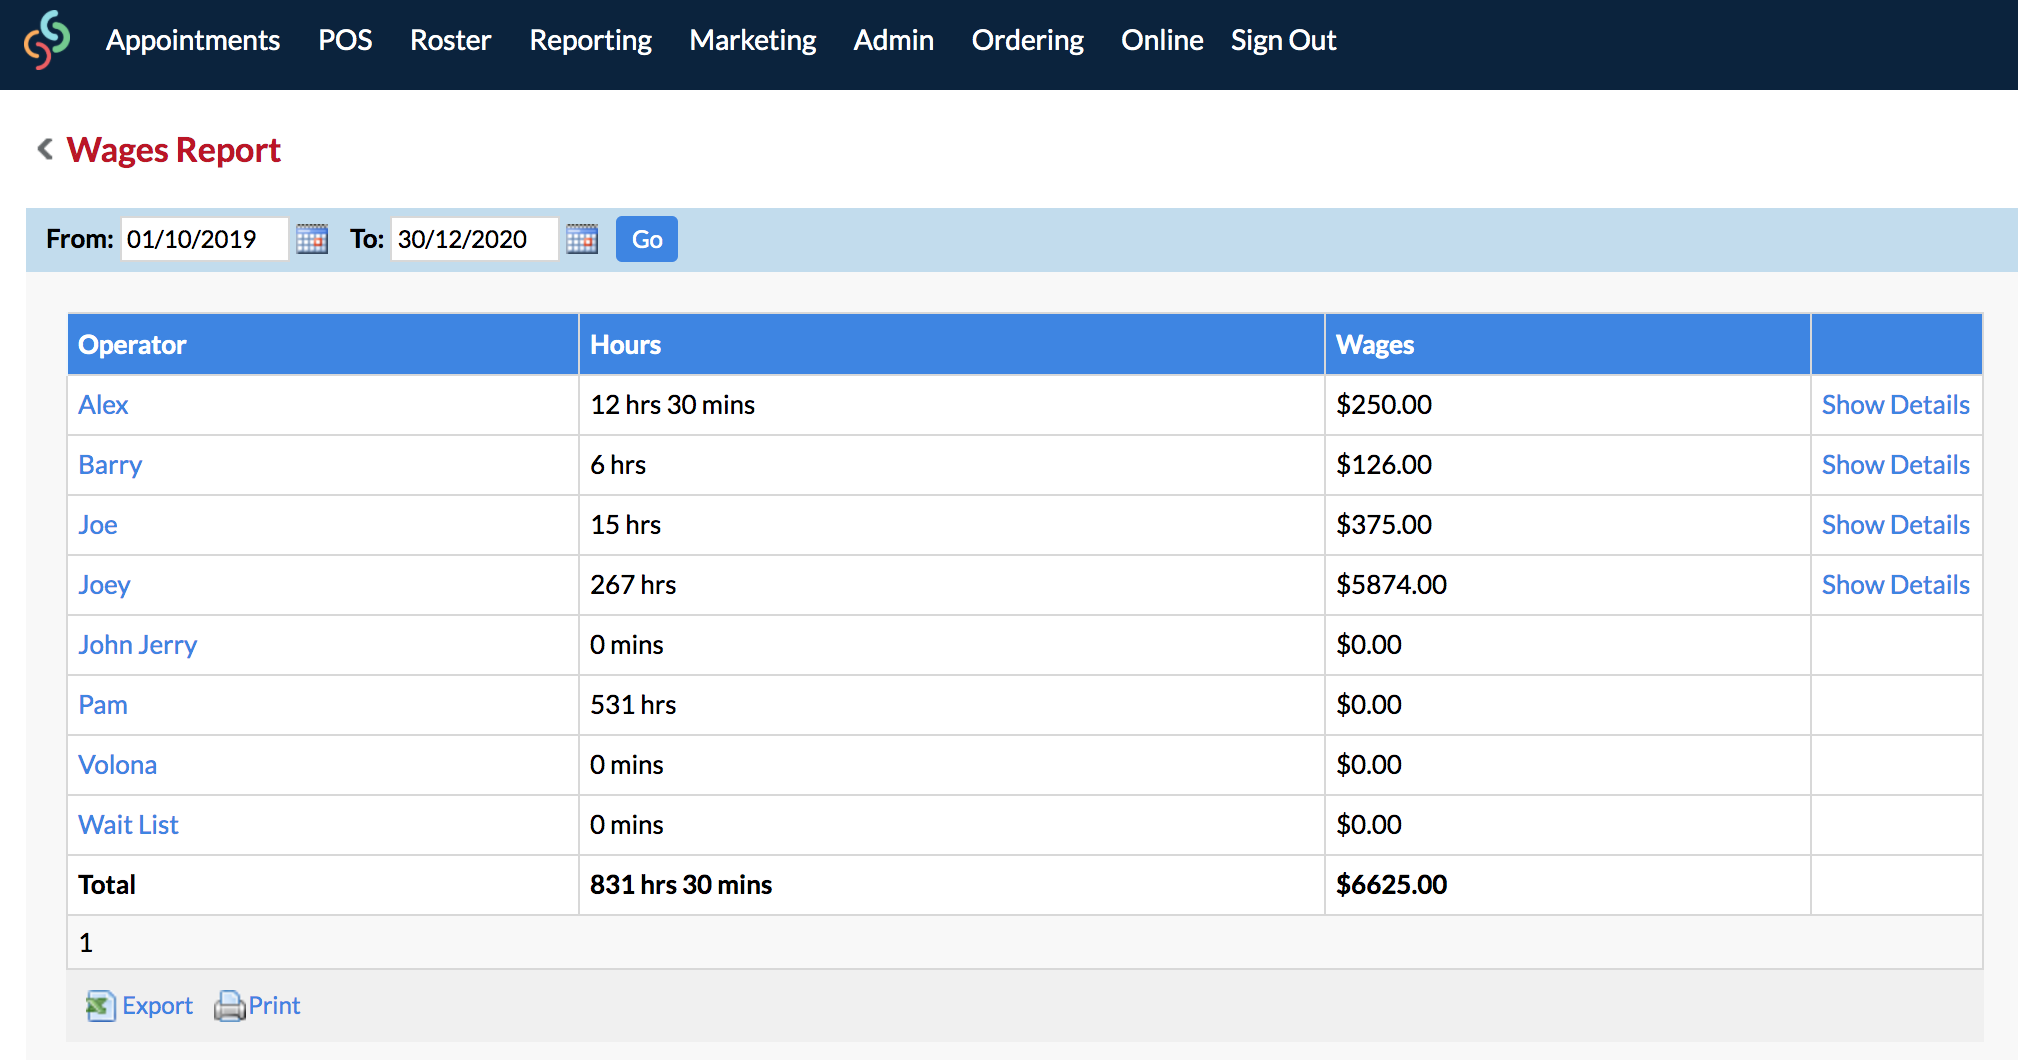
Once you have selected a date-range, you can click the Show Details link to see any one operator's wage details.
Scheduling Lunch in the Roster
If you want your operator's lunch schedule to be recorded in the Wages Report, you have to add in lunch while making your roster.
If you don't need to record wages, then Lunch can be created via Tasks instead. Please click here for more information on scheduling time off and breaks with Tasks.
You will need to have already created a Roster Type for Lunch. Once that's done, you can select it as a Roster Type from the drop-down menu in Roster Item Details:
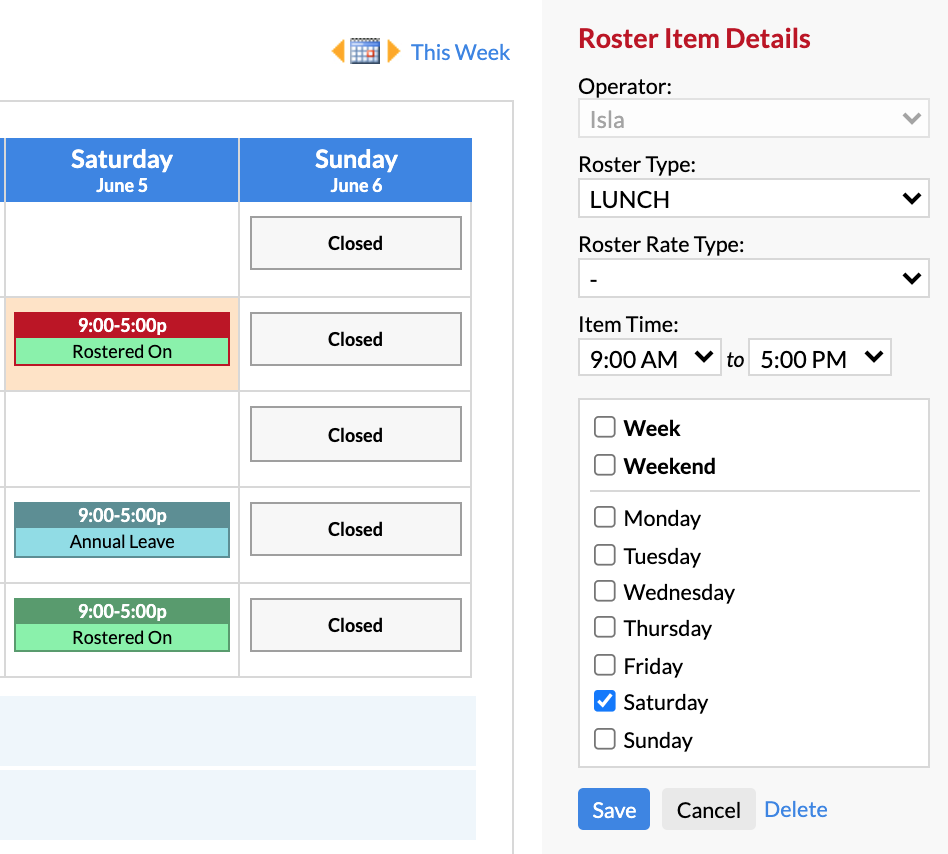
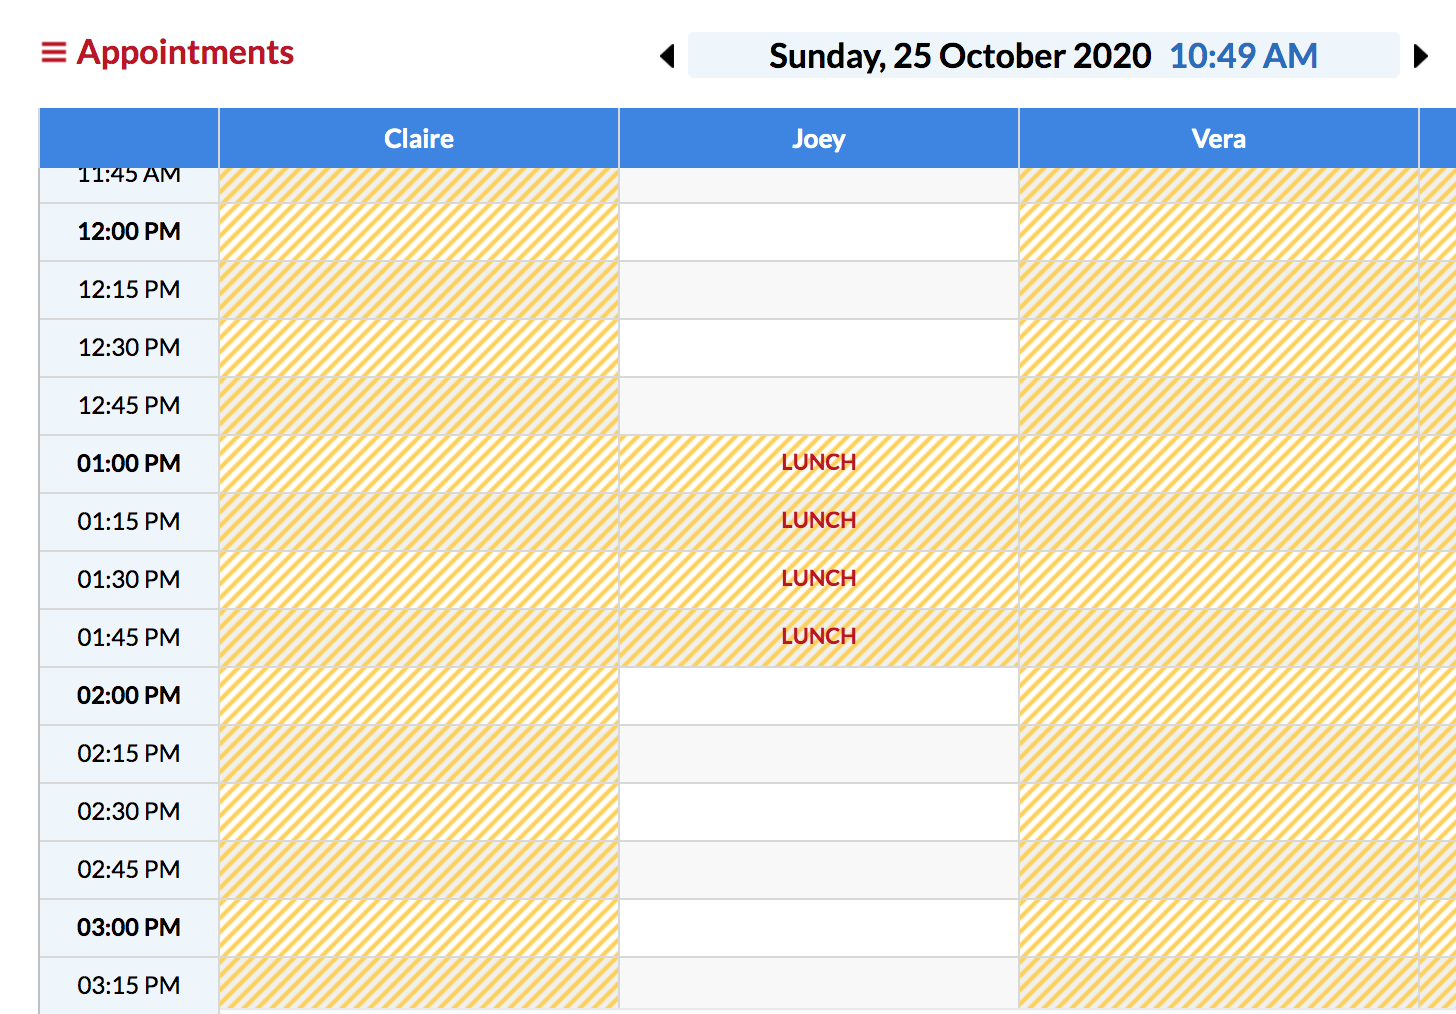
Make sure you add in a "Rostered On" type for before and after lunch, to ensure their whole day is properly set up.
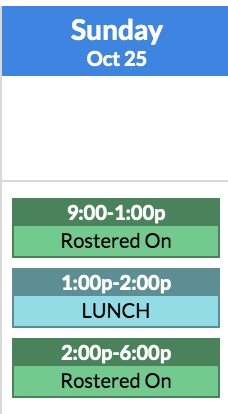
It would look like this on your Appointments page:
For more information on scheduling lunch using Advanced Rostering, please checkout the following article:
Advanced Rostering—Scheduling Lunch
If you're unsure of how to add more than one roster type to the roster, please checkout this article:
Advanced Rostering—Scheduling Two Roster Types On The Same Day
If you have any questions, please let us know via the Submit a Request option in your Help & Support page.